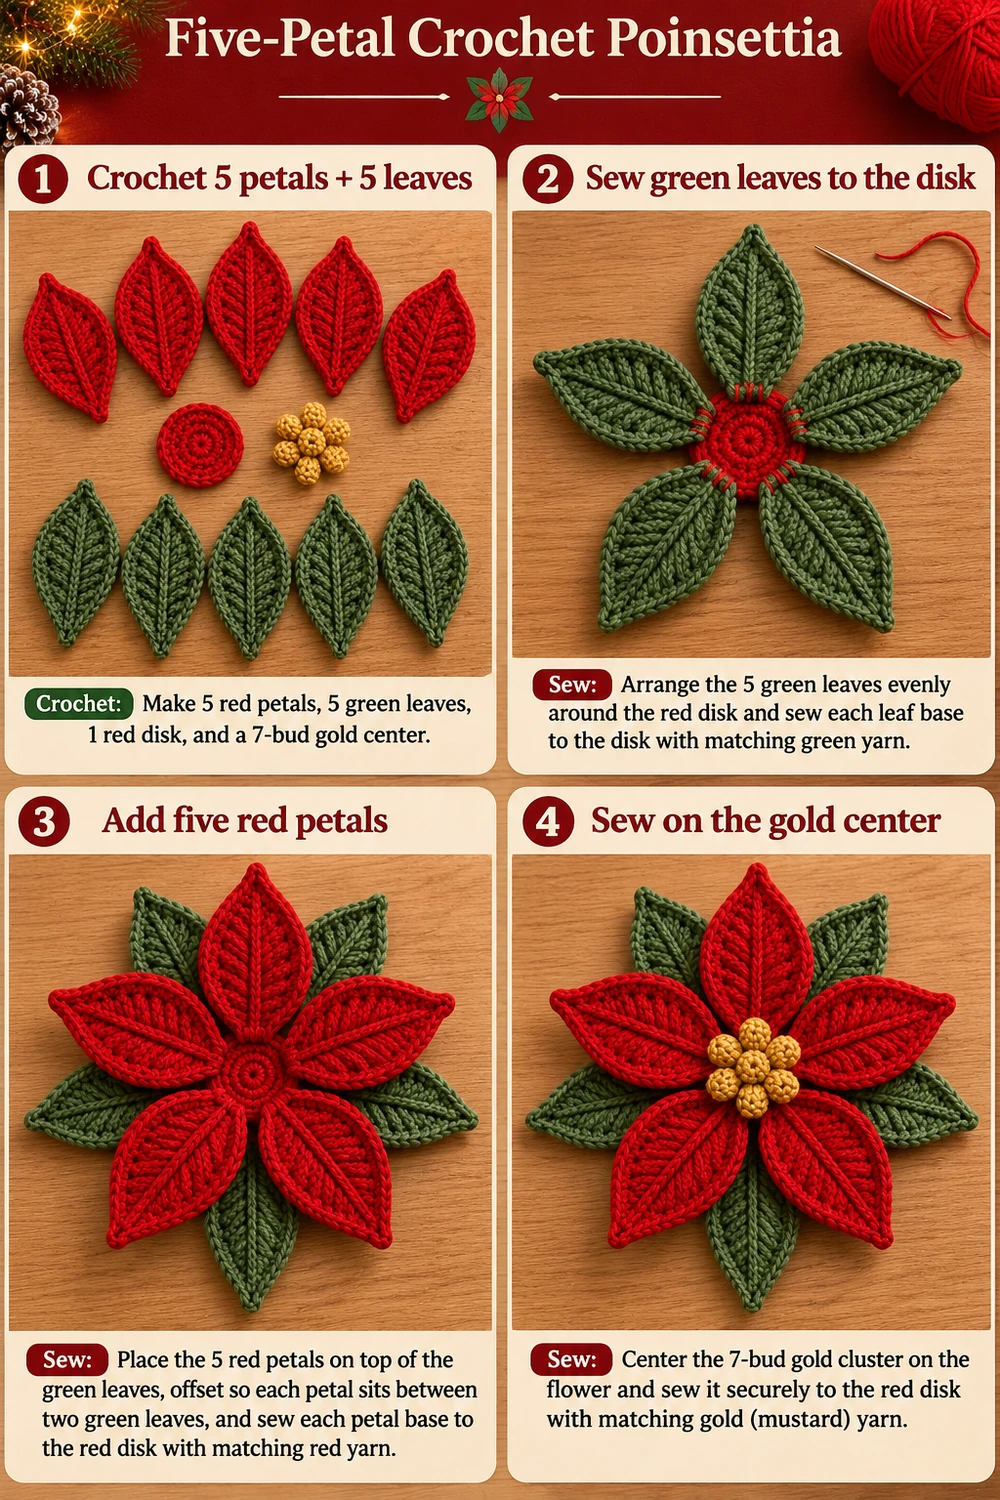
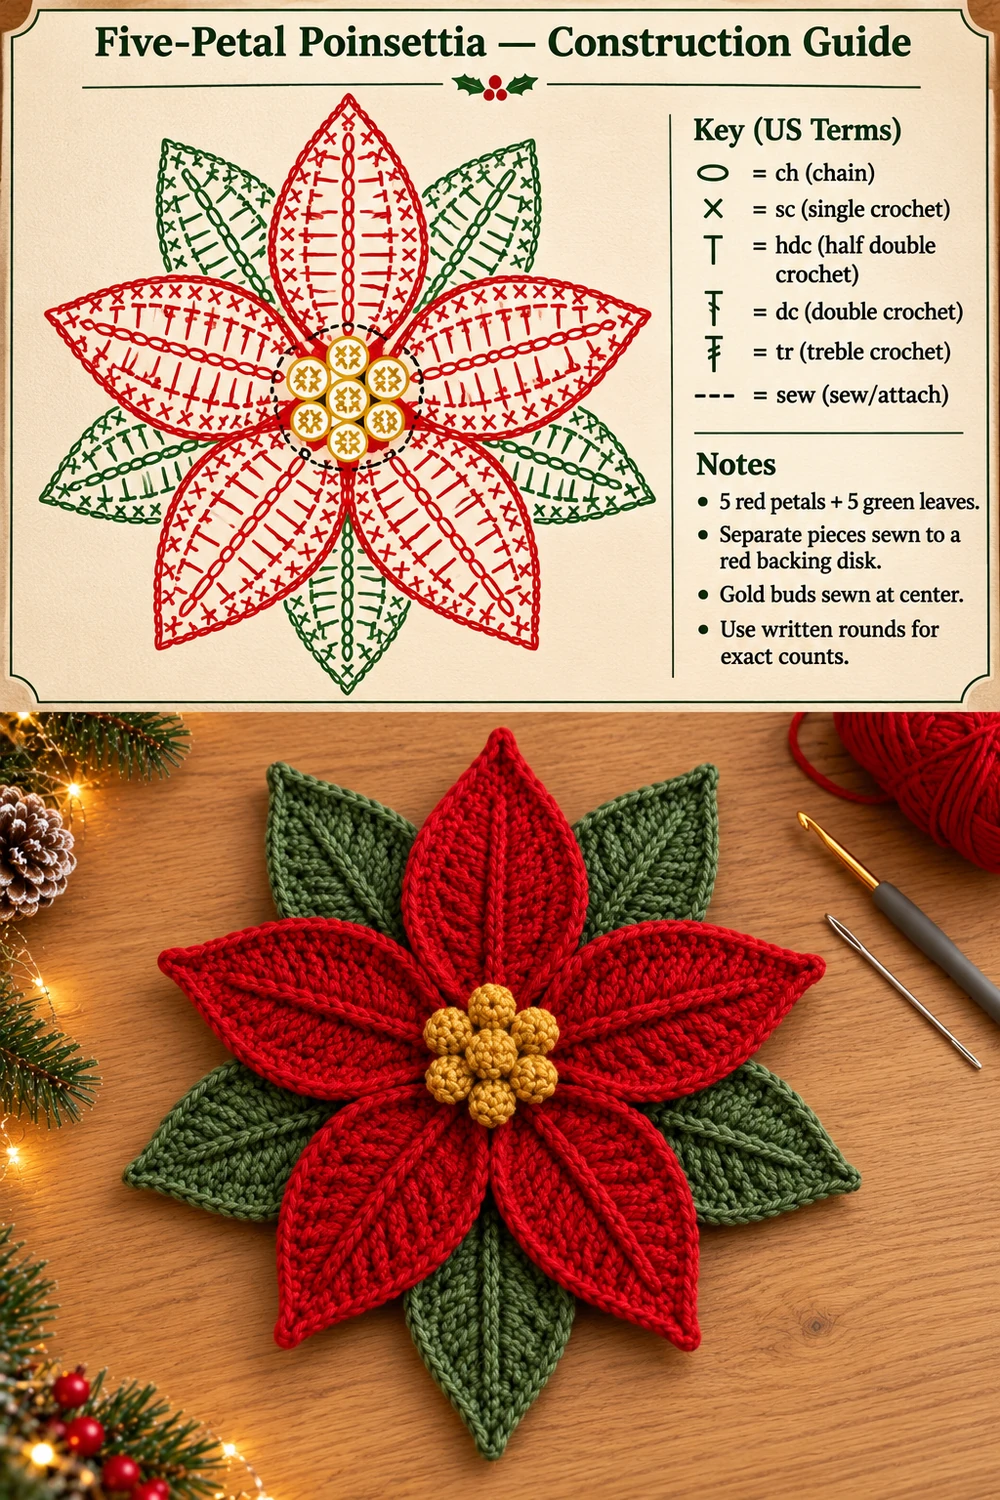
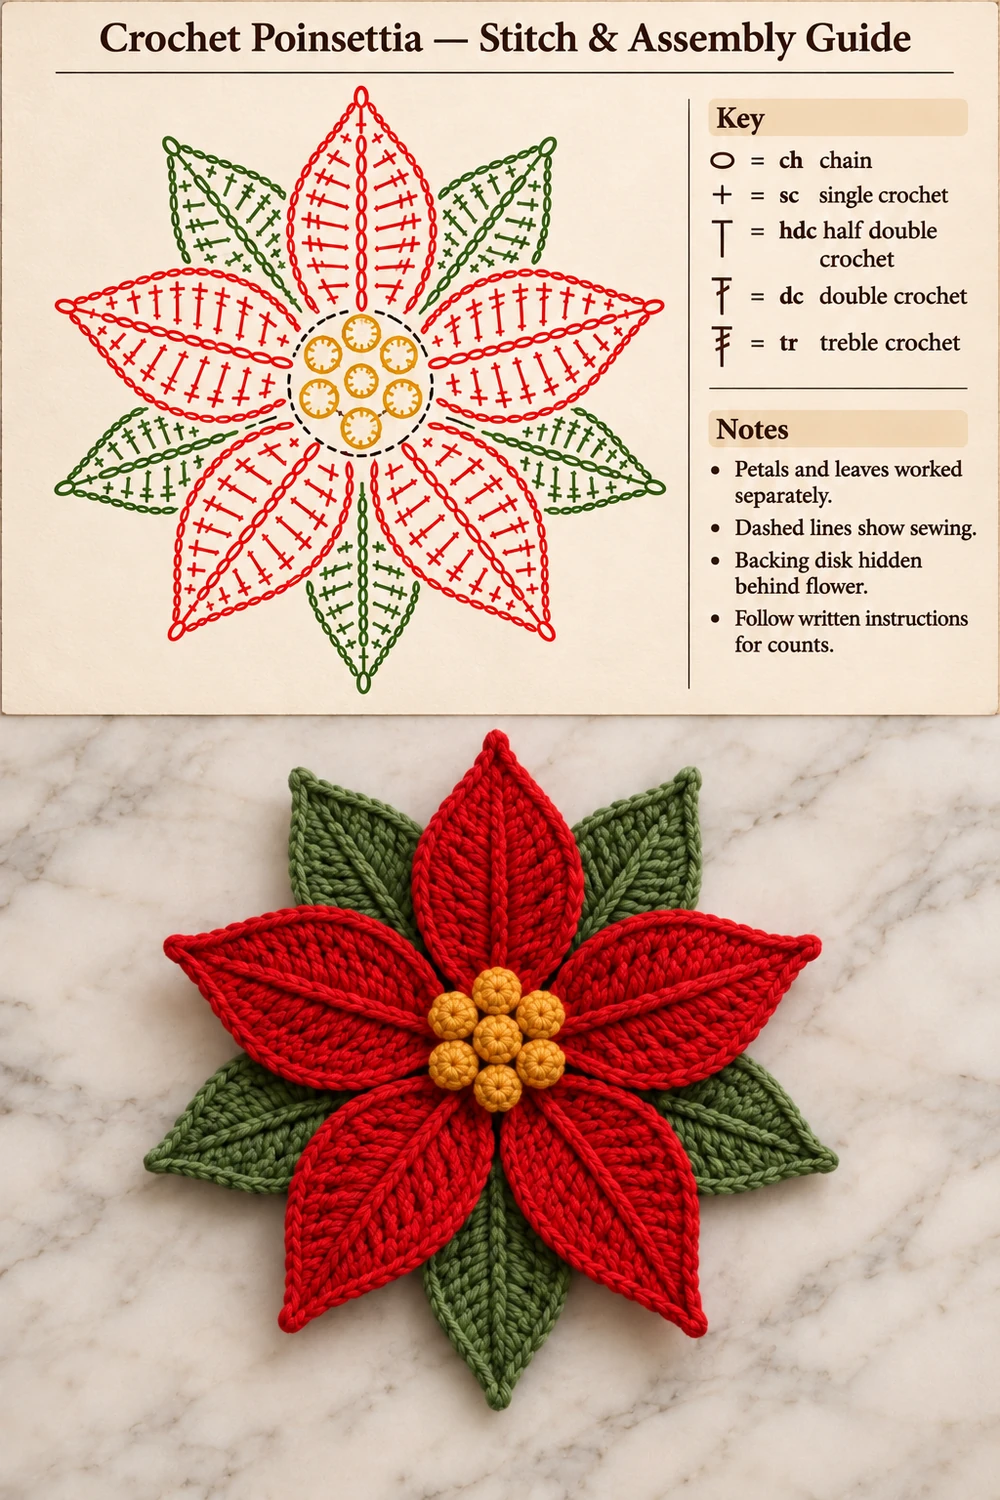
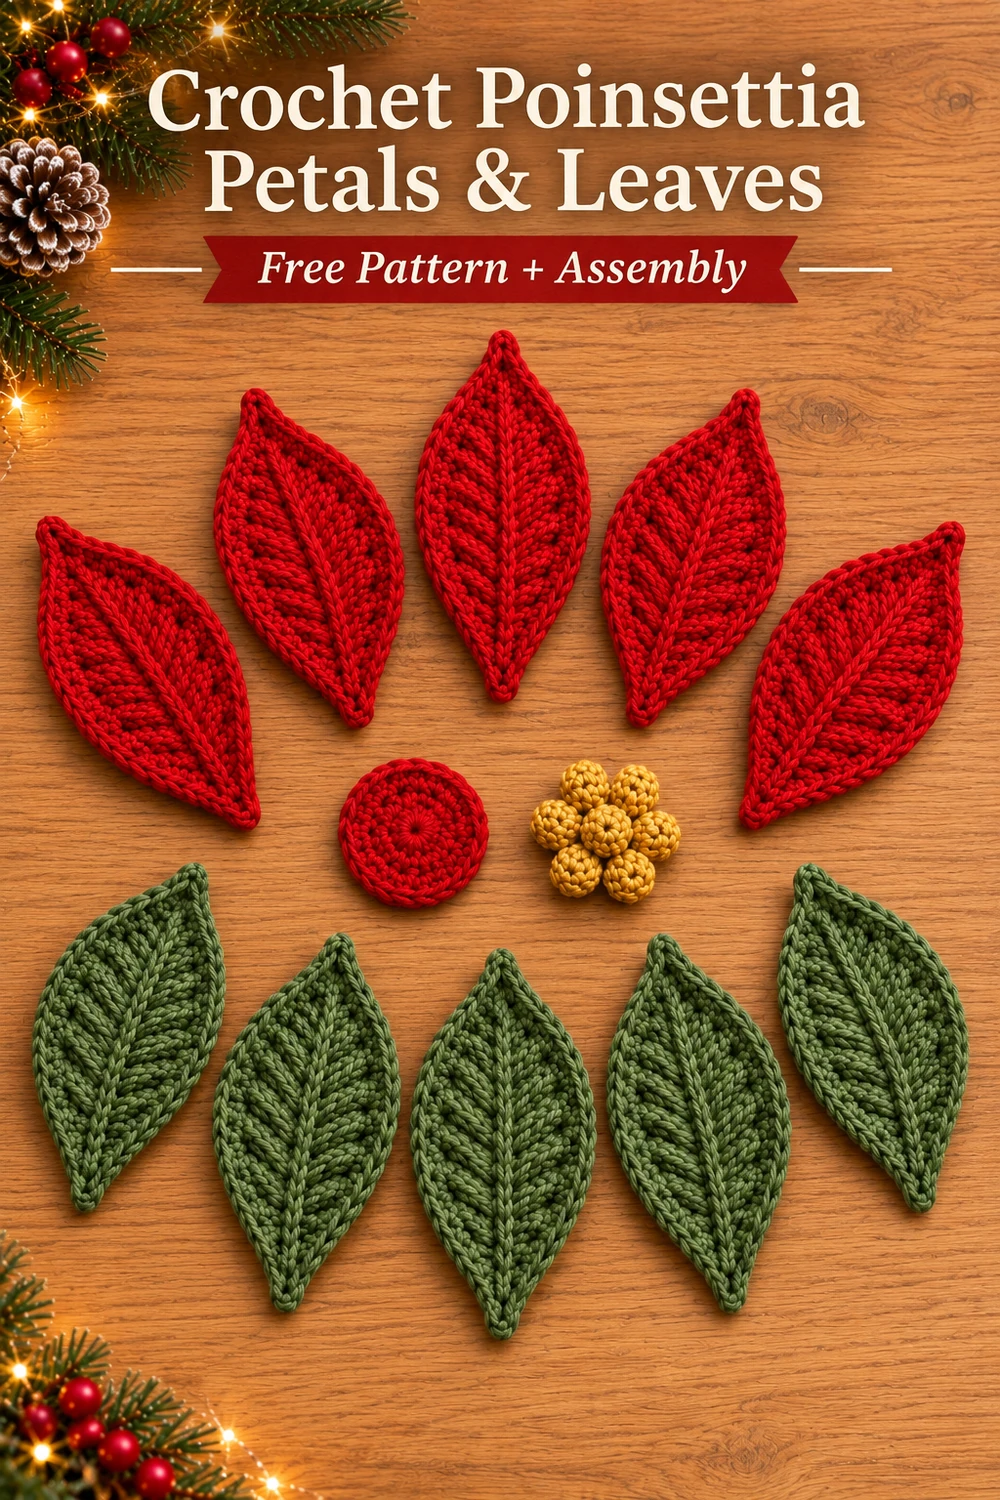
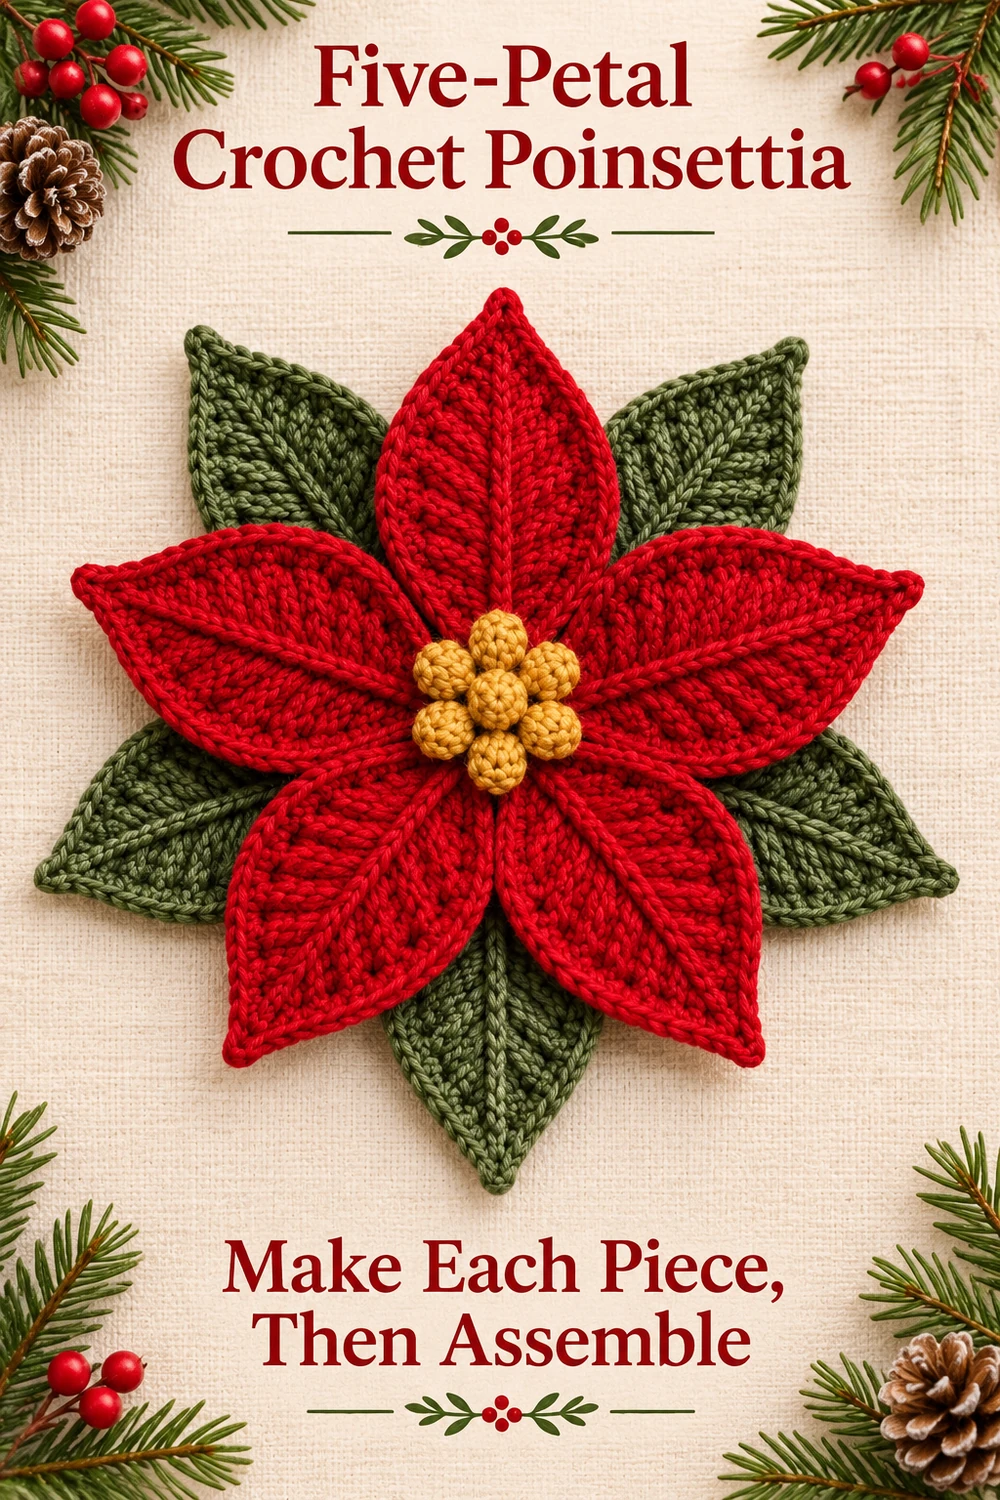
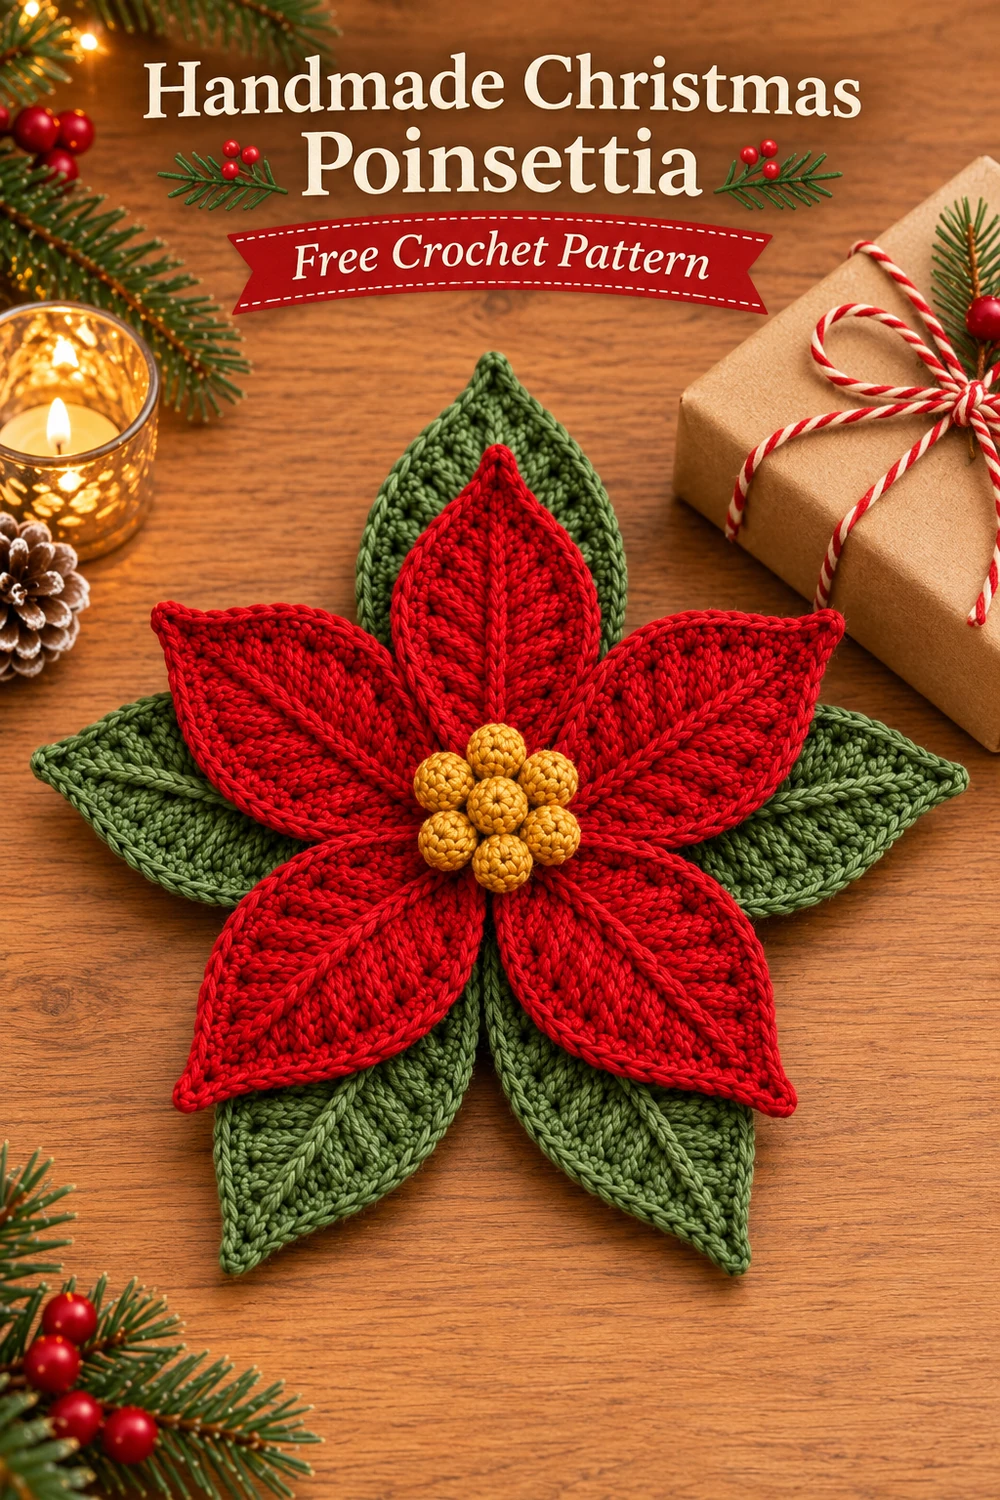
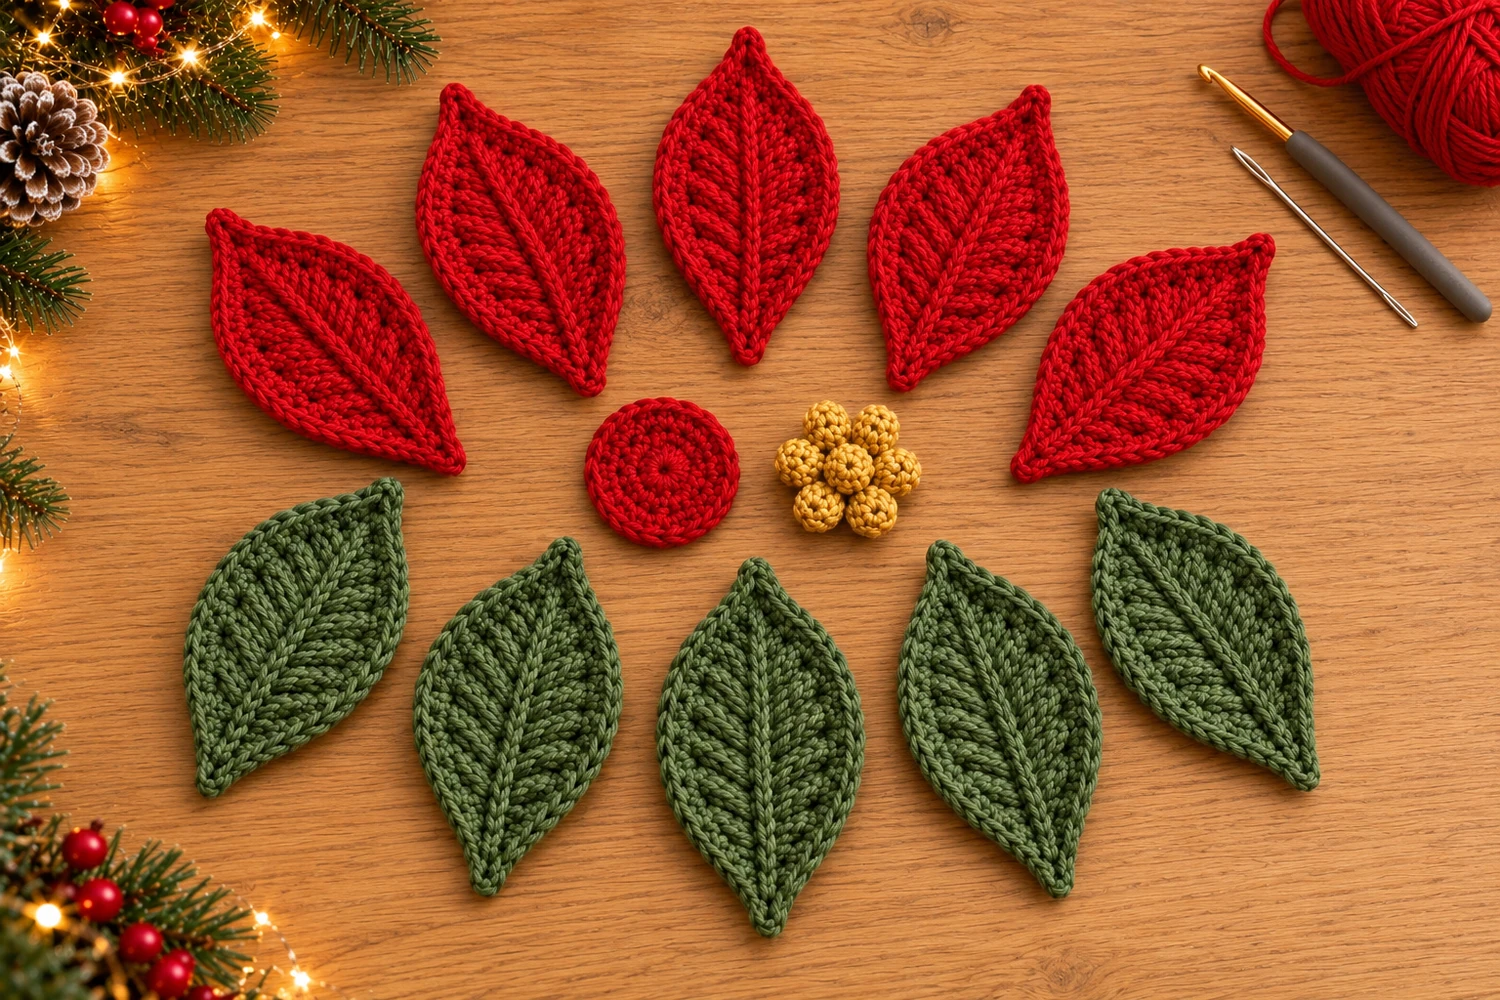
This five-petal crochet poinsettia begins as a small collection of separate pieces: five pointed red petals, five green leaves, a red backing disk, and a golden bud cluster. The long shapes and raised center veins give the pieces their character before the flower is assembled.
Make the components first, block them lightly, and arrange them on the table before sewing. This original pattern is inspired by the reference photograph; it is not the original recipe used by the photographer. The green leaves sit behind the red petals, while the golden cluster covers their meeting point. No beads, wire, or purchased flower center are required.
Five-Petal Crochet Poinsettia Materials
- Smooth sport-weight or light DK cotton in bright red, muted forest green, and mustard gold. As a planning allowance, have approximately 25 g each of red and green and a small amount of gold; these are not measured usage figures.
- A 2.75 mm crochet hook, adjusted to suit your yarn.
- A blunt tapestry needle, sharp scissors, removable stitch markers, rustproof pins, and a blocking mat.
- Optional: a tiny amount of stuffing for the gold buds. For very small buds, their yarn tails may supply enough filling.
Skill level: Intermediate. You need to work around both sides of a chain, change stitch heights, identify individual stitches in a shaping round, and sew several layers together. Estimated size: individual petals approximately 3–3½ inches (7.5–9 cm) long; assembled flower approximately 6–7 inches (15–18 cm) across. These are estimates, not measurements from a finished sample. Yarn, hook, and tension affect the result. The arithmetic has been checked, but this pattern has not been physically tested.
Before Crocheting the Pieces
Use red and green yarns of similar thickness so the two layers support each other. A much heavier green yarn can make the backing dominate the flower, while a very fine green thread may disappear beneath the red pieces. Make one petal before making the remaining nine pointed pieces.
Each petal and leaf uses the same stitch sequence. The foundation chain becomes the middle line. Taller stitches widen the sides, and a single-crochet shaping round defines the outline. A loose slip-stitch edge finishes the perimeter, and a separate line of surface slip stitches raises the center vein. The vein is crochet worked through the finished fabric, not embroidery.
Work both red petals and green leaves flat. Do not stuff them or fold them into tubes. The only rounded pieces are the tiny golden buds. There is no hanging loop in this version, matching the component set in the reference.
US Crochet Terms
- ch: chain
- sl st: slip stitch
- sc: single crochet
- hdc: half double crochet
- dc: double crochet
- tr: treble crochet
- inc: work 2 sc into the same stitch
- sc2tog: single crochet two stitches together
- st(s): stitch(es)
- MR: magic ring
Treble crochet: yarn over twice, insert into the indicated stitch, pull up a loop, then yarn over and draw through two loops three times. Sc2tog: pull up a loop in each of the next two stitches, yarn over, and draw through all three loops on the hook.
Small point: ch 2, then sl st into the first of those two chains. This makes an added point without consuming another base stitch. Beginning ch 1 does not count, and joining slip stitches are excluded from the round totals. The Craft Yarn Council abbreviation guide explains the standard US names.
Component and Stitch Counts
| Piece | Quantity | Counts |
|---|---|---|
| Red petal | 5 | Round 1: 25 sts; Round 2: 31 sc; Round 3: 31 edging sl sts plus 2 small points |
| Green leaf | 5 | Same instructions and counts as the red petal |
| Red backing disk | 1 | 6, 12, 18, and 24 sc over four rounds |
| Golden bud | 7 | 6, 6, and 3 sc over three rounds |
| Golden cluster | 1 assembled cluster | Six buds around one central bud |
The five green pieces form the lower layer, and the five red pieces form the upper layer. All ten pointed pieces are separate until the sewing stage. The red disk stays behind the flower and supports the attachments; it is not a large red center left visible between the petals.
Crochet One Pointed Petal or Leaf
Use red for a petal or green for a leaf. Make five in each color. Leave an 8-inch starting tail for attachment, then ch 13.
Round 1: Work Around the Foundation Chain
Starting in the second chain from the hook, work sc, hdc, dc in each of the next 2 chains, tr in each of the next 4 chains, dc in each of the next 2 chains, and hdc in the next chain. You have worked 11 stitches and have one foundation chain remaining.
Work 3 sc in that last chain. Rotate the piece so you can crochet along the unused underside of the foundation chain. Do not turn the work over. On that underside, work hdc, dc in each of the next 2 chains, tr in each of the next 4 chains, dc in each of the next 2 chains, hdc, and sc. Join with a sl st to the first sc. (25 sts)
The first side contains 11 stitches, the far end contains three sc, and the return side contains 11 stitches: 11 + 3 + 11 = 25. Work into unused chain loops on the return journey rather than inserting into the tops of the stitches from the first side.
Number the stitches 1–25 starting with the first sc. The three sc at the far end are stitches 12, 13, and 14; put a marker in stitch 13. This is the tip opposite your starting tail. The beginning and end of the round meet at the attachment end.
Round 2: Shape the Outline
Ch 1. Work the following sequence from stitch 1 of Round 1:
- Sc in sts 1–3, inc in st 4.
- Sc in sts 5–7, inc in st 8.
- Sc in sts 9–12, work 3 sc in marked st 13.
- Sc in sts 14–17, inc in st 18.
- Sc in sts 19–21, inc in st 22.
- Sc in sts 23–25.
Join to the first sc. (31 sc) Four ordinary increases add four stitches, and the three-sc tip adds two: 25 + 4 + 2 = 31. Move the tip marker to the middle sc of the three-sc group. In this new round, that is stitch 16.
Spread the piece on the table. Both sides should be similar in width, with the tallest foundation-round stitches through the middle. A little natural curve is acceptable; a tightly rolled tube usually means the foundation or edging tension is too tight.
Round 3: Fine Edge and Two Points
Work a relaxed sl st into each of the first 16 sc. After the sl st in marked stitch 16, make a small point: ch 2, sl st into the first of those two chains. Continue with a sl st in each of the remaining 15 sc. Make another small point at the attachment end, then join to the first edging sl st. Fasten off and leave a tail to weave in. (31 base edging sl sts and 2 added points)
The slip stitch used to close each two-chain point is additional; it is not included among the 31 stitches worked around the base. Keep the edging loose enough to follow the fabric. If the sides draw inward noticeably, use a slightly larger hook for this edging round.
Add the Raised Crochet Vein
Lay the piece right side up. Hold matching yarn underneath it. Insert the hook from front to back near the attachment end, through the center line formed by the foundation chain, and pull a loop to the front.
Insert the hook through the next opening along that center line, catch the yarn from underneath, and pull it through the fabric and the loop already on the hook. Continue in this way toward the far tip, making one surface sl st at each successive foundation-chain position. Stop just before the tip so the point remains free.
Cut the yarn, pull the end through the final loop, and take it to the back with a needle. Weave the vein ends in without pulling the center line shorter. This surface-crochet line is decorative and does not change the perimeter count. Do not add a second raised vein or branches; the reference pieces have one simple center ridge.
Block All Ten Pointed Pieces
Dampen the cotton according to its care label and lay the pieces flat. Pin the two ends first, then ease the sides into matching lance-shaped outlines. Keep the surface vein centered. Do not stretch the small points until they become long loops.
Compare all five red petals together and all five green leaves together. They should be similar enough that one piece will not dominate the arrangement. Let them dry fully before removing the pins or sewing. Blocking can smooth a slight ripple, but it cannot correct a missed group of stitches.
Make the Red Backing Disk
Use red and work in a continuous spiral. Mark the first stitch of each round and move the marker as you go.
Round 1: 6 sc in an MR. Close the ring. (6 sc)
Round 2: Inc in every st. (12 sc)
Round 3: Repeat [sc in the next st, inc in the next st] 6 times. (18 sc)
Round 4: Repeat [sc in the next 2 sts, inc in the next st] 6 times. (24 sc)
Sl st in the next st to smooth the finish, fasten off, and leave a long sewing tail. The smoothing slip stitch does not add a counted stitch. Keep the disk flat and unstuffed. It serves as a small fabric base rather than a visible layer extending beyond the petals.
Make Seven Golden Buds
Use mustard gold. Work these small pieces firmly enough that any filling stays hidden. Make seven identical buds.
Round 1: 6 sc in an MR. Pull the ring closed. (6 sc)
Round 2: Sc in each st. (6 sc)
Round 3: Sc2tog 3 times. (3 sc)
If needed, tuck a tiny bit of filling or the starting tail inside before closing. Cut an 8-inch tail, pass it through the front loops of the three remaining stitches, and pull closed. Keep the sewing tail attached. The closed side will face downward when the buds are joined.
Place one bud at the center and arrange six around it. Sew each outer bud to the center bud and to its immediate neighbors with small matching stitches. Keep the upper surfaces round rather than pulling them into a flat ring. Leave several tails available to attach the cluster to the flower later.
Assemble the Poinsettia in Layers
1. Arrange the Green Leaves
Place the red disk on the table and mark its center. Arrange the five green leaves right side up around it, with their attachment ends overlapping the disk and their tips radiating outward. Space them approximately one fifth of a circle apart, or about 72 degrees.
Overlap only the lower portion of each leaf. Keep the pointed outer ends free. Pin all five before sewing and look at the arrangement from above. The pieces should suggest an even five-pointed star, with the center veins aimed toward the disk center.
Use each green starting tail to sew its base securely to the red disk. Make several small stitches through solid fabric rather than one long stitch across an open gap. Secure the ends on the back. This step is sewing: you are not crocheting the leaves together around a new round.
2. Add the Red Petals
Arrange the five red petals above the green layer. Offset the red tips so they point between the green tips. Keep their inner ends close together at the center; the green leaves should remain visible around the outside.
Sew each red base through the supporting leaf bases and into the disk. Catch only the inner part of each petal so its length can lift slightly from the green layer. Do not stitch the red and green outer edges together. Check the front after every petal to keep the center compact and the five red tips evenly spaced.
3. Attach the Golden Cluster
Position the seven-bud cluster directly over the petal bases. Use its reserved gold tails to sew through the center of the layered flower and back through the cluster bases. Attach it at several points so the cluster does not lean to one side.
Secure and bury every tail on the back. The red disk should be mostly hidden when viewed from the front. Gently lift and settle the petals with your fingers rather than bending them sharply along the veins.
Check the Finished Flower
Lay the flower on a flat surface and rotate it slowly. There should be five red tips, five green tips, and a small golden center. If one petal sits higher than the others, check whether its base was sewn farther from the center or pulled too tightly.
Gently tug each attachment. Add another short sewing pass if a base shifts freely. Do not rely on glue to compensate for loose stitching. The flower is a decorative textile piece, not a toy; small sewn components should be kept away from young children.
Troubleshooting and Care
The Two Sides of a Petal Look Different
Check the foundation round first. Both sides use 11 stitches in mirrored heights. The three sc at the far end belong to the turning tip, not to either side. If you accidentally add a twelfth side stitch, the center vein will sit off to one side.
The Edge Pulls the Petal into a Cup
Count 31 sc before the edging and keep every edging slip stitch relaxed. A tight surface vein can also shorten the center line. If the outline count is correct, loosen the vein or the edging rather than stretching the piece aggressively.
The Flower Has Large Gaps at the Center
Move the inner ends closer together and allow a little more overlap on the disk. The golden cluster should cover a small meeting point, not bridge a wide hole. Pin the whole red layer before sewing so you can make this adjustment evenly.
The Buds Look Too Large
Use a slightly finer gold cotton and an appropriate smaller hook for the same bud counts. Keep the filling minimal. The center should sit above the bases without hiding most of the long red petals.
Spot-clean the assembled flower with mild soap and cool water when necessary, following the yarn label. Blot rather than rub the raised veins, reshape the petals, and dry flat. Store it without heavy objects pressing on the bud cluster. If the pieces need refreshing, dampen and shape the tips gently while keeping the sewn center supported.
More Christmas Crochet Projects
The Seven-Petal Crochet Poinsettia Ornament offers a different flower arrangement. For a larger lacy setting, try the Poinsettia Crochet Snowflake. The Red Lace Crochet Christmas Bow is another project that uses separate shaped pieces and a careful sewing stage.