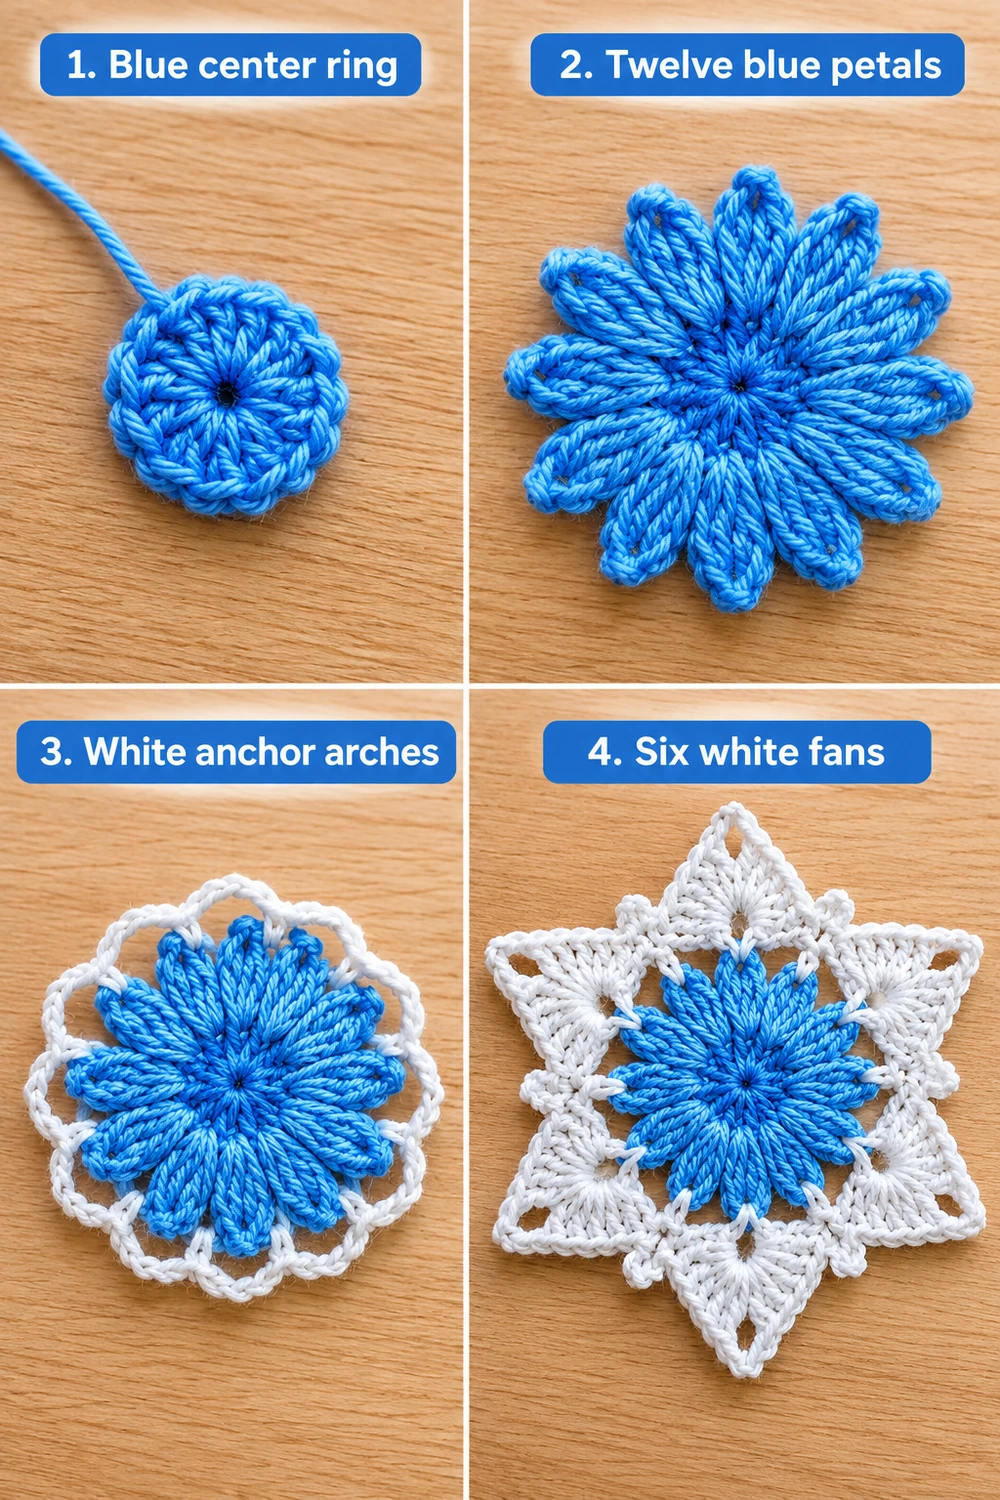
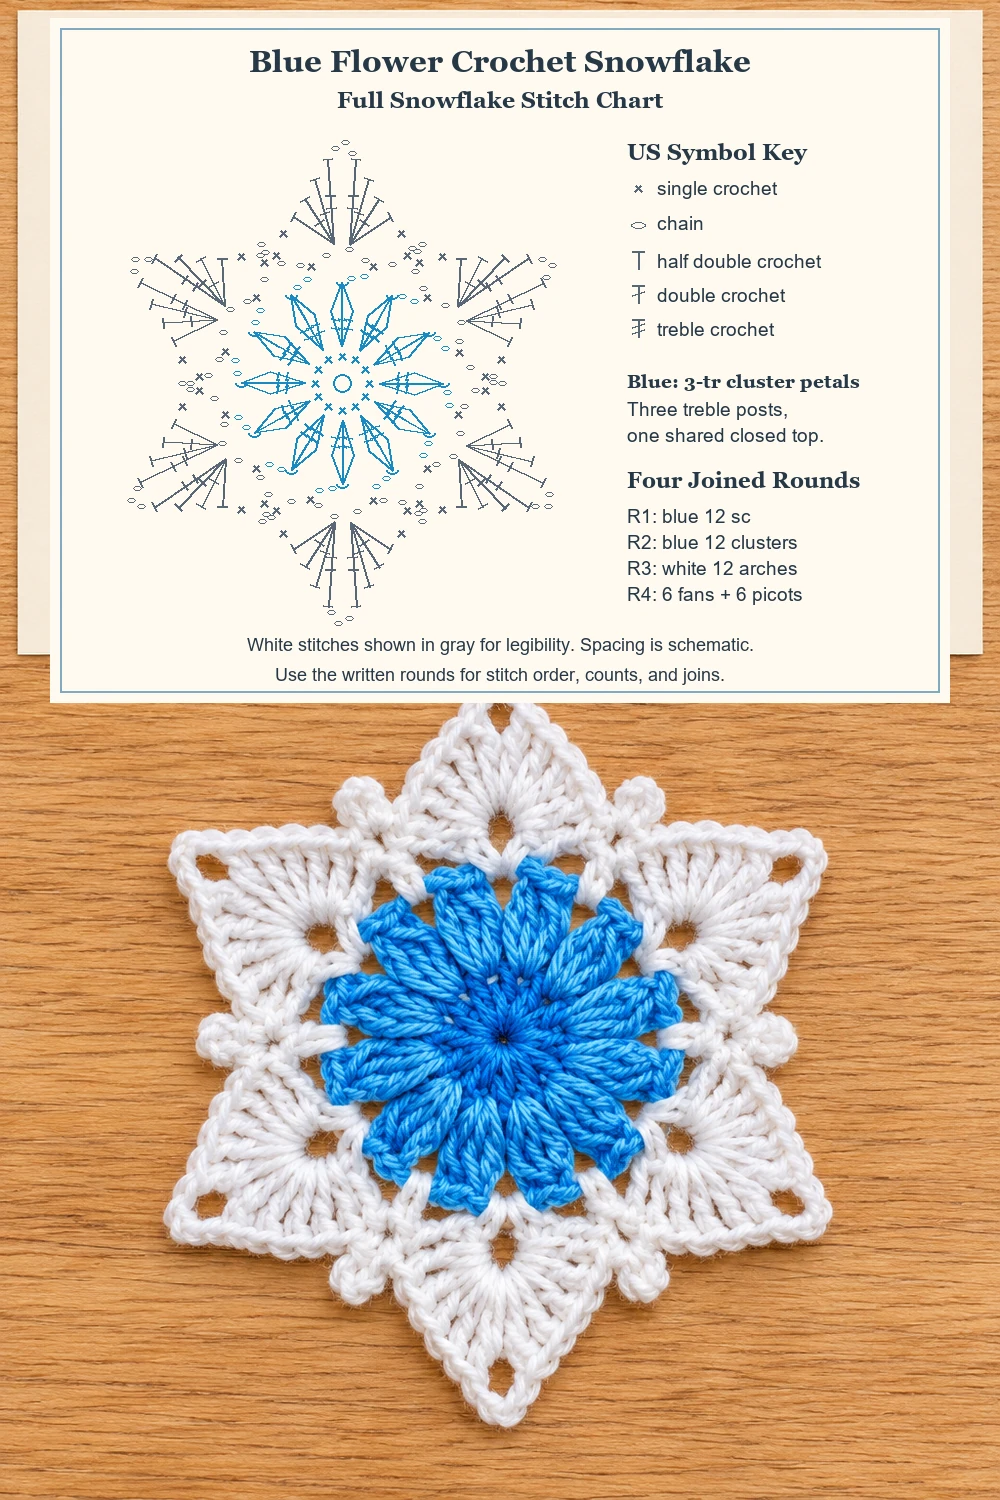
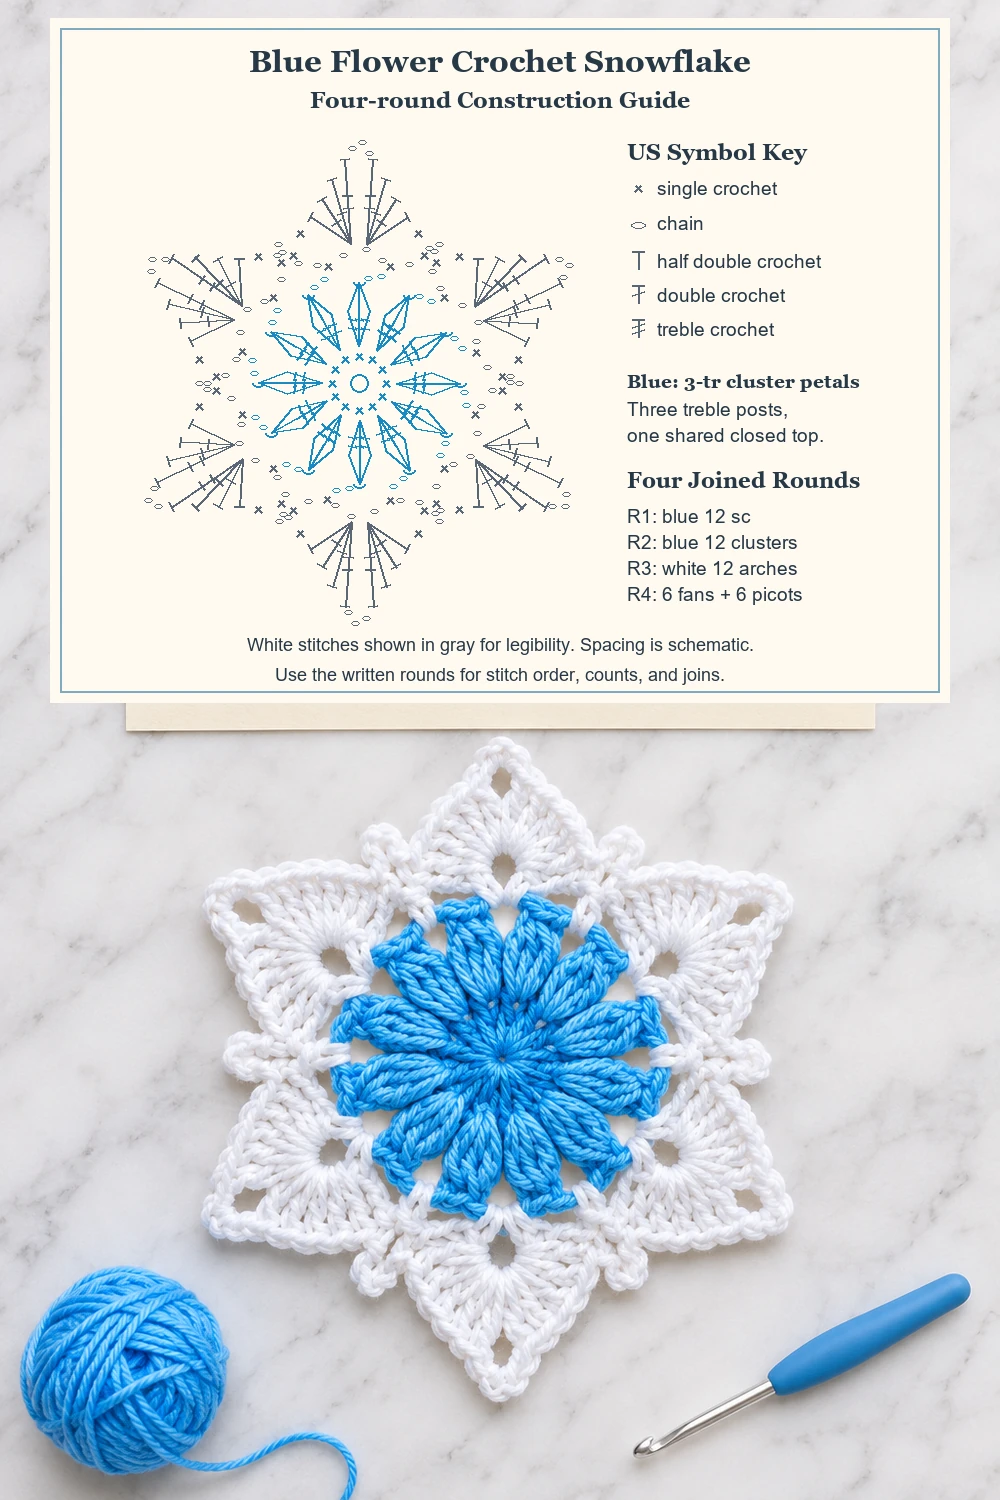
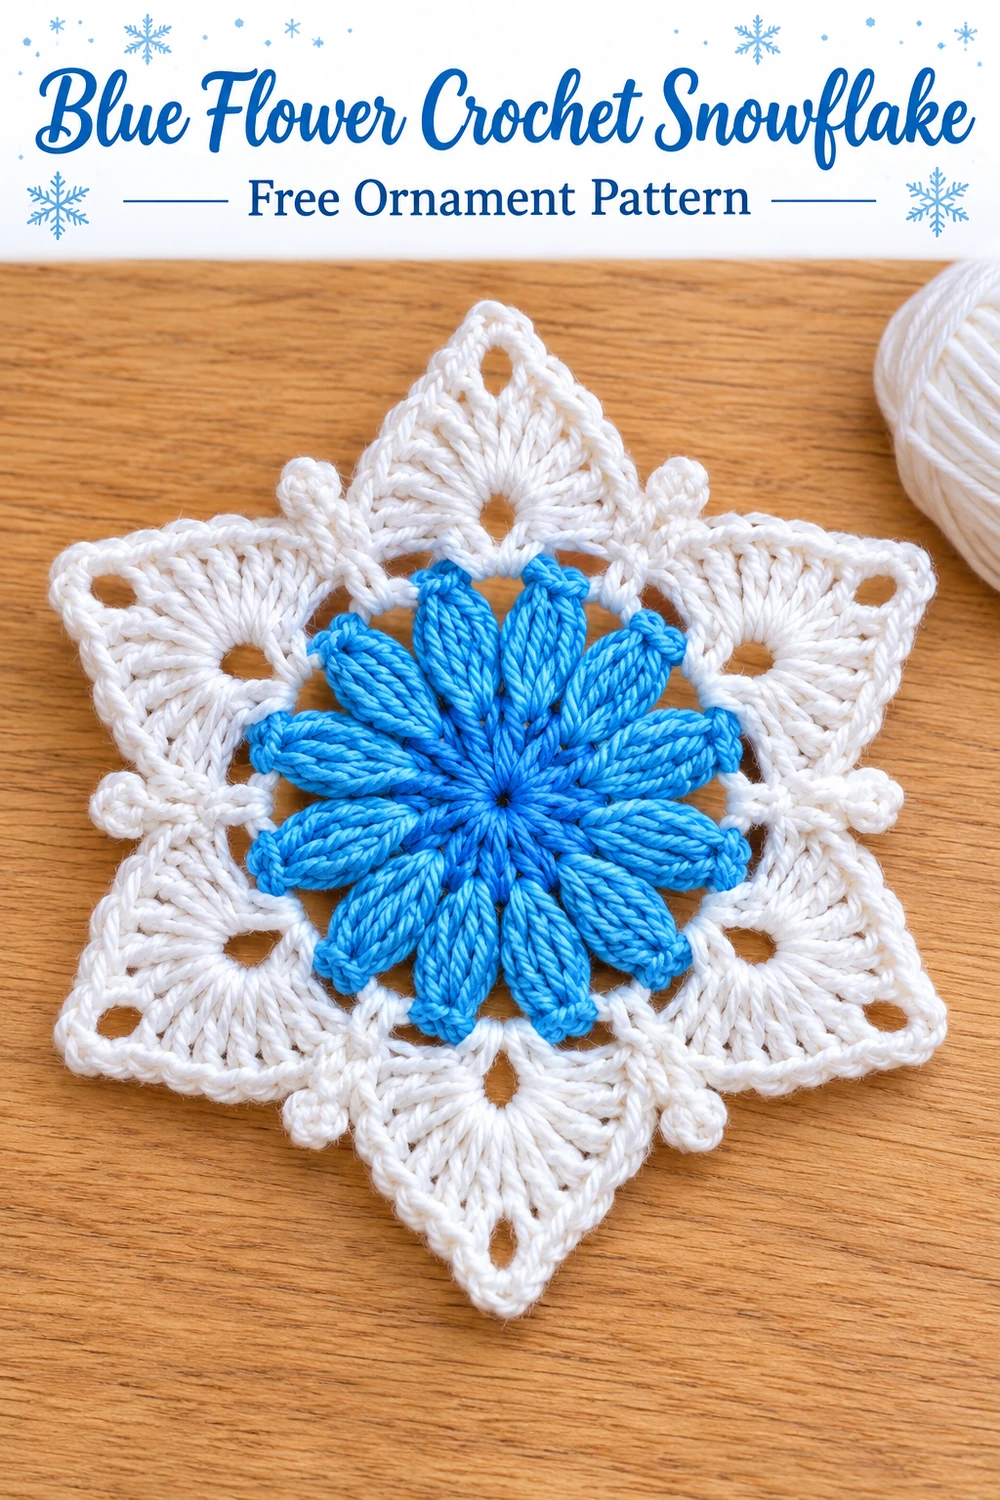
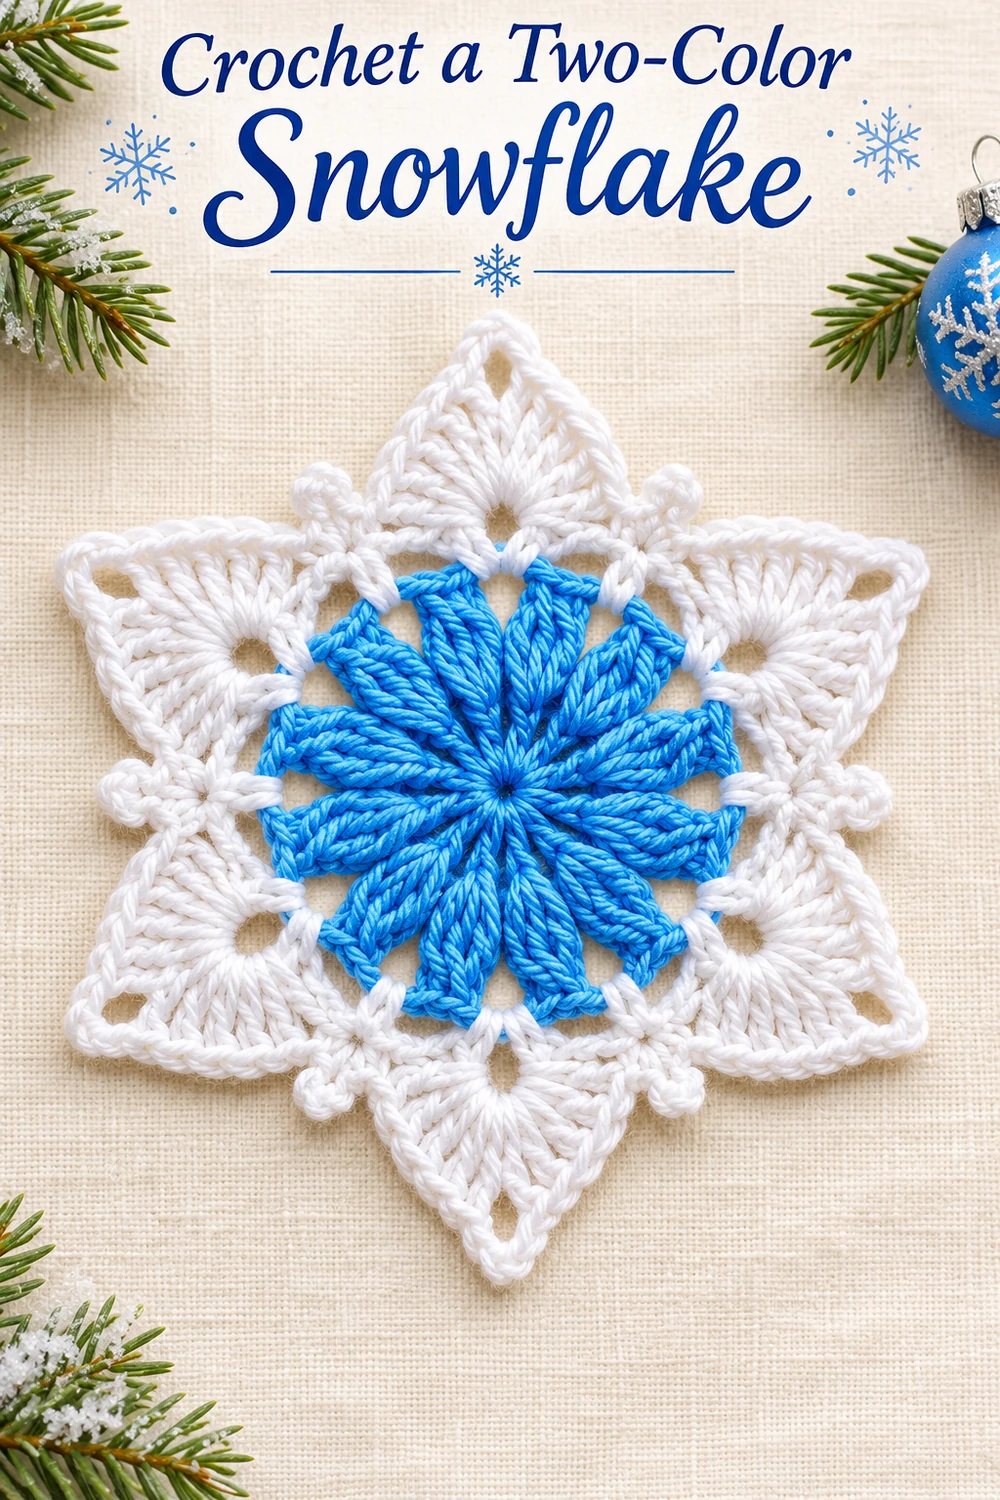
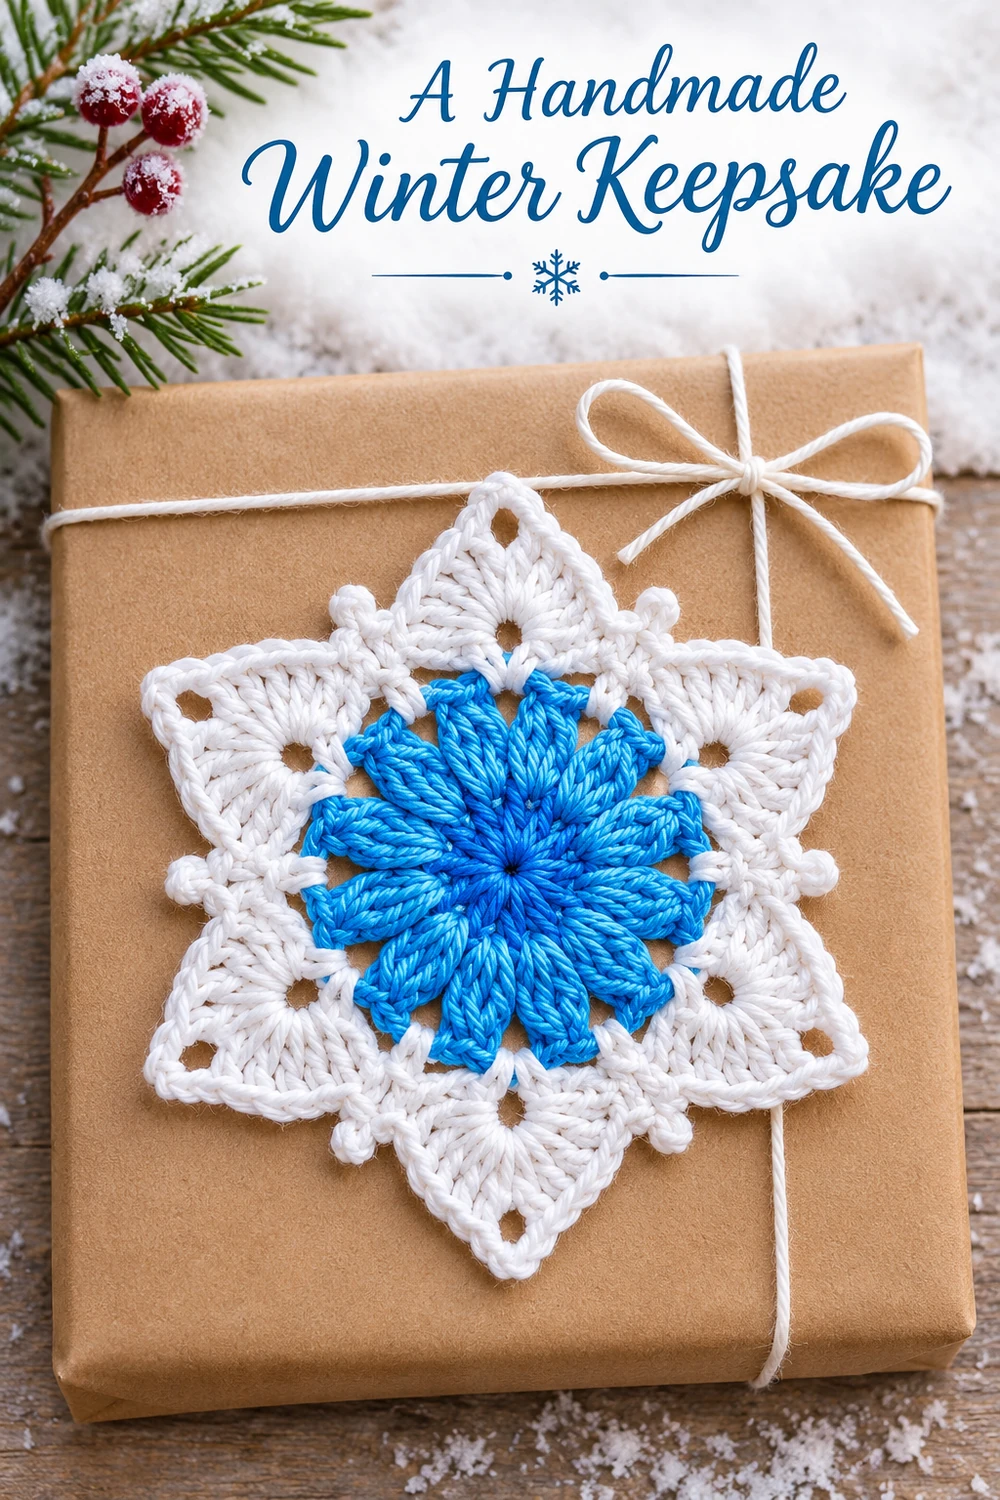
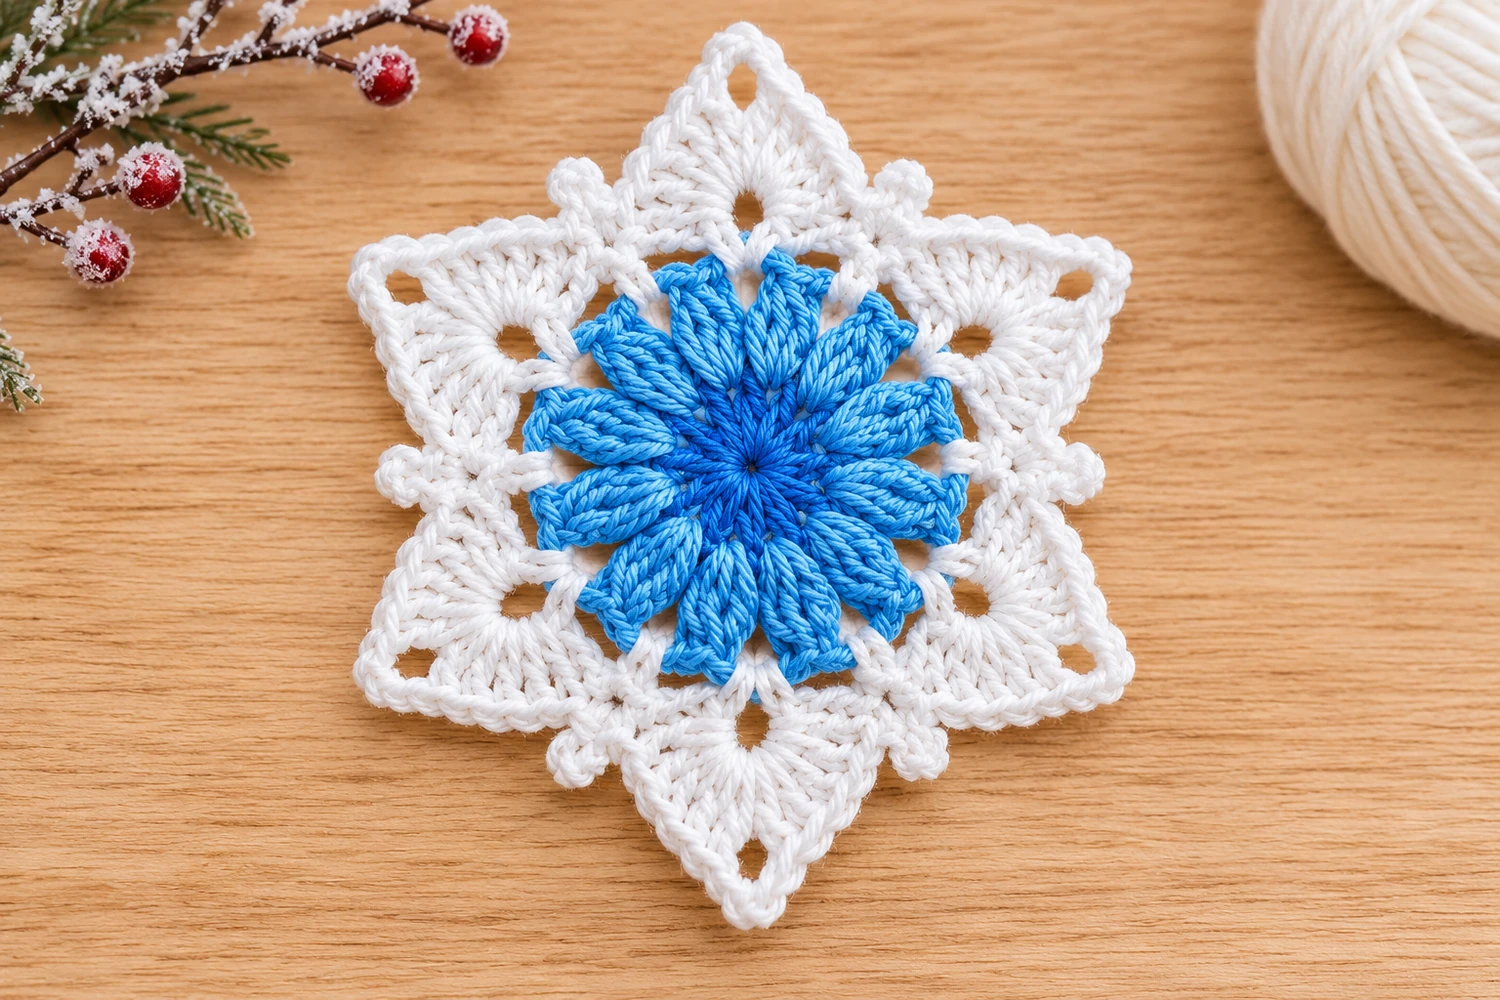
This blue flower crochet snowflake combines a bright raised center with six white pointed fans. Twelve long blue petals sit close together, while small open spaces separate them from the white edging. A little picot in each valley gives the silhouette a delicate finish without adding beads, ribbon, or other decorations.
The motif is made flat in four joined rounds. Two blue rounds create the center, then two white rounds establish the arches and shape the six points. This is an original interpretation inspired by the supplied reference, not the original pattern behind its photograph. The counts have been checked mathematically; the pattern has not been physically tested. The styled images illustrate the intended result.
Blue Flower Crochet Snowflake Materials
- Smooth cotton yarn in bright sky blue and white, both the same weight. Sport or DK cotton gives clear stitch definition.
- Approximately 10–15 yd (9–14 m) of blue and 15–20 yd (14–18 m) of white as planning allowances, not measured consumption.
- A 3 mm hook as a starting option, adjusted to your yarn and tension.
- A tapestry needle, scissors, and six removable stitch markers.
- A blocking mat and rustproof pins.
- Optional fabric stiffener suitable for cotton and an optional thin white hanging cord.
Skill level: Intermediate, or a confident beginner comfortable with tall stitches and clusters. Estimated size: about 4–5 in (10–13 cm) across opposite points after blocking. This is a design estimate rather than a measurement from a tested sample. Gauge is not critical, but consistent tension helps all six fans match.
How the Flower Becomes a Snowflake
The blue center starts with twelve single crochet stitches. Each one supports a three-treble cluster, so Round 2 contains twelve raised petals, each with a single closed top. Chain spaces between those petals provide a clear place to attach white yarn.
The first white round creates twelve equal arches. The final round alternates a large pointed fan in one arch and a small picot group in the next. This two-arch repeat is worked six times, producing six main points and six small details between them.
The points are crocheted directly onto the motif. There are no separate pieces to sew together, no stuffing, and no embroidered details. If you choose to add a hanging cord, attach it only after the motif is blocked and dry.
US Crochet Abbreviations
- MR = magic ring.
- ch = chain.
- sl st = slip stitch.
- sc = single crochet.
- hdc = half double crochet.
- dc = double crochet.
- tr = treble crochet.
- 3-tr cl = three-treble cluster worked into one stitch.
- st(s) = stitch(es); sp(s) = space(s).
Beginning chains do not count as stitches in any round. Joining slip stitches also stay outside the counts. Work in joined rounds without turning, keeping the same side facing you throughout.
Three-treble cluster: one raised blue petal
Yarn over twice, insert the hook into the indicated stitch, yarn over, and pull up a loop. Yarn over and pull through two loops twice; leave the last loop of this unfinished treble on the hook. Two loops remain.
Repeat that unfinished treble twice more in the same base stitch. Each repetition adds one unfinished top loop. After the third repetition, four loops remain on the hook. Yarn over and pull through all four loops to close the cluster. This makes one cluster, not three separate counted stitches.
Do not add a separate securing chain after closing the cluster. The ch 2 stated in Round 2 is the complete separator before the next petal. Adding another chain would enlarge every gap.
Pointed fan and small picot
Pointed fan: Work (sc, hdc, 2 dc, tr, ch 3, tr, 2 dc, hdc, sc) into the same chain arch. That is ten actual stitches plus a ch-3 tip space. Five stitches rise toward the tip and five descend from it.
Small picot: Ch 3, then sl st into the first of those three chains. The picot forms a small loop above the preceding sc. Its chains and slip stitch are not counted as extra sc stitches.
Blue Center: Rounds 1 and 2
Round 1: twelve-stitch foundation
With blue, make a MR. Ch 1, then work 12 sc into the ring. Pull the tail to close the center neatly. Join with a sl st to the first sc. 12 sc.
Identify the first actual sc before starting the petal round. The height chain and joining slip stitch do not provide additional foundation stitches.
Round 2: twelve raised petals
Ch 4 for height; this does not count as a stitch. Beginning in the same sc as the join, work [3-tr cl in the next sc, ch 2] twelve times, using each sc from Round 1 once. Join to the closed top of the first cluster. Fasten off blue. 12 clusters and twelve ch-2 spaces.
The twelve clusters contain 36 unfinished treble components, but only twelve closed cluster tops. Count the closed tops to check the round. Do not count the starting ch 4 as another petal.
Let the clusters sit close together to form the blue flower. Gently smooth them outward with your fingers while keeping the ch-2 spaces accessible. Leave a blue tail long enough to weave through the backs of several sturdy stitches.
White Anchor Arches: Round 3
Join white with a sl st in any blue ch-2 space. Ch 1. Work [sc in the current ch-2 space, ch 3] around all twelve spaces, moving to the next blue space after each chain arch. Join to the first white sc. 12 sc and twelve ch-3 arches.
Work under the entire blue ch-2 space rather than into one chain link. The white sc sits between two blue petals; it should not split a cluster or cover its raised surface.
Place a marker in every other white ch-3 arch. These six marked arches will receive the large fans. The unmarked arches between them receive the small picot groups. Start marking with the first arch made after the first white sc.
Six White Points and Valley Picots: Round 4
Slip stitch into the first marked ch-3 arch. Ch 1. Repeat the following two-part sequence six times:
- In the marked arch: Work one pointed fan: (sc, hdc, 2 dc, tr, ch 3, tr, 2 dc, hdc, sc), all under the same arch.
- In the next unmarked arch: Work sc, make a small picot (ch 3, sl st into the first chain), then work another sc into that same arch.
Continue to the next marked arch for the next repeat. Do not work into the sc anchors between arches. After the sixth picot group, join with a sl st to the first sc of the first fan. Fasten off white.
Final count: six fans, six ch-3 tip spaces, and six small valley picots. The actual stitch total is 72 stitches: 60 in the fans plus 12 sc in the picot groups. More specifically, there are 24 sc, 12 hdc, 24 dc, and 12 tr. Chain spaces, picot chains, and joining slip stitches are listed separately from those totals.
What to check before weaving in the ends
- Each fan has two dc and one tr on each side of its tip.
- Every large white point has a small ch-3 opening at its apex.
- A single picot group sits between each pair of fans.
- All twelve arches from Round 3 have been used once.
- There are twelve raised blue petals beneath the white round.
Remove the markers and weave the white tail into the backs of nearby white stitches. Keep blue tails within the blue center so they do not show through the white edging.
Blocking and Shaping the Snowflake
Blocking helps the fan tips become evenly spaced and opens the little chain holes. Follow your yarn’s care instructions. If damp blocking is suitable, moisten the motif and press out excess water in a towel without twisting or rubbing the clusters flat.
- Lay the snowflake with the raised blue petals facing up.
- Pin the six main tips at equal distances from the center, with one point up and one point down.
- Adjust the six valleys so they fall halfway between neighboring tips.
- Open each tip space gently and arrange the small picots so they remain visible.
- Let the piece dry completely before removing the pins.
Use the center as the reference for every measurement. A starting radius of about 2–2.5 in (5–6.5 cm) gives the estimated diameter, but let the crochet determine a comfortable final size. Do not stretch one fan much farther than the others to reach a target measurement.
If you want a firmer hanging decoration, test a suitable stiffener on leftover yarn. Apply it according to its own directions and let it dry fully. The blue clusters should retain their texture rather than being pressed into a flat disk.
Optional Hanging Cord
The reference motif can be displayed flat without a hanger. To hang it, pass a short length of thin white cord through one white ch-3 tip opening after blocking. Bring the ends together and tie a secure knot, leaving enough room for the branch or hook you plan to use.
Keep the cord light so it does not pull the fan into a long narrow shape. A separate cord is an accessory, not another crochet round, and it does not alter any of the stitch counts. There are no beads or sewn decorations in this version.
Troubleshooting the Petals and Points
A blue petal has loose strands at its top
Check the cluster closure. Three unfinished trebles in one base stitch leave four loops before the final pull-through. Pull through all four at once. Closing only part of the group leaves an unfinished strand and changes the attachment point.
The white round cups around the center
Count the twelve ch-3 arches first. A missed blue space removes an entire white arch. If the count is correct, check that the chains are not much tighter than the rest of the work. Remake overly tight chain arches before adding the fans.
One fan looks smaller
Read the fan from its valley edge to its tip: sc, hdc, two dc, tr. The second side mirrors that sequence in reverse. A missing dc or a dc used in place of a tr changes the slope. Correct the fan before fastening off; blocking cannot add a missing stitch.
There are seven fans or a gap at the join
The last round uses two arches per repeat, not one. Alternate a large fan and a small picot group across all twelve arches. Marking every other arch makes this easier to see. The starting slip stitches are only a way to reach the first arch and are not an additional repeat.
Can I change the yarn weight?
Yes, using the same stitch sequence and a hook suited to the yarn. Fine cotton thread makes a smaller ornament; thicker yarn makes a larger motif and heavier clusters. Keep blue and white the same weight for a balanced result, and measure after blocking rather than assuming the estimated dimensions will stay the same.
Care, Storage, and Display
Store the snowflake flat between layers of tissue, with space around the tips. If it has been stiffened, avoid damp storage and follow the stiffener’s cleaning guidance. For an unstiffened cotton version, follow the yarn label and reshape gently after cleaning.
Use it as a Christmas tree ornament, a small garland motif, or a removable gift decoration. If adding a cord, keep the decoration out of reach of young children. Keep crochet away from open flames and hot light bulbs.
More Winter Crochet Projects
For another floral center, try the Puff Stitch Crochet Snowflake, which uses a different five-round construction. The Picot Fan Crochet Snowflake offers a lighter lace outline. You can also pair this two-color motif with the Lavender Lace Crochet Star for a varied handmade winter display.