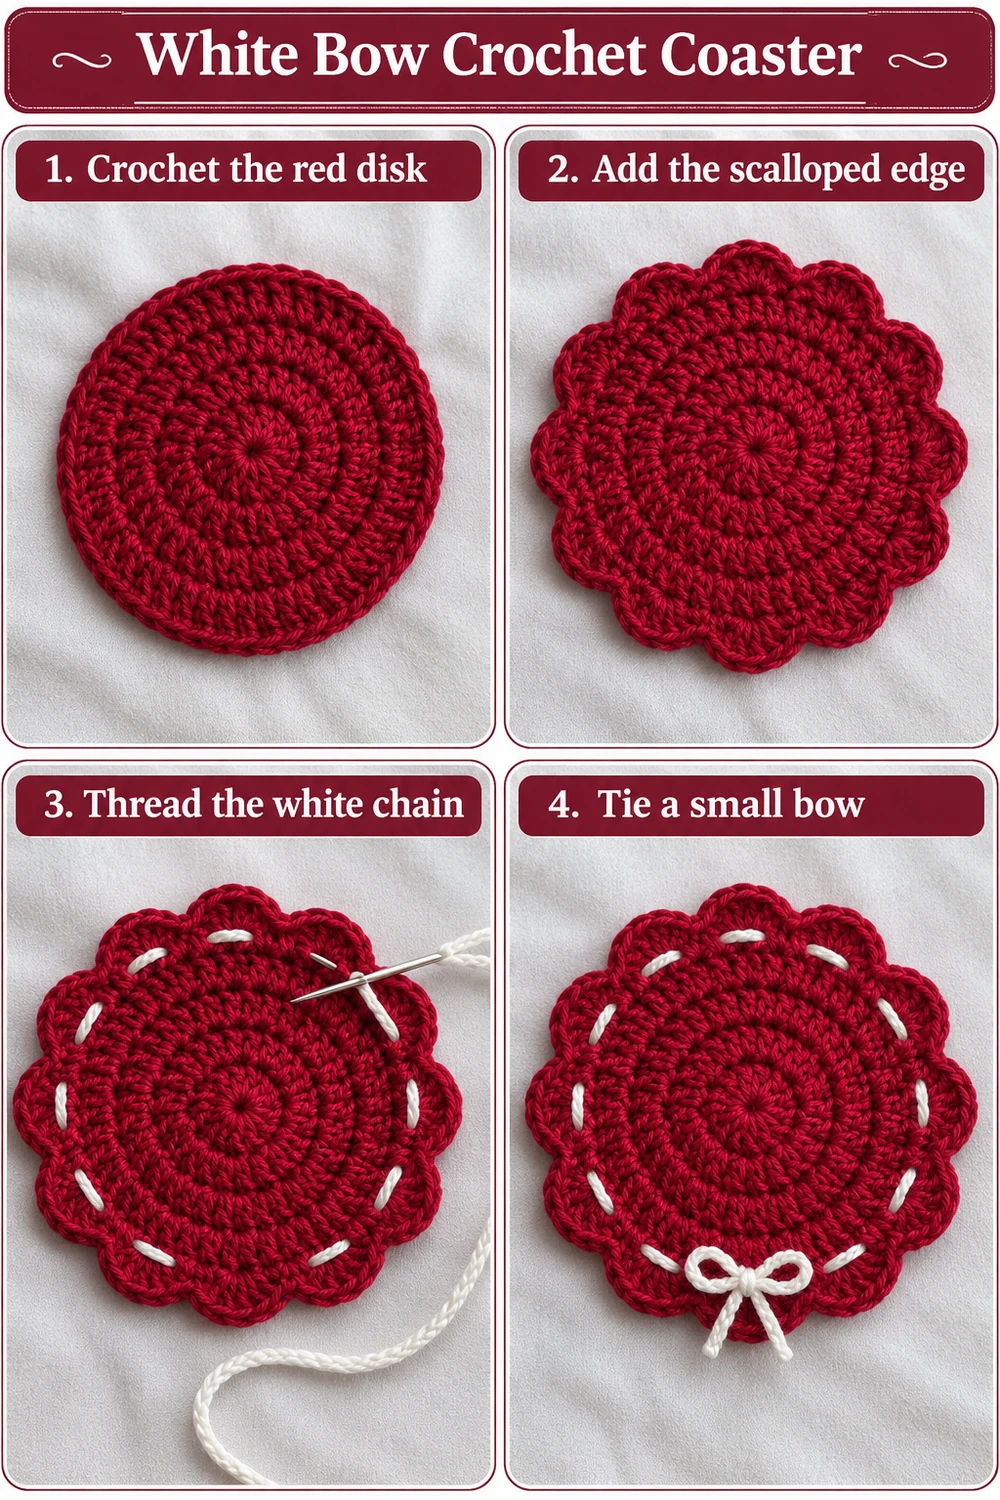
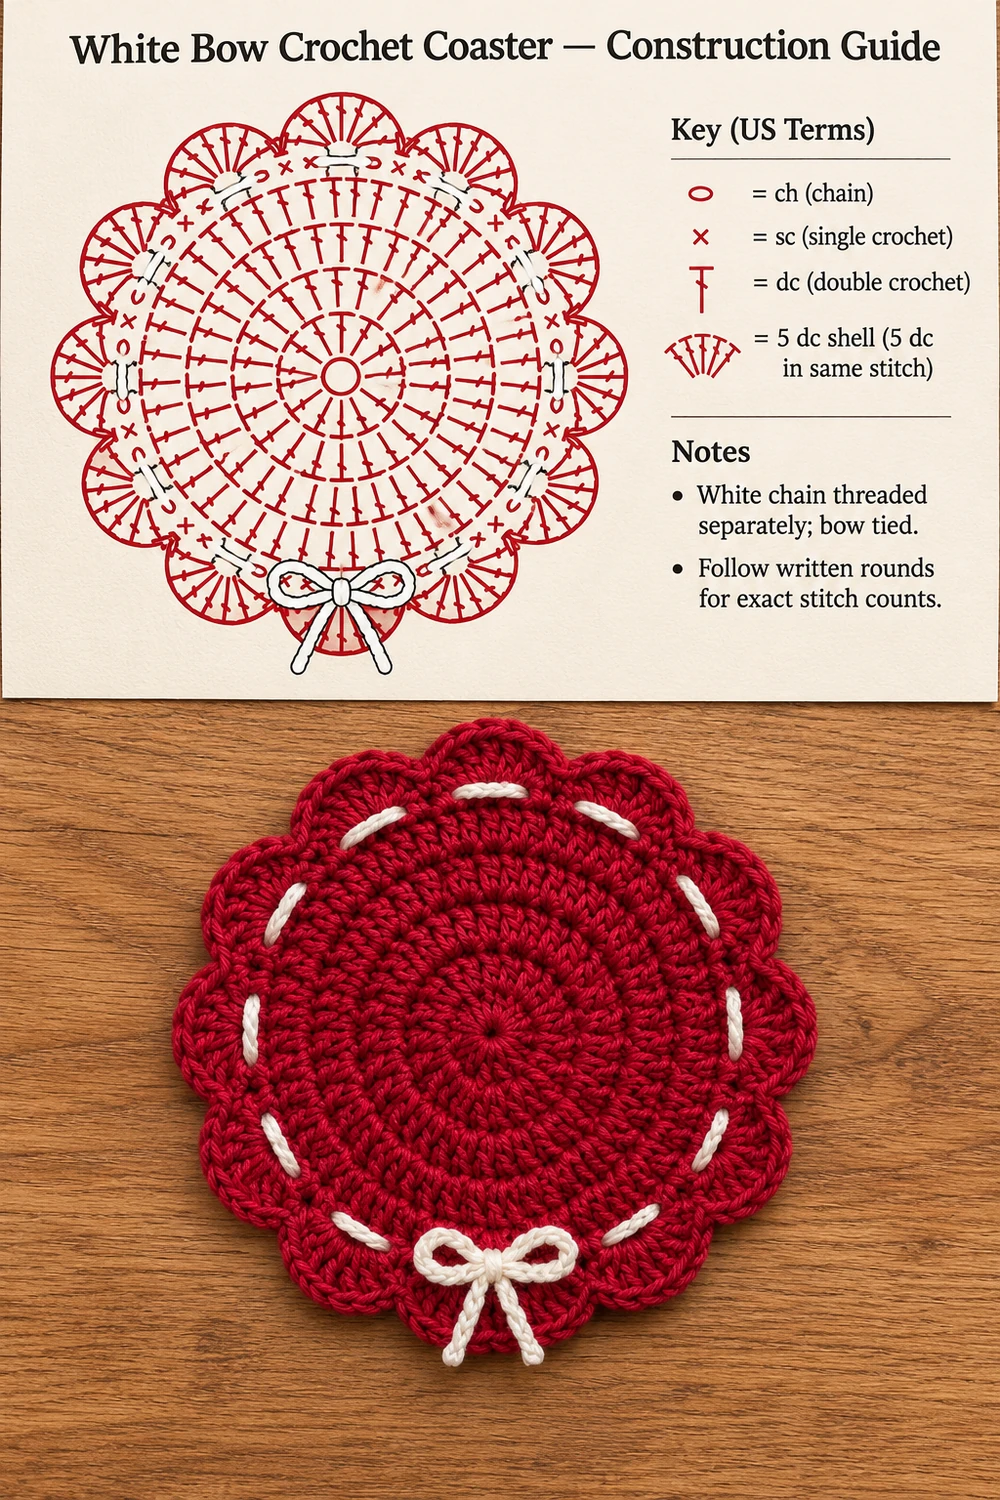
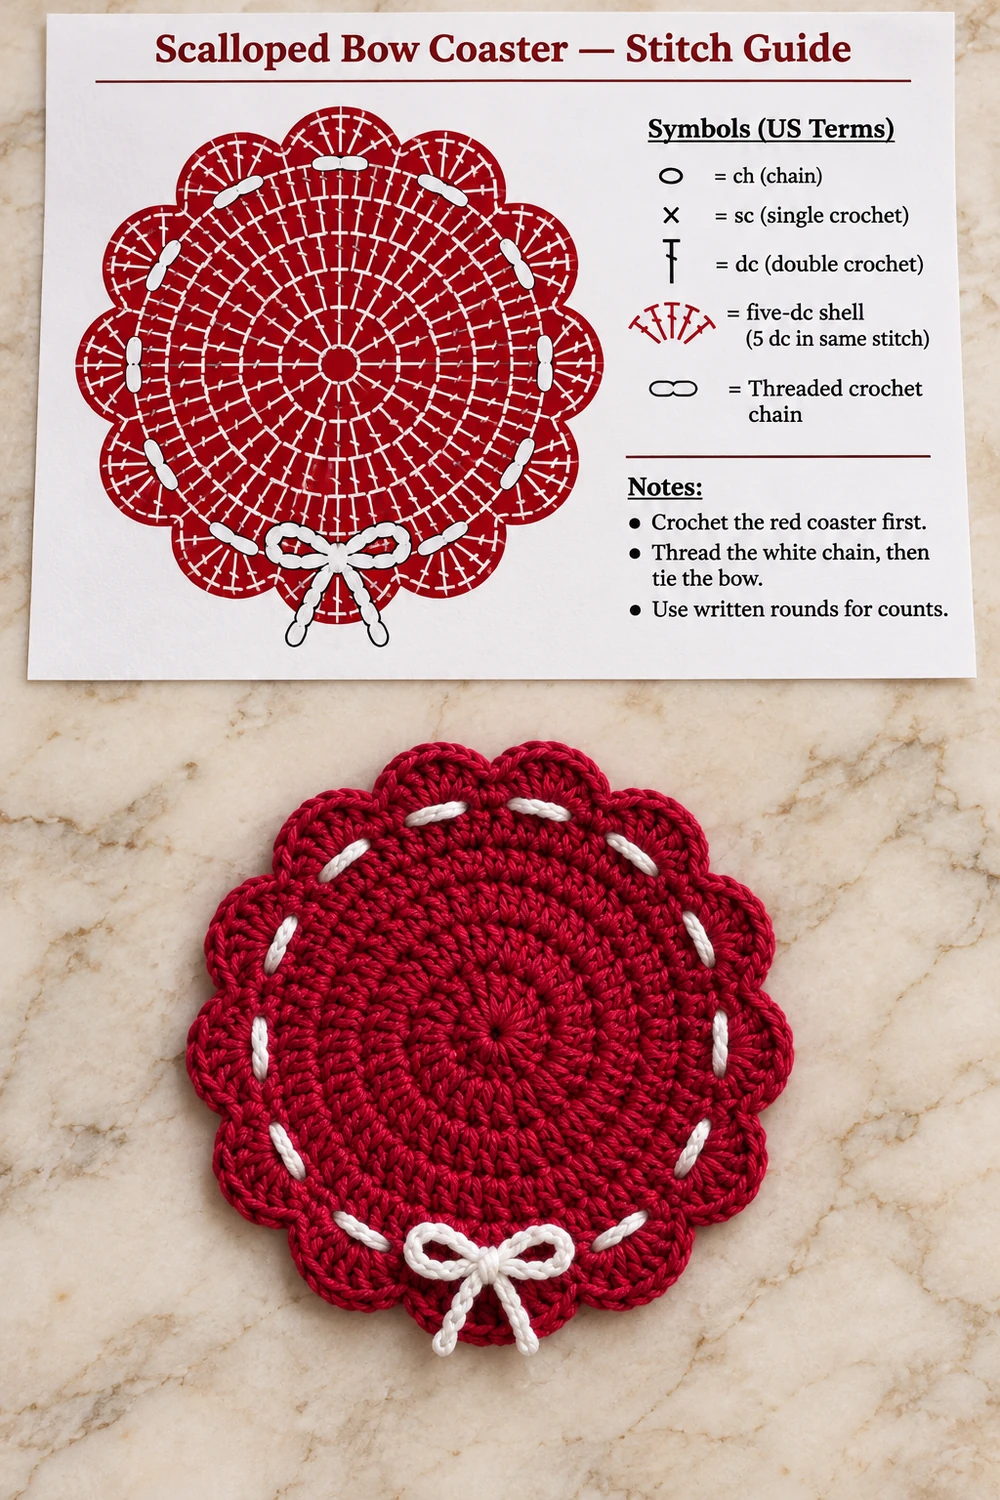
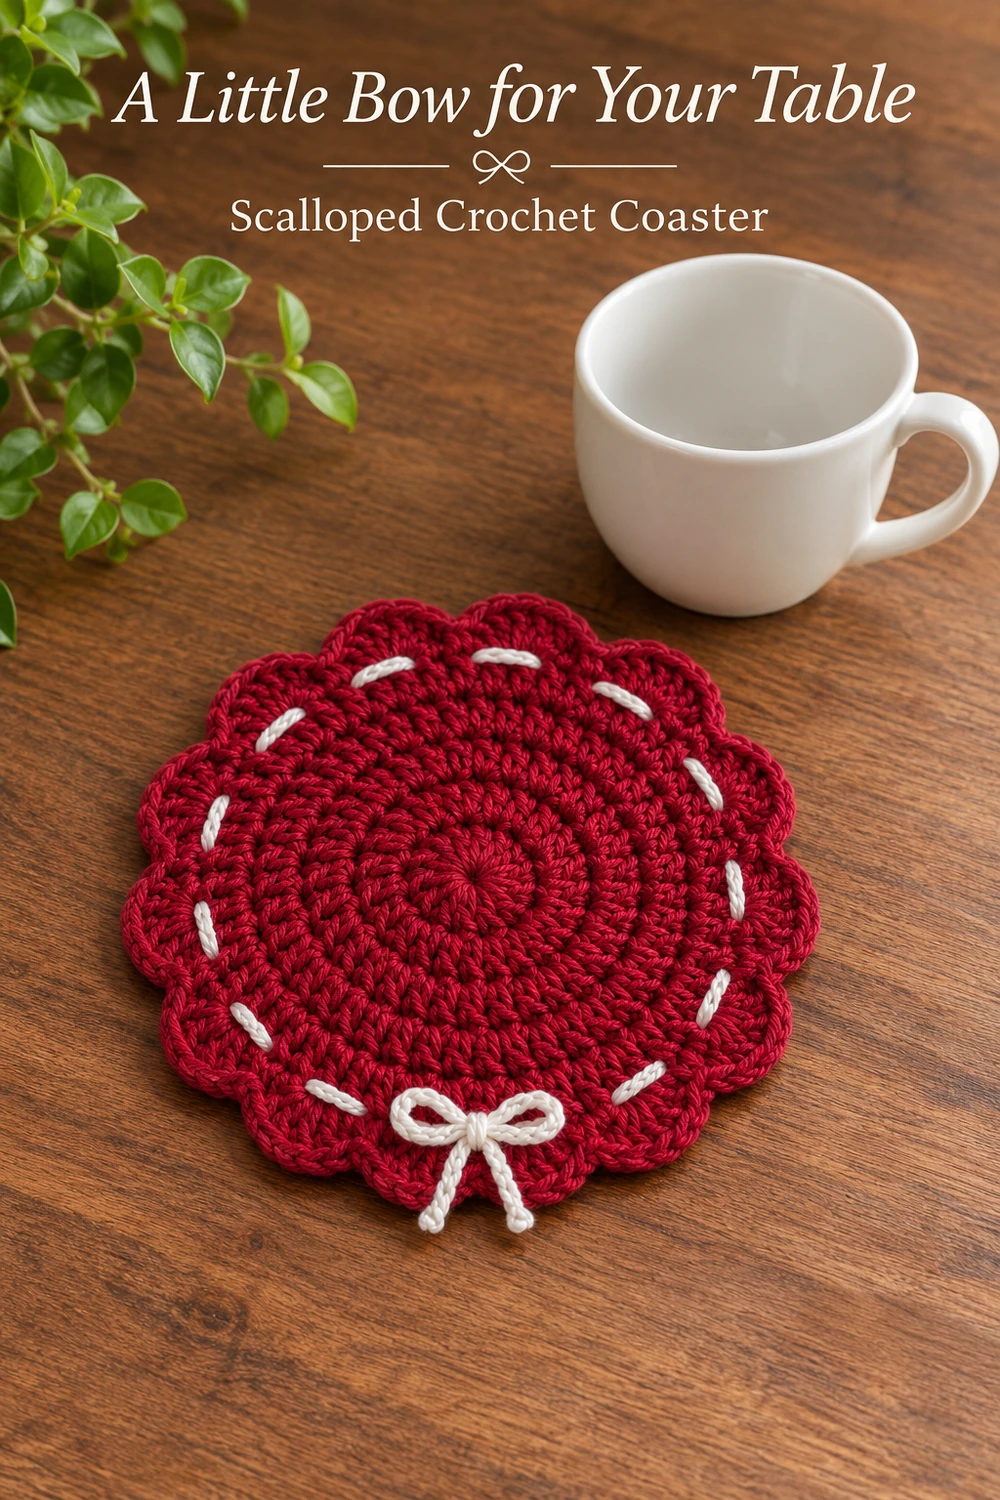
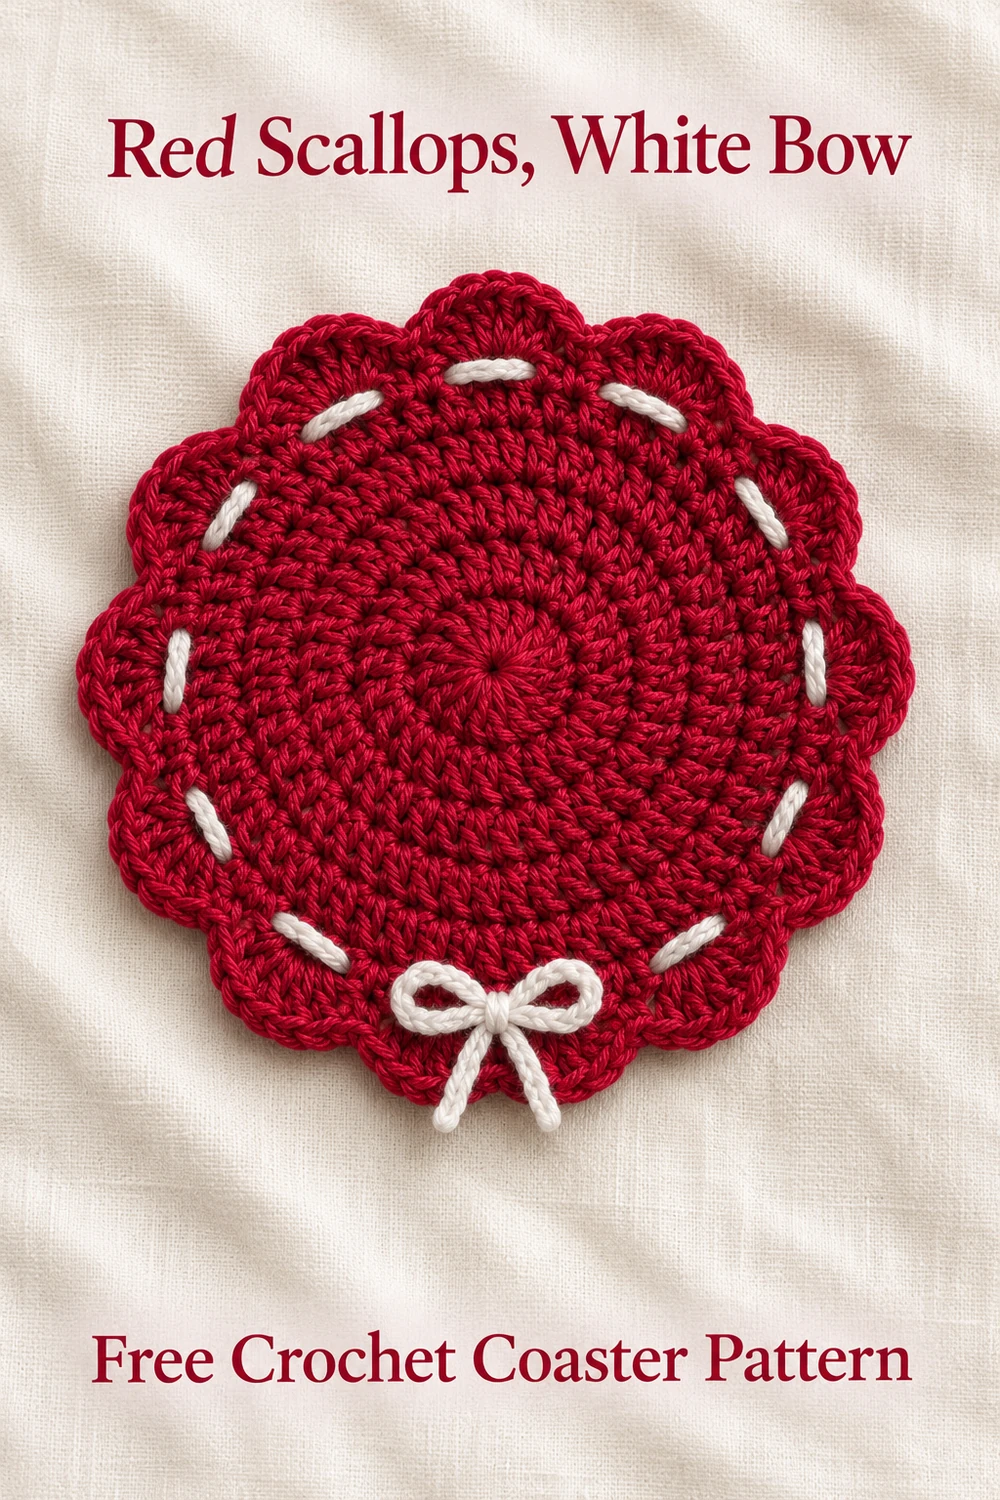
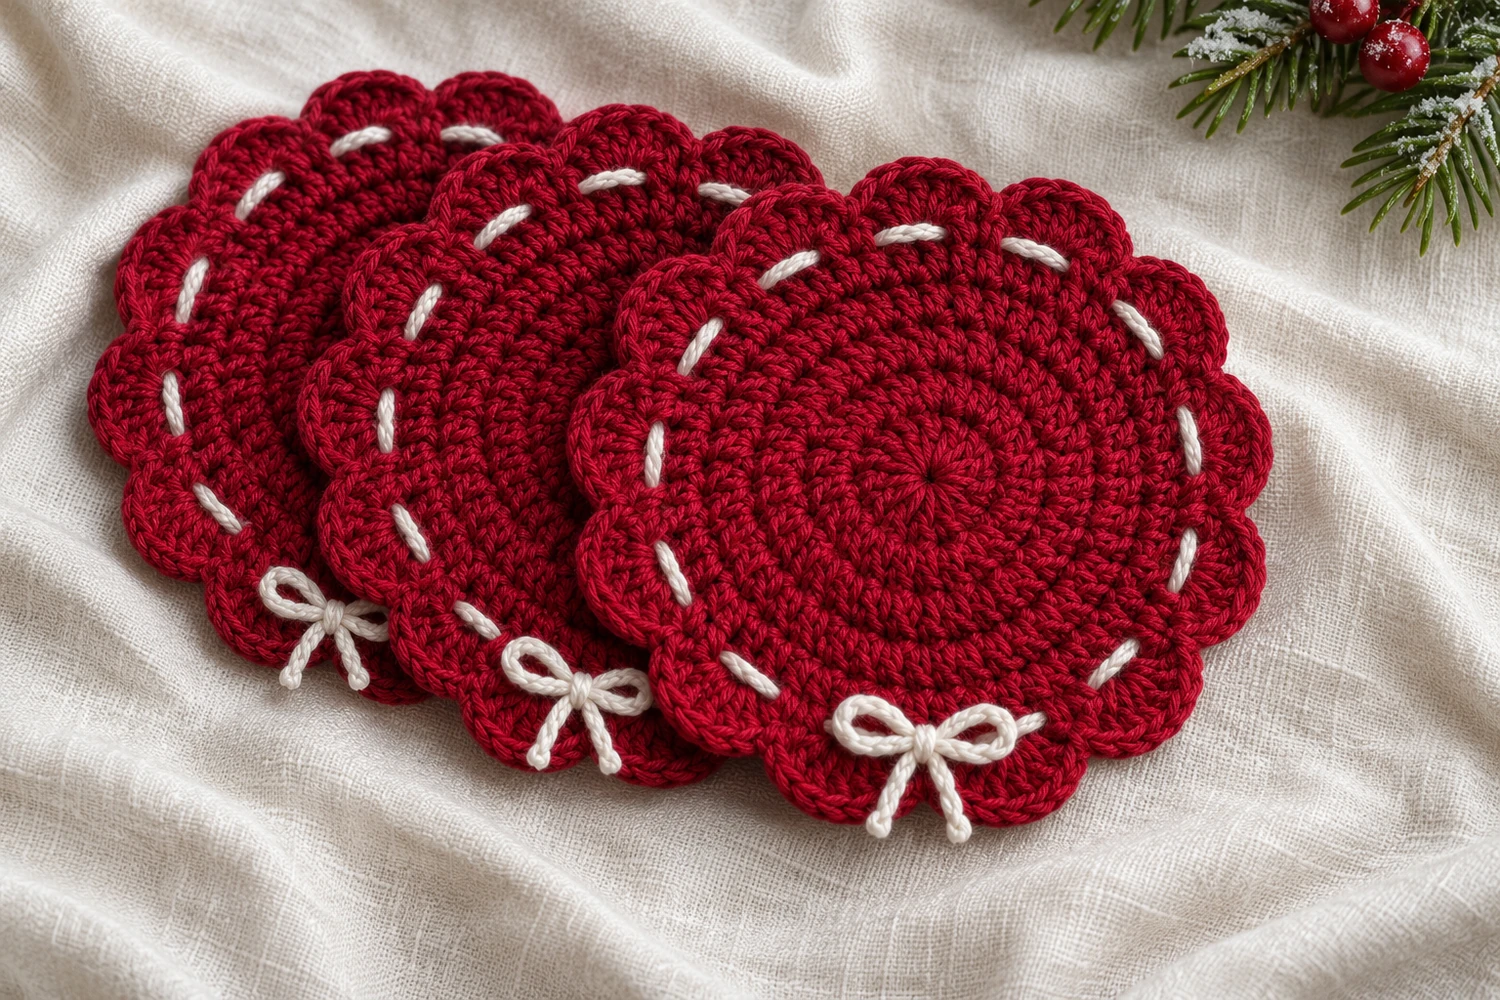
This white bow crochet coaster pairs a solid cherry-red center with a scalloped edge and a delicate white cord. The cord passes in and out around the perimeter, leaving little white dashes between the red fans before finishing in a small bow.
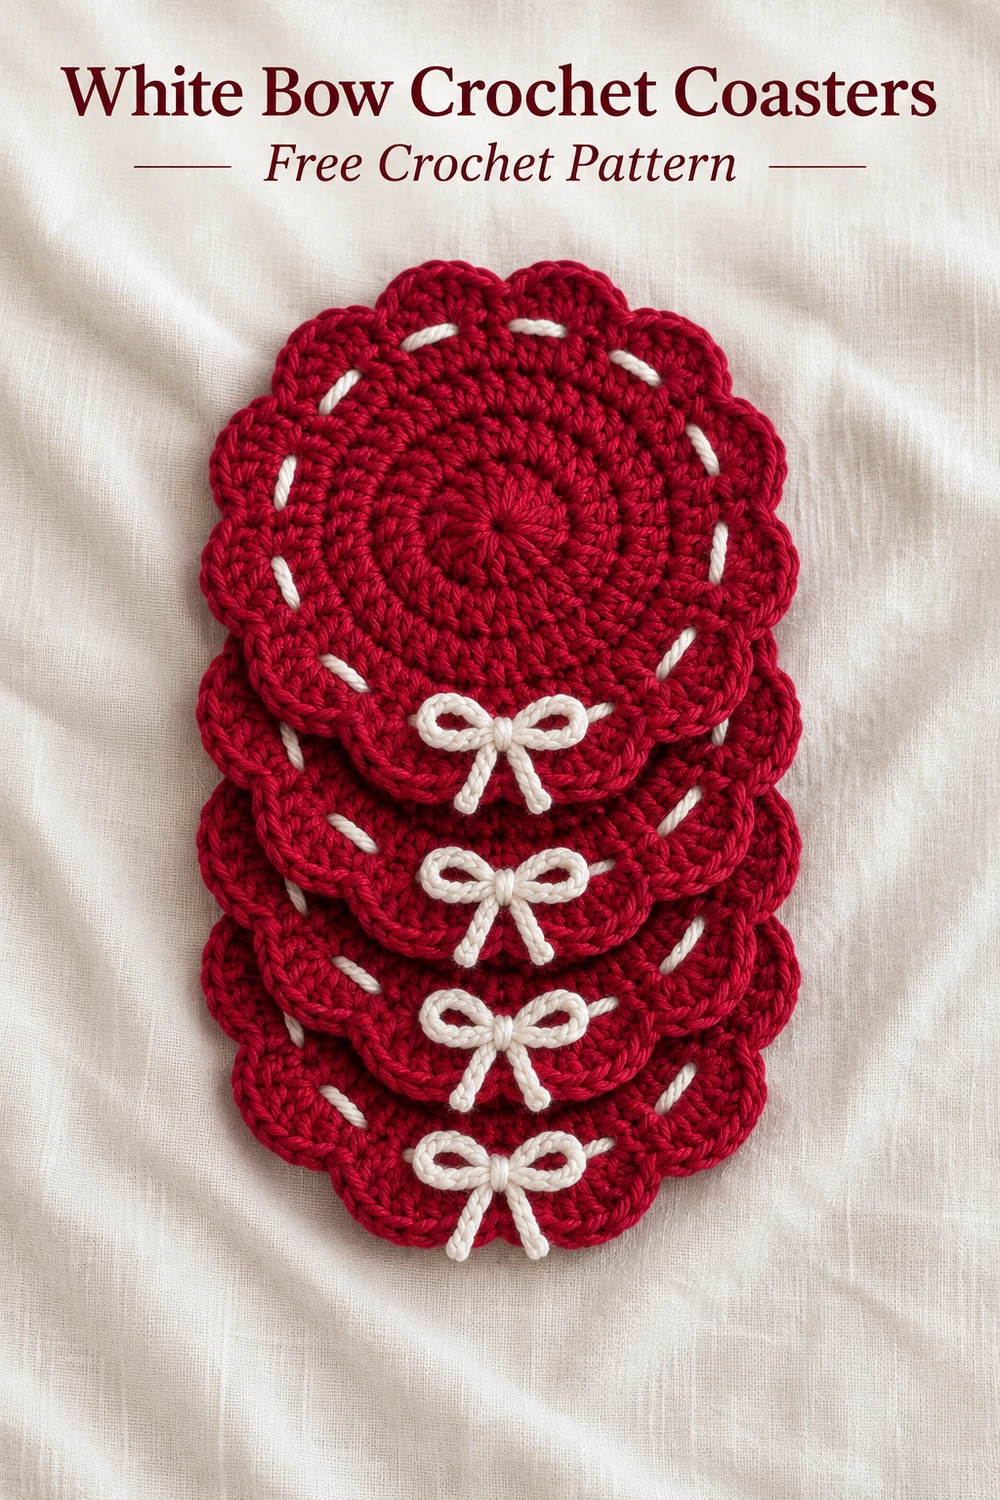
Work one coaster first, then repeat it for a matching set. The reference shows several overlapping pieces, but each coaster is made separately. This original pattern is inspired by the photograph, not the original recipe behind it. The white detail is a crocheted chain threaded through the finished red piece and tied; it is not satin ribbon or a separate flower applique.
White Bow Crochet Coaster Materials
- Smooth cotton in deep cherry red or cranberry red for the main coaster. Allow approximately 15–20 g per coaster as a planning amount, not measured consumption.
- Fine white cotton for the threaded chain. Choose a strand noticeably thinner than the red yarn so the cord passes through the eyelets comfortably.
- A 2.75 mm hook for sport or light DK red cotton, adjusted for your tension; a suitable smaller hook for the fine white cotton.
- Tapestry needle with an eye that accepts the white chain, scissors, stitch markers, rustproof pins, and a blocking mat.
Difficulty: Confident beginner to intermediate. The red rounds use basic increases, chains, and shell fans; the cord takes a little patience to thread evenly. Estimated finished diameter: approximately 4–4½ inches (10–11.5 cm), including the scallops, with sport cotton. This is an estimate, not a measured sample. Yarn and tension determine the size. The stitch arithmetic has been reviewed, but the pattern has not been physically tested.
Before You Start
Use smooth, washable cotton for a clear stitch pattern and a fairly level center. A fluffy yarn hides the gaps used for threading, while very stretchy yarn can let the white cord draw the edge out of shape. Keep the red center firm but flexible.
The solid circular area is the resting surface. The scallops and bow sit outside it. Before making a set, compare the plain center with the base of the cup or glass you intend to use. A wide or uneven vessel base should not rest on the raised bow.
Make the red coaster and block it before adding the white chain. This gives you a settled perimeter to measure. The chain must have enough extra length for the bow; pulling a short cord tightly around the coaster will make the red disk cup.
US Crochet Terms
- ch: chain
- sl st: slip stitch
- sc: single crochet
- dc: double crochet
- st(s): stitch(es)
- sp(s): space(s)
- MR: magic ring
A shell is five separate dc worked into the same indicated space. The stitches are not closed together as a cluster. In the eyelet round, one sc and one ch-1 space replace each pair of old dc.
Beginning ch 3 counts as the first dc. Beginning ch 1 does not count. Joining slip stitches are never included in the stitch totals. Work all red rounds with the same side facing; do not turn. The Craft Yarn Council abbreviation guide is a useful reference for the US terminology.
Round Counts
| Round | Construction | Completed count |
|---|---|---|
| 1 | Foundation circle | 12 dc |
| 2 | Increase in every stitch | 24 dc |
| 3 | Alternate one dc and an increase | 36 dc |
| 4 | Two dc, then an increase | 48 dc |
| 5 | Threading eyelets | 24 sc and 24 ch-1 spaces |
| 6 | Scalloped edge | 12 shells of 5 dc, with 12 sc anchors |
| White chain | Separate adjustable cord | Length fitted to the blocked perimeter plus bow allowance |
The red pattern has fixed counts. The white chain is fitted by length because its finer yarn may have a different gauge. Record its final chain count after the first coaster if you want matching cords for the rest of the set.
Crochet the Solid Red Center
Round 1: Close the Center
With red, make an MR. Ch 3, counting as the first dc, then work 11 dc into the ring. Pull the ring closed gently and join with a sl st to the top of the beginning ch 3. (12 dc)
Leave a tail long enough to secure the ring on the back. Close it firmly enough that the middle has only a tiny opening, without drawing the twelve stitches into a cone.
Round 2: Twenty-Four Stitches
Ch 3, counting as the first dc, and work 1 dc into the same stitch. Work 2 dc into every remaining stitch around. Join to the top of the beginning ch 3. (24 dc)
The first increase already contains the beginning chain and one dc. Do not put two additional dc beside the chain, which would give you an extra stitch.
Round 3: Thirty-Six Stitches
Ch 3, counting as a dc in the first stitch. Work 2 dc in the next stitch. Repeat [dc in the next stitch, 2 dc in the next stitch] 11 more times. Join to the top of the beginning ch 3. (36 dc)
There are twelve increases evenly spaced around the circle. Each two-stitch base repeat becomes three dc, so twelve repeats produce 36 stitches.
Round 4: Forty-Eight Stitches
Ch 3, counting as the first dc. Dc in the next stitch, then work 2 dc in the next stitch. Repeat [dc in each of the next 2 stitches, 2 dc in the next stitch] 11 more times. Join to the top of the beginning ch 3. (48 dc)
Lay the disk on a flat surface. A small ripple may relax during blocking, but a pronounced wave suggests extra increases. A deep cup can indicate missing increases or very tight tension. Correct the count now, before adding the eyelets and shells.
Round 5: Make the Threading Eyelets
Ch 1, sc in the first stitch. Ch 1 and skip the next stitch. Repeat [sc in the next stitch, ch 1, skip the next stitch] 23 more times. Join with a sl st to the first sc. (24 sc and 24 ch-1 spaces)
The last ch 1 travels over the final skipped dc to the beginning sc. Do not omit that last eyelet. Mark one ch-1 space near the join; it will be the starting location for the shell round and, later, a convenient place for the white cord ends.
Keep these chains even and relaxed. They need to remain visible beneath the shell round so the fine white chain can pass through them. Do not make them large enough to form loose loops beyond the red disk.
Round 6: Twelve Red Scallops
Sl st into the first marked ch-1 space. Ch 3, counting as the first dc, and work 4 dc into that same space. Sc in the next ch-1 space.
Repeat [5 dc in the next ch-1 space, sc in the following ch-1 space] 11 more times. Join with a sl st to the top of the beginning ch 3. Fasten off. (12 shells, 60 dc, and 12 sc anchors)
Work around the chain spaces rather than into the sc tops of Round 5. Each shell-and-anchor pair uses two spaces, so twelve pairs use all 24. The sc between the fans makes a shallow valley and separates the small scalloped lobes.
Weave the red ends securely into the back of the disk. Pass the starting tail through several stitches around the ring before trimming it. Keep the front center free from knots or raised finishing tails.
Block the Red Coaster
Dampen or wash the red piece according to the yarn label. Gently squeeze out excess water without wringing. Place the coaster flat on the mat and ease the solid center into a circle.
Pin the twelve shell tips evenly around the outside, using only light tension. The center should remain level while the fans keep their rounded shape. Do not stretch the eyelets so much that the red perimeter looks like a loose net.
Let the coaster dry fully before adding white. If the red cotton is unfamiliar, test for color transfer during this first wash. A red yarn that releases dye can stain the white cord and pale table linens.
Crochet the Fine White Cord
With fine white cotton and a suitable hook, make a relaxed chain. A starting trial of ch 240 is useful, but it is not a fixed fit for every yarn. Before fastening off, lay the chain around the blocked coaster at the eyelet ring.
Allow enough length to travel around that ring without tension, plus approximately 8 inches (20 cm) extra for the two bow loops and short tails. Add chains or undo a few until the length suits your coaster. Measure with the chain relaxed, not stretched.
Fasten off and weave the small yarn ends into the chain itself as neatly as possible. The visible cord is a crochet chain. Do not substitute a broad satin ribbon if you want the small white dashes shown in the reference.
Thread the White Chain Around the Edge
Place the coaster right side up. Locate the 24 ch-1 spaces from Round 5 beneath the scallops. Start near a valley where you want the bow to sit at the lower edge.
Using a blunt needle or a small hook, pass the white chain down through the first eyelet, then up through the next, alternating around the whole ring. Keep the chain outside the solid center and inside the shell tips. Pass through the existing openings rather than piercing or splitting the red yarn.
Continue over and under all 24 eyelets. This leaves approximately twelve short white sections showing on the front, alternating with hidden sections behind. The two ends meet near the chosen starting valley.
Spread the white sections evenly and slide the cord gently until both loose ends are similar in length. The red circle must remain flat. If the chain is too bulky to pass through comfortably, remake it with finer white cotton rather than forcing it through the red stitches.
Tie the Small White Bow
Tie the two white chain ends into a small bow at the outer edge. Adjust the loops and tails while holding the cord loose around the coaster. The bow should sit beside the usable red disk, not raised in its center.
Do not tighten the first knot so much that it gathers the eyelet ring. Flatten the coaster again and check that every shell sits naturally. If the bow keeps slipping, use one small removable matching thread tack through its knot and an edge stitch; leave the chain easy to remove for washing.
The bow is tied from the threaded chain. It is not an additional crocheted bow component, an embroidered motif, or a sewn ribbon applique. Make a matching chain and bow for each coaster in the set.
Make a Coordinated Set
For four coasters like the reference stack, repeat the entire red pattern four times. Use the same yarn and hook and compare the circles after Round 4. Counting at that point is faster than trying to make the shell edges match after finishing.
Block the red pieces together to similar diameters. Once the first cord fits well, use its final length and chain count as a guide for the other three, checking each one before tying the bow. Small differences in chain tension can affect how much length remains for the tails.
Keep the bow size restrained and the tails short enough that they do not trail under the cup base. Stack the dry coasters loosely with the bows staggered so the knots do not press into the solid centers.
Troubleshooting
The Center Waves
Count the dc rounds: 12, 24, 36, and 48. Each round adds twelve stitches. Extra dc beside a beginning ch 3 or an extra increase near the join can make the fabric ruffle.
There Are Thirteen Scallops
Check Round 5 for exactly 24 eyelets. Round 6 alternates one shell and one sc anchor across those spaces. Do not add a shell into the joining slip stitch or into an sc top between two eyelets.
The White Cord Makes the Coaster Cup
Loosen the bow and spread the chain around the entire ring. The cord should follow the edge, not act as a drawstring. Add chain length if needed, then retie the bow without gathering the red fabric.
The Cup Rocks on the Surface
Check that the vessel base fits inside the solid red area and does not touch the bow or scallops. Remove any bulky tail knots from the center back. Use a different vessel or a larger coaster if the base extends onto the raised edging.
Care and Storage
Remove the white cord before washing if the red yarn might release dye, and clean according to both cotton labels. Reshape the red circle while damp, dry flat, and rethread the cord after it is completely dry.
Use the coaster for ordinary table display and moisture protection as appropriate for the yarn and surface. This pattern does not establish heat resistance for use as a potholder or trivet. Store the set flat, with the small bows protected from heavy objects.
More Crochet Coasters
The Crochet Wreath Coaster offers another festive border and bow combination. For contrasting colors, try the Red and Cream Flower Coaster, or explore the Christmas Bauble Coaster for a different holiday outline.