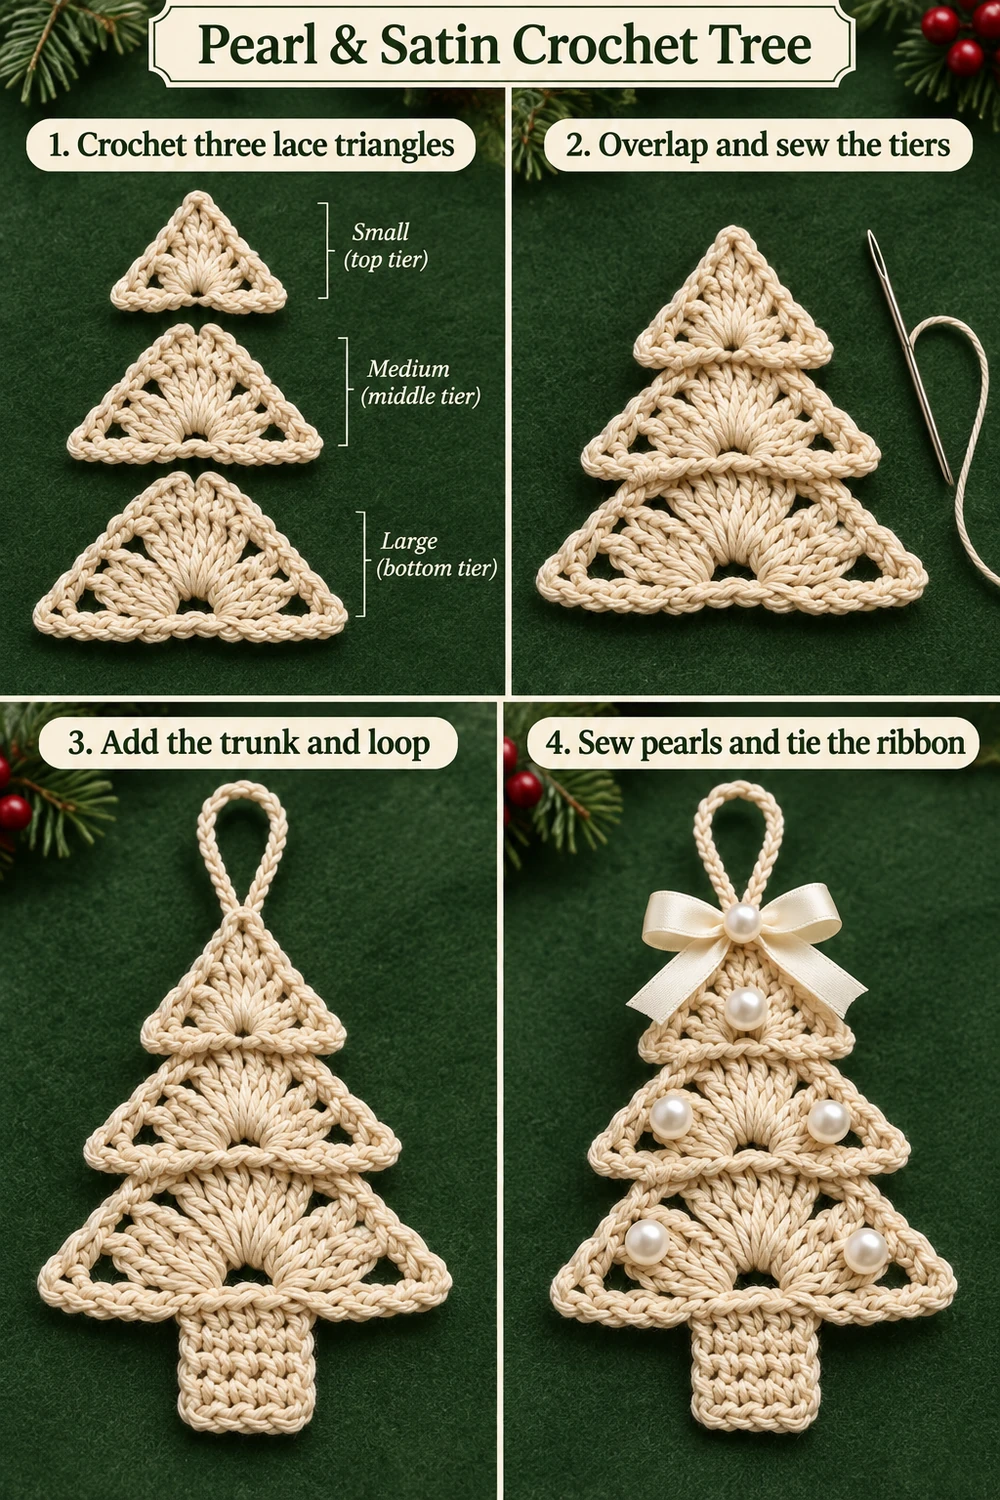
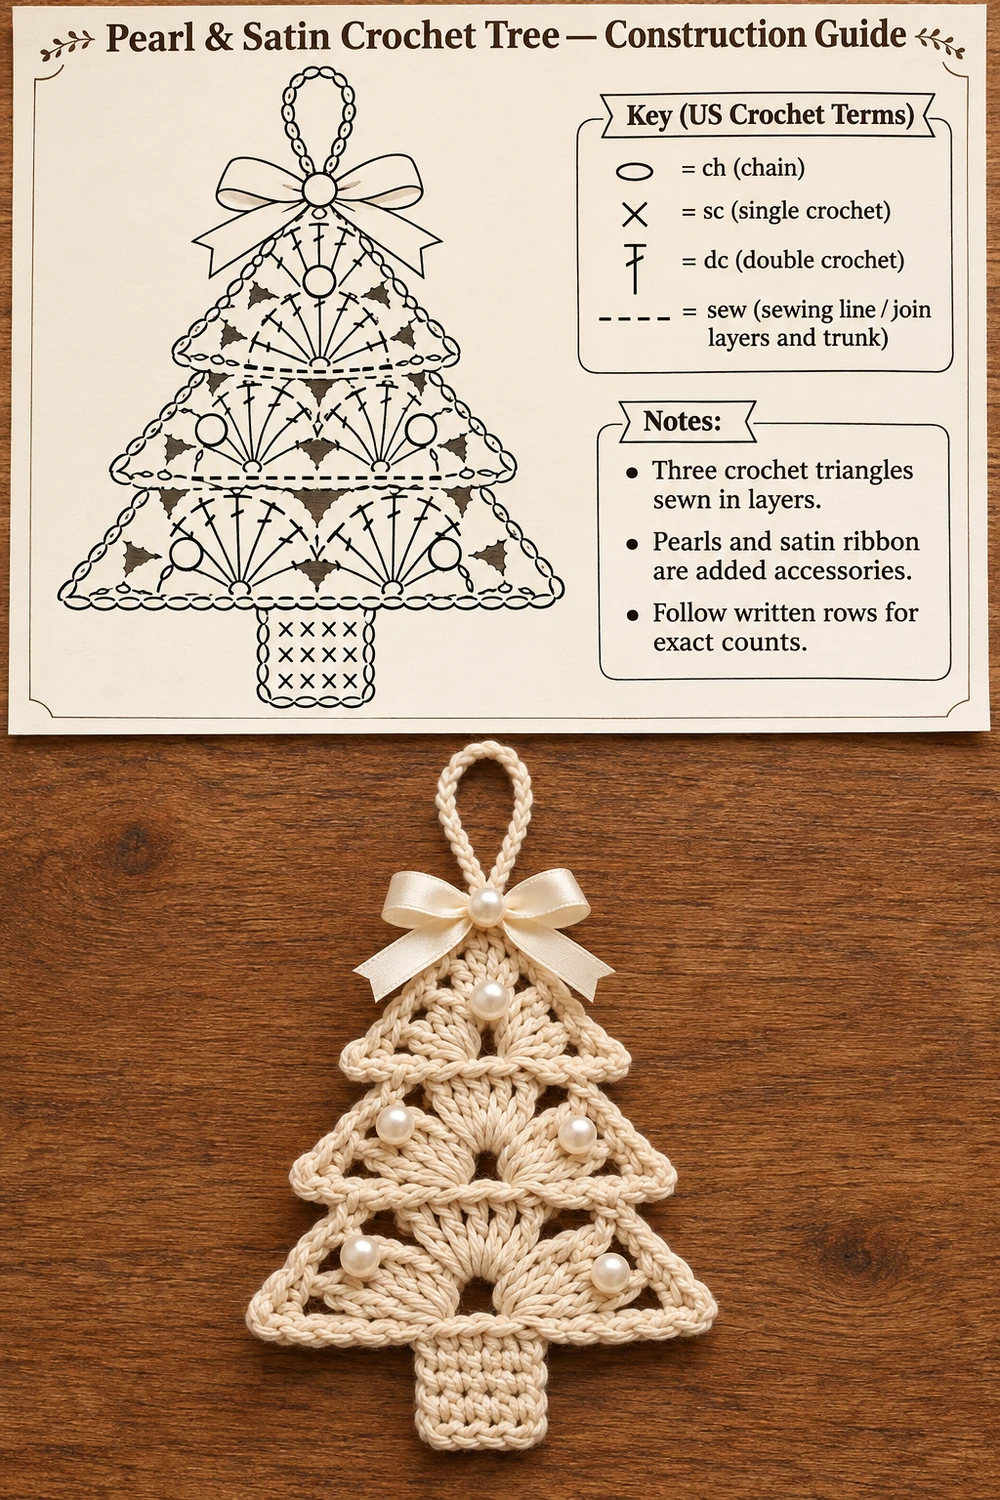
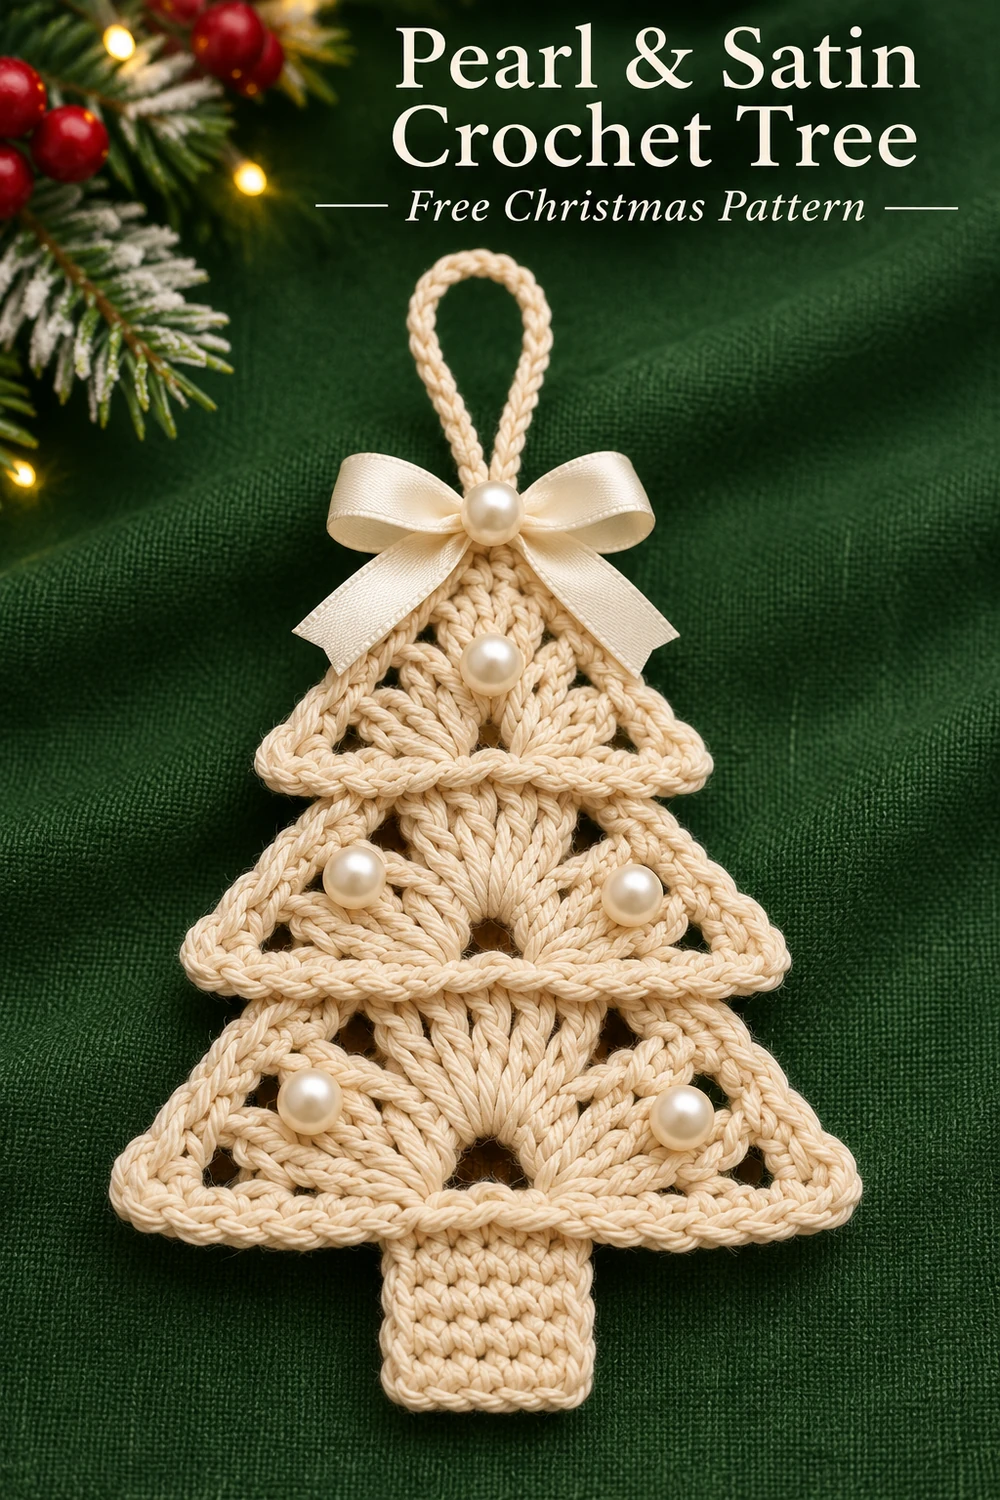
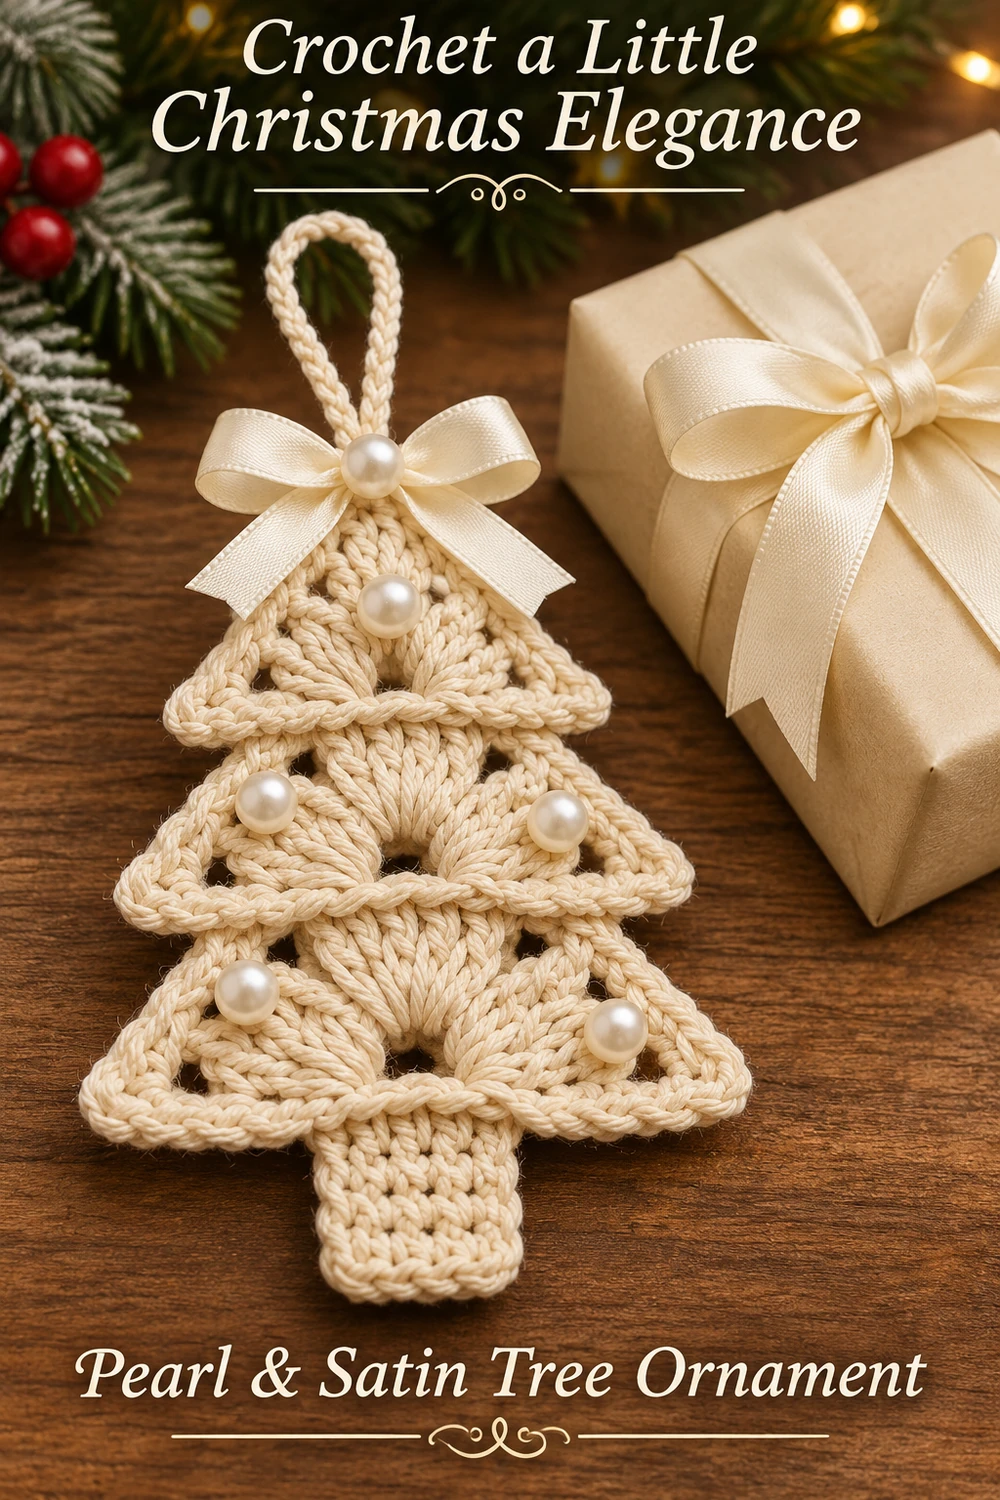
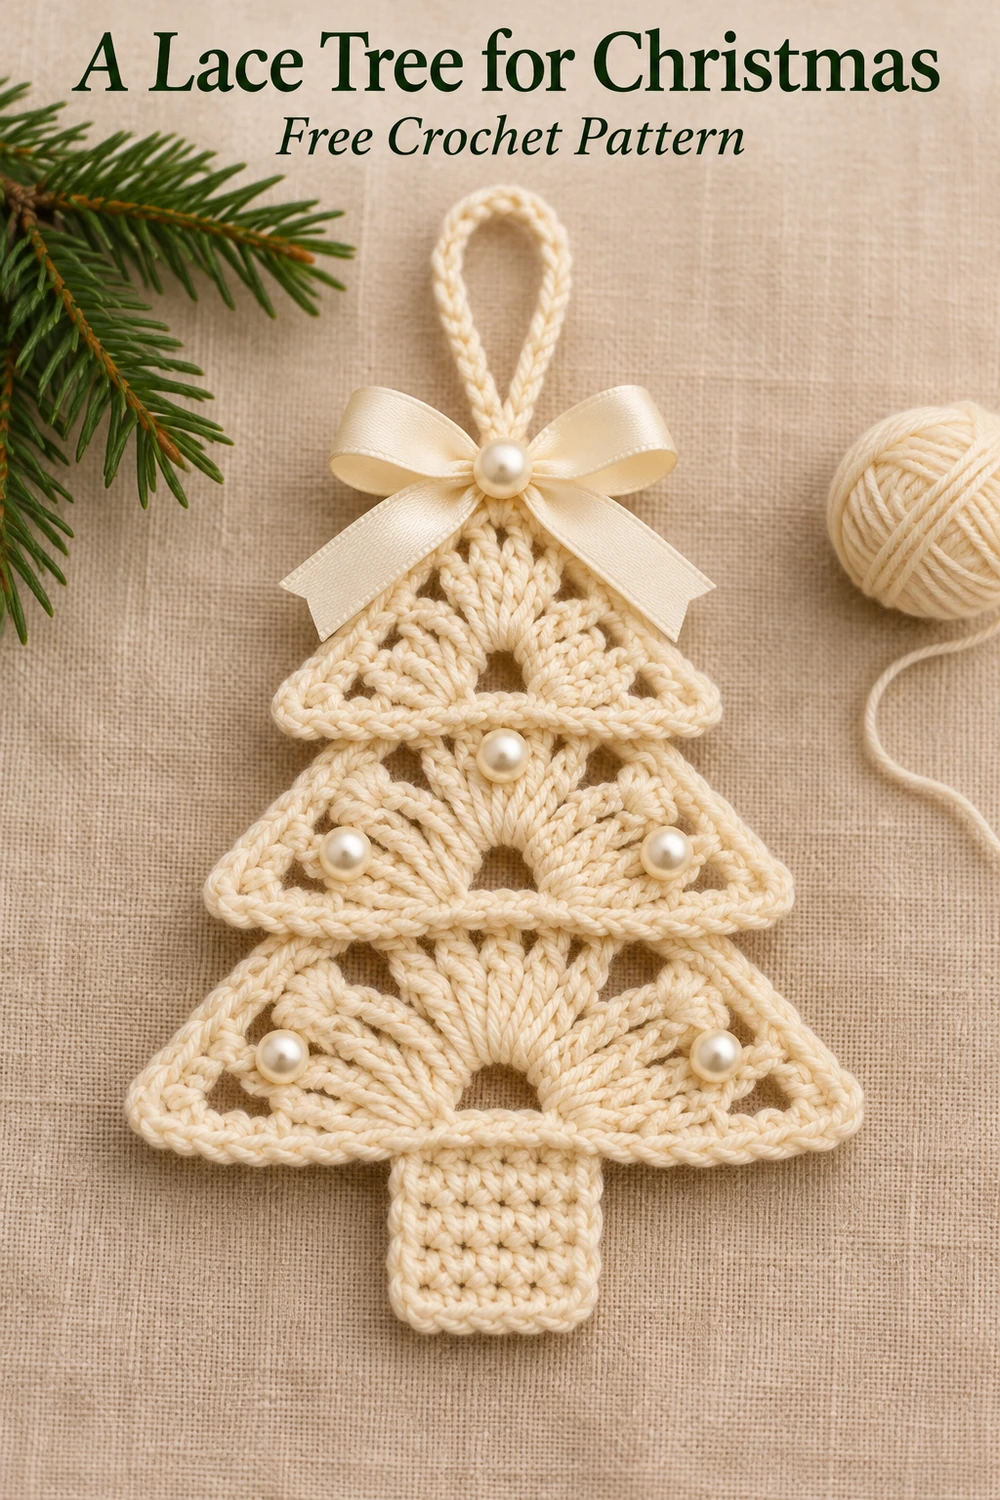
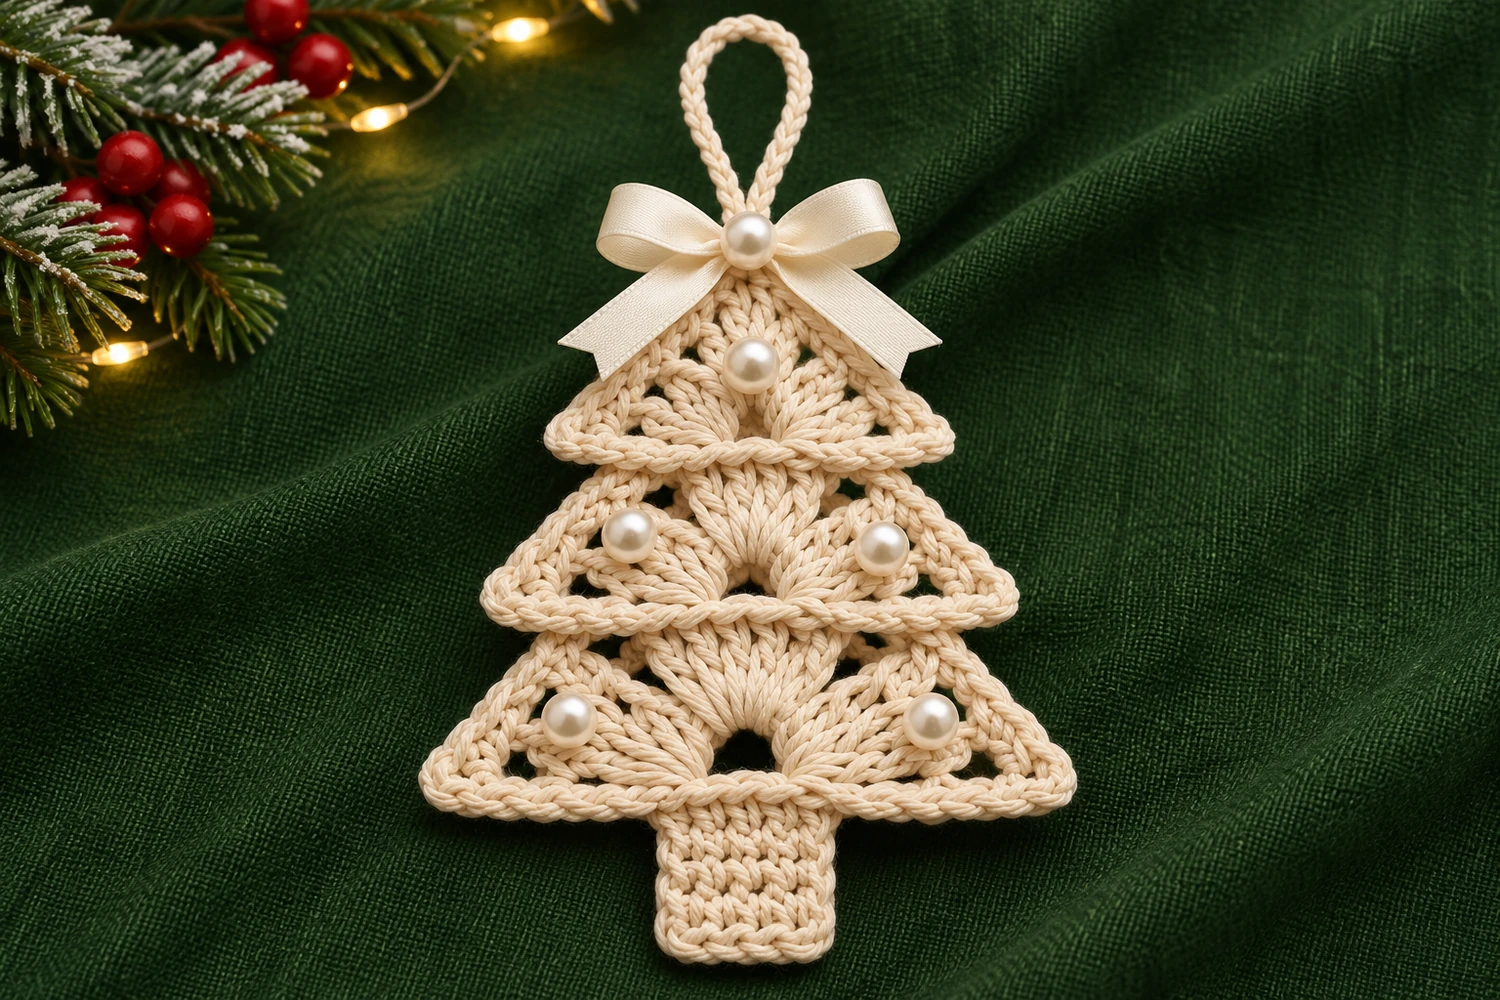
This pearl and satin crochet tree brings together three ivory lace triangles, a short cream trunk, and a soft ribbon bow. Five sewn pearls sit among the openwork fans, while one smaller pearl finishes the center of the bow at the top.
The tree is built from separate crochet pieces, which makes it easy to arrange the stepped outline before sewing. This original pattern is inspired by the reference image and is not the original recipe behind that photograph. The pearls are accessory beads and the bow is satin ribbon; neither is made from crochet stitches.
Pearl and Satin Crochet Tree Materials
- Smooth ivory or natural cream sport-weight cotton. Allow approximately 20–30 g as a planning amount, not measured consumption.
- A 2.5 mm crochet hook, adjusted to match your cotton.
- Five sew-through imitation pearls, approximately 6 mm across, for the tree; one smaller pearl, approximately 4–5 mm, for the bow.
- Ivory satin ribbon approximately ¼ inch (6 mm) wide, with enough length to tie a small bow and trim two tails.
- Matching sewing thread, a fine beading needle, a tapestry needle, scissors, markers, rustproof pins, and a blocking mat.
Skill level: Intermediate, mainly because of the orientation and layered assembly. Estimated finished size: approximately 5–6 inches (13–15 cm) tall, excluding the loop, with sport cotton. This is an estimate, not a measured sample. Your yarn and tension will change the result. The count arithmetic has been reviewed, but the pattern has not been physically tested.
Before You Begin
Choose cotton with a clear twist and an even thickness. Very fuzzy yarn hides the small spaces between the three-double-crochet groups and makes the sewn pearls harder to place neatly. Use the same yarn and hook for all three triangles and the trunk.
Work and block the crochet before adding ribbon or beads. This keeps water and pins away from the accessories and allows you to correct the shape while the pieces are still separate. Do not pull the tiers into a narrow cone; this is a flat ornament with a stepped silhouette.
The triangles are worked as small half-granny shapes. After blocking, rotate each so its central chain-space corner points upward. The edge made from the two sets of row ends becomes the horizontal lower edge. This orientation matters: the pointed corner becomes the tree tip, rather than hanging downward like a miniature shawl.
US Crochet Terms and Working Notes
- ch: chain
- sl st: slip stitch
- sc: single crochet
- dc: double crochet
- st(s): stitch(es)
- sp(s): space(s)
- MR: magic ring
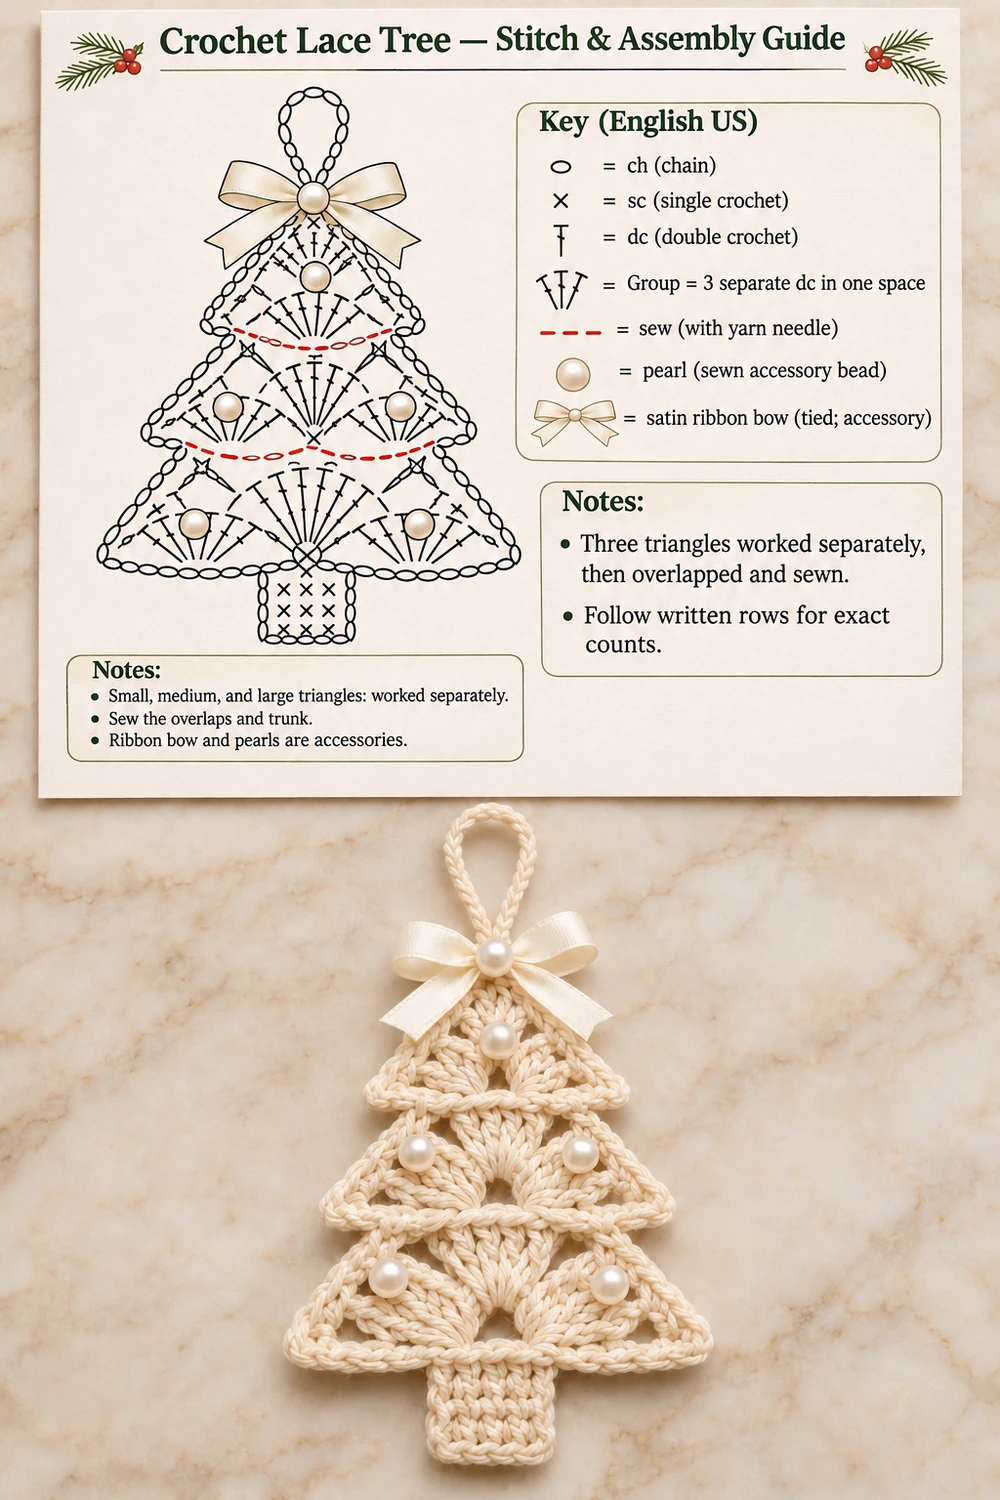
A group means three separate dc worked into the same space. Do not close them together as a cluster. The central corner is the ch-3 space between the two groups at the pointed middle of the working row. Side gaps are ch 1.
The beginning ch 3 counts as one dc. Beginning ch 1 does not count, and joining slip stitches are excluded from totals. When ending a row, the last dc is the top of the previous row’s beginning ch 3. For general US terminology, see the Craft Yarn Council abbreviation guide.
Component Counts
| Piece | Rows | Count before edging |
|---|---|---|
| Small upper triangle | 1–2 | 12 dc in 4 groups; 2 side gaps; 1 central corner |
| Medium triangle | 1–3 | 18 dc in 6 groups; 4 side gaps; 1 central corner |
| Large lower triangle | 1–4 | 24 dc in 8 groups; 6 side gaps; 1 central corner |
| Triangle edging | 1 round each | 25, 37, or 49 sc, plus one ch-2 apex space |
| Trunk | 6 rows | 7 sc per row |
| Hanging loop | 1 chain | Ch 30, sewn at the upper apex |
| Pearls | Added after blocking | 5 on the crochet and 1 on the ribbon bow |
Make one triangle of each size. All three use the same instructions below; the only difference is where you stop. Keep the pieces separate until the assembly step.
Crochet the Three Lace Triangles
Row 1: First Two Groups
With cream, make an MR. Ch 3, then work 2 dc into the ring. Ch 3 and work 3 dc into the ring. Close the ring gently and turn. (6 dc in 2 groups and 1 central ch-3 space)
The beginning chain supplies the first dc of the first group. There is no chain gap outside either end group. Leave a tail long enough to secure the ring after you have checked the shape.
Row 2: Four Groups
Ch 3, work 2 dc into the first dc. Ch 1. In the central ch-3 space work (3 dc, ch 3, 3 dc). Ch 1 and work 3 dc into the last dc of the row. Turn. (12 dc in 4 groups, 2 ch-1 gaps, and 1 central ch-3 corner)
For the small triangle, stop here and continue to the edging. The two end groups are placed into stitch tops; the middle groups are placed around the chain corner. Do not work another group into the two dc that you pass on either side.
Row 3: Six Groups
Ch 3, work 2 dc into the first dc. Ch 1, work 3 dc into the next ch-1 gap, ch 1. In the central ch-3 corner work (3 dc, ch 3, 3 dc). Ch 1, work 3 dc into the next ch-1 gap, ch 1, and work 3 dc into the last dc. Turn. (18 dc in 6 groups, 4 ch-1 gaps, and 1 central corner)
For the medium triangle, stop here and continue to the edging. There are three groups on each side of the central corner.
Row 4: Eight Groups
Ch 3, work 2 dc into the first dc. Repeat [ch 1, 3 dc in the next ch-1 gap] twice, then ch 1. In the central ch-3 corner work (3 dc, ch 3, 3 dc). Repeat [ch 1, 3 dc in the next ch-1 gap] twice, then ch 1 and work 3 dc into the last dc. Do not begin a fifth row. (24 dc in 8 groups, 6 ch-1 gaps, and 1 central corner)
This is the large triangle. Each new row adds one group at each outer end while preserving two groups at the central corner. The group totals therefore grow 2, 4, 6, and 8.
Edge Each Triangle
Fasten off the working yarn so the edging can start at a clearly identified corner. Hold the triangle with the central ch-3 corner at the top and the two row-end edges forming the lower base. Join cream at the first dc of the last completed row, at one lower outside corner.
Ch 1. Work 1 sc into each dc and 1 sc into each ch-1 side gap along the first sloping edge. At the central ch-3 corner, work (sc, ch 2, sc). Continue with 1 sc in every dc and 1 sc into each ch-1 gap along the second sloping edge.
You now reach the other lower outside corner. Work across the straight lower base: make 2 sc around each dc row end as you approach the original ring, work 1 sc into the ring area, then make 2 sc around each row end on the remaining half of the base. Join to the first edging sc with a sl st.
The small triangle has two row ends on each half of the base, the medium has three, and the large has four. Their base counts are therefore 9, 13, and 17 sc. Their two sloping edges and apex contain 16, 24, and 32 sc. Total edging counts are 25, 37, and 49 sc, plus the ch-2 apex space.
Do not add extra corner stitches beyond this allocation. The corner will soften naturally when the cotton is blocked. Fasten off with a generous tail, and weave in the foundation-ring tail securely on the back.
Make the Short Cream Trunk
Ch 8. Row 1: sc in the second ch from the hook and in each remaining chain. Turn. (7 sc)
Rows 2–6: ch 1, sc in each of the 7 sts. Turn after each row. Fasten off with a long sewing tail. (7 sc per row)
The trunk stays flat and unstuffed. Its upper edge will be hidden behind the bottom tier. Keep the visible portion fairly short so it supports the tree shape without becoming a long hanging stem.
Block and Arrange the Layers
Dampen the four crochet pieces according to the cotton’s care label. Pin each triangle with its central corner pointing upward and its base horizontal. Keep the two side lengths balanced, open the chain gaps gently, and let the fabric dry completely.
Place the large triangle at the bottom, right side up. Set the medium triangle above it, overlapping enough to hide the upper point of the large triangle. Place the small triangle above the medium in the same way. Keep the upper apexes on one vertical center line.
The lower edge of each upper tier should remain visible across the tier below it. Adjust the overlap before sewing so the left and right branch tips step outward evenly. There is no fixed overlap measurement because the finished size depends on your yarn; use the blocked pieces themselves to determine a balanced arrangement.
Sew the Tree Together
Pin the medium tier to the large tier. On the back, sew the overlapping upper portion with several small matching stitches through solid dc groups. Keep the exposed lower edge of the medium tier free so it retains its raised outline. Do not sew across an open chain gap with a long visible strand.
Repeat for the small tier. Check from the front after each attachment. The tree should lie flat while the lower edges show a little layered depth; pulling the sewing yarn too tight will cup the ornament.
Center the trunk behind the lower base of the large tier. Overlap its upper edge by approximately two rows of the trunk and sew it securely to the back. Stitch across the overlap more than once, then secure and bury the tail. The remaining trunk rows show beneath the tree.
These joins are sewing, not a continuation of the granny rows. The pieces are intentionally made separately so their placement can be adjusted before the final stitches are secured.
Add the Five Body Pearls
Lay the tree flat and arrange five sew-through imitation pearls on the front: one on the small tier, two on the medium tier, and two on the large tier. Place the paired beads to the left and right, leaving the center lace openings visible.
Thread a fine needle with matching sewing thread. Bring it through a firm crochet group behind a pearl, pass through the bead, and return through the fabric. Repeat several times, then secure the thread on the back. Do not rely on a single pass or sew only around one loose chain.
The pearls are separately purchased beads, not bobble stitches. Use beads with holes that accept the needle and thread without forcing them. For a bead-free display version, omit them; the crochet instructions and counts remain the same.
Tie the Satin Bow
Tie a small bow in the ivory satin ribbon. Adjust the two loops until they are balanced and trim the tails on a diagonal. Keep the bow narrow enough that the small upper tier still shows below it.
Sew the bow’s knot to the front of the tree just below the upper apex. Then sew the sixth, smaller pearl through the bow center, catching the knot and the supporting crochet behind it. Use separate securing stitches for the bow and pearl so one attachment does not depend on the other.
The bow is tied ribbon. Do not crochet a substitute bow and describe it as the same construction. Avoid glue as the only attachment, especially on the smooth satin and pearl surfaces.
Attach the Crochet Hanging Loop
With cream, ch 30. Fasten off with tails at both ends. Bring the two ends together to form a loop and sew them behind the upper apex, above the ribbon bow. Pass through several strong crochet stitches and reinforce the attachment before burying the tails.
The loop should carry the ornament’s weight through the crochet, rather than through the ribbon or pearl. Hold it gently to check that the tree hangs upright. Move the attachment slightly if the layers lean to one side.
Troubleshooting the Lace Tree
The Triangle Is Facing the Wrong Way
Find the central ch-3 corner of the last row. After edging, this becomes the ch-2 apex. Point that corner upward. The two sets of row ends form the bottom base; they should not be placed along the outside sloping edges.
The Tiers Do Not Look Graduated
Check the stopping rows: two rows for the small piece, three for the medium, and four for the large. Their final group counts are four, six, and eight. If two triangles have the same number of groups, one has been stopped at the wrong row.
The Lower Edges Pull Inward
Count the row-end stitches on the base and keep them relaxed. There should be two sc around every dc row end plus one at the ring center. Avoid catching only a thin strand of a turning chain. If the count is correct, reshape the base gently while damp.
The Pearls Drag the Lace Down
Use lighter imitation pearls and anchor them through solid dc groups. Add them only after the tree has been sewn together and blocked. A large heavy bead placed in an open gap can distort the whole tier.
Care and Storage
Keep the ornament dry and store it flat without heavy objects pressing on the bow. Spot-clean the cotton gently when necessary, following both the yarn and ribbon care instructions. Avoid soaking beads unless their finish is suitable for water, and let the ornament dry fully before storage.
This is a decorative piece with small sewn accessories and a long loop. Keep it away from young children and inspect the bead, bow, and hanger attachments before each display season.
More Christmas Crochet Ideas
The White Pearl Crochet Tree uses another shell arrangement with a lower ribbon accent. For a different openwork silhouette, try the Snowflower Lace Crochet Tree. The Holly Heart Crochet Keychain is a small sewn-assembly project for the same festive season.