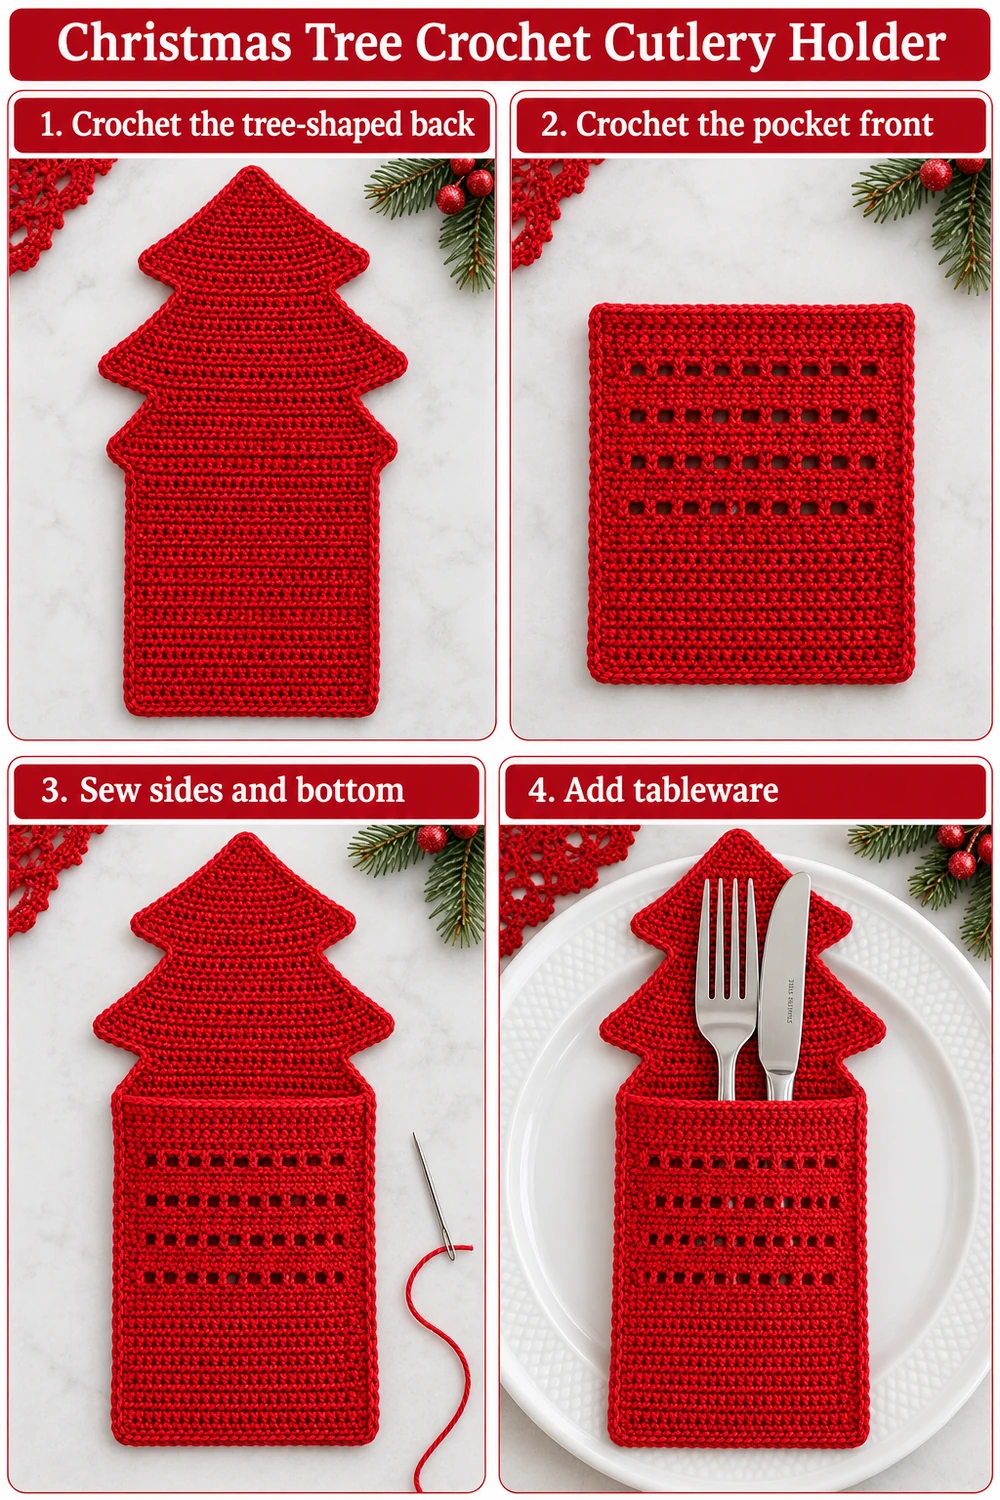
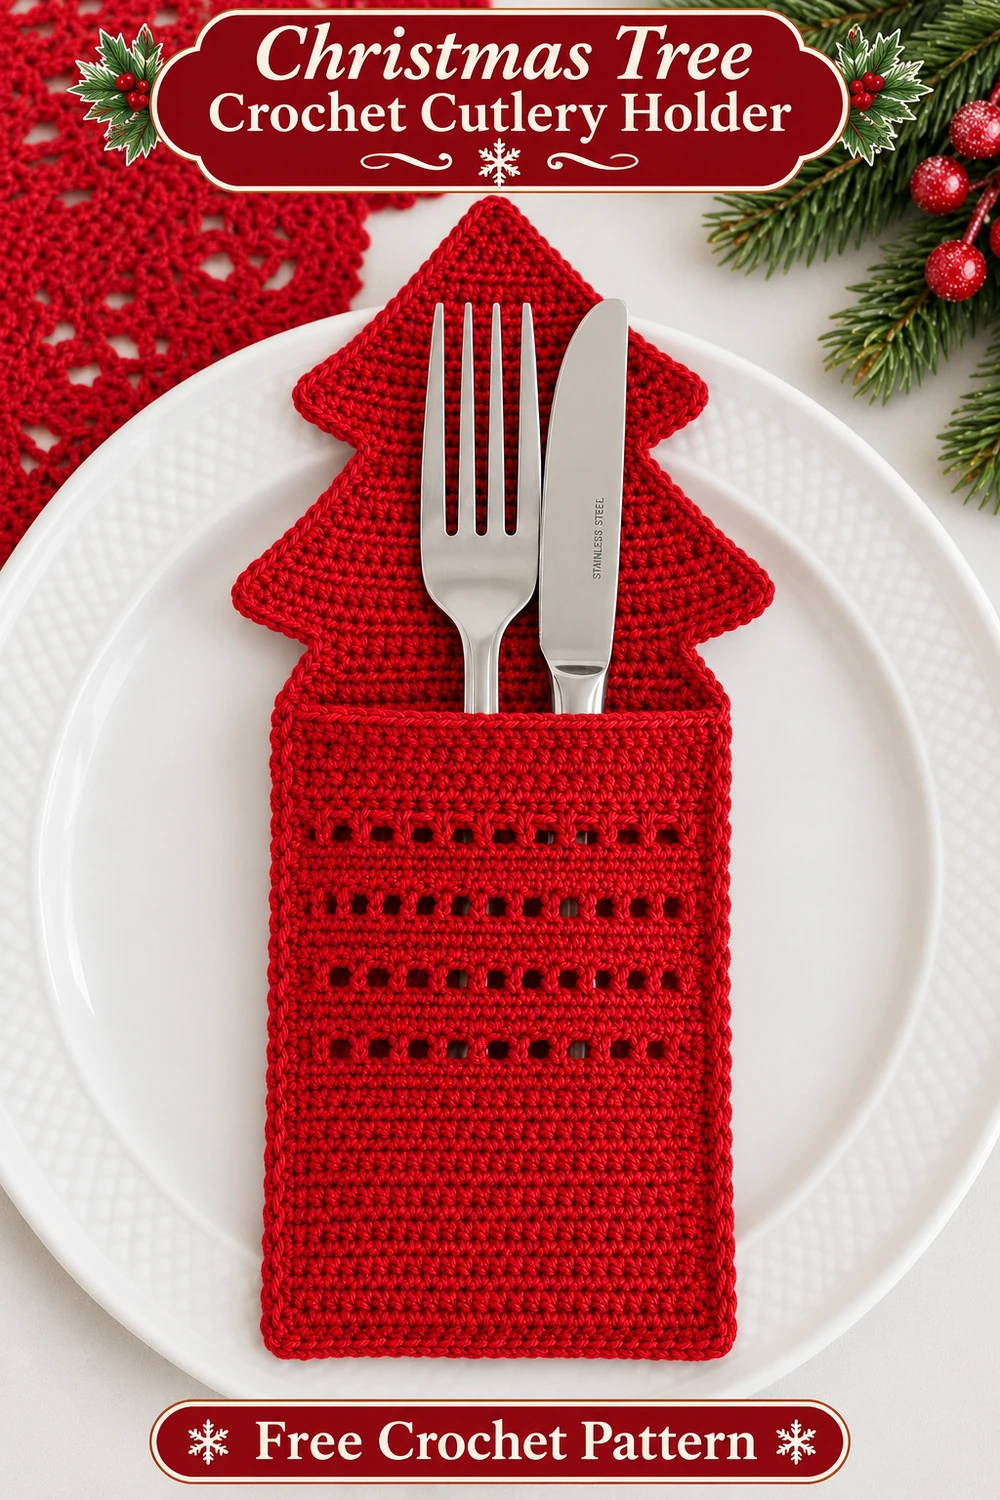
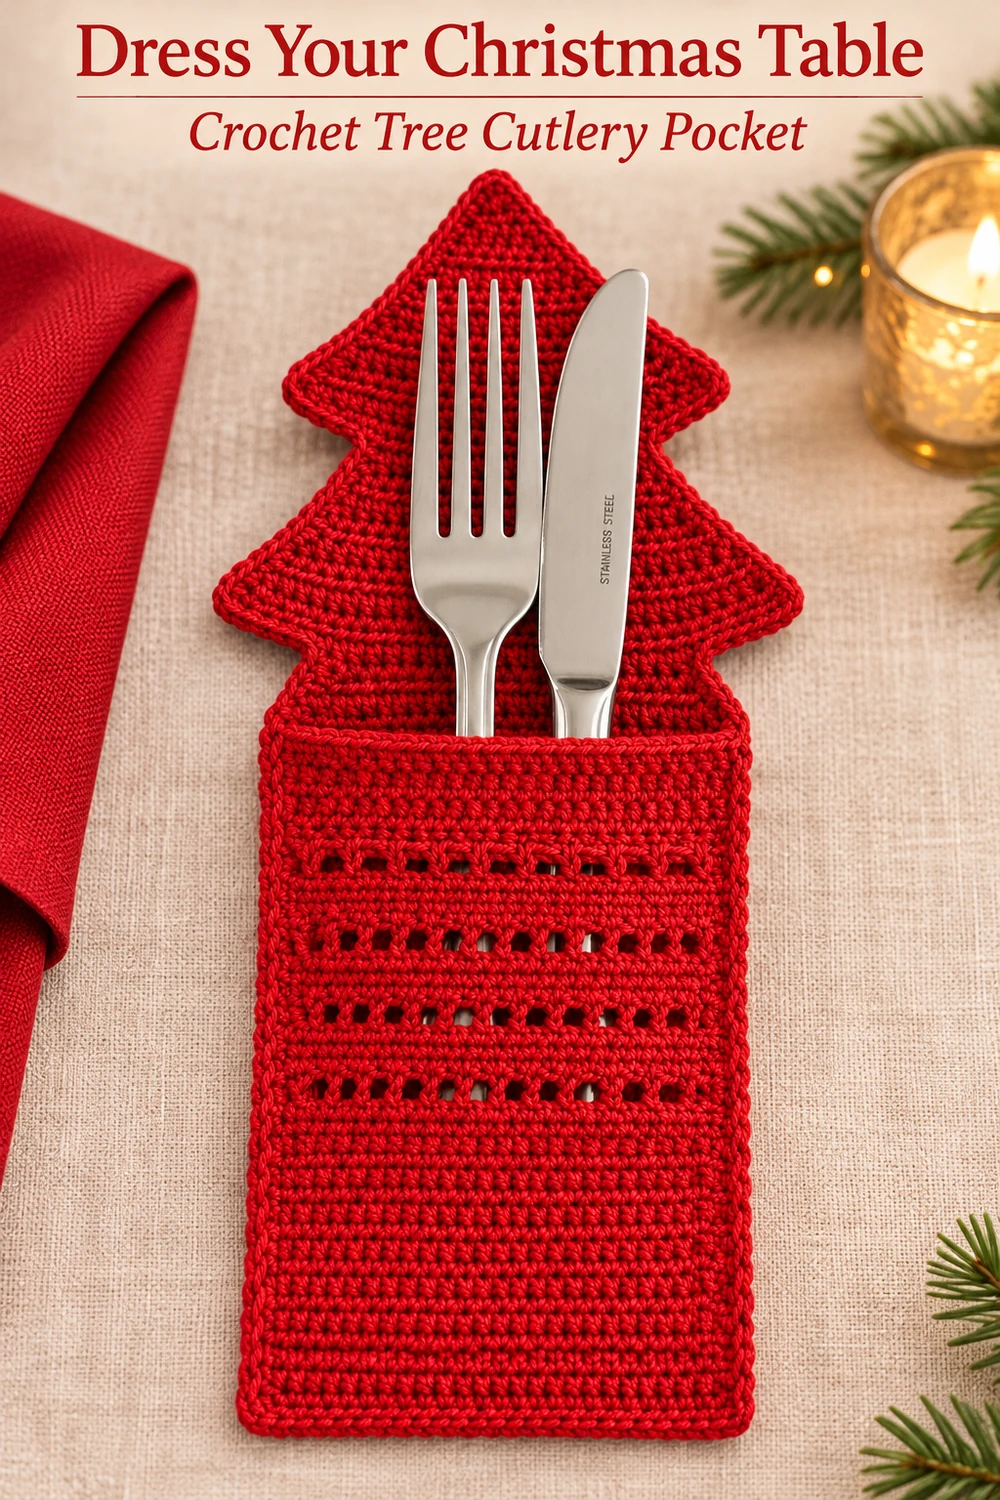
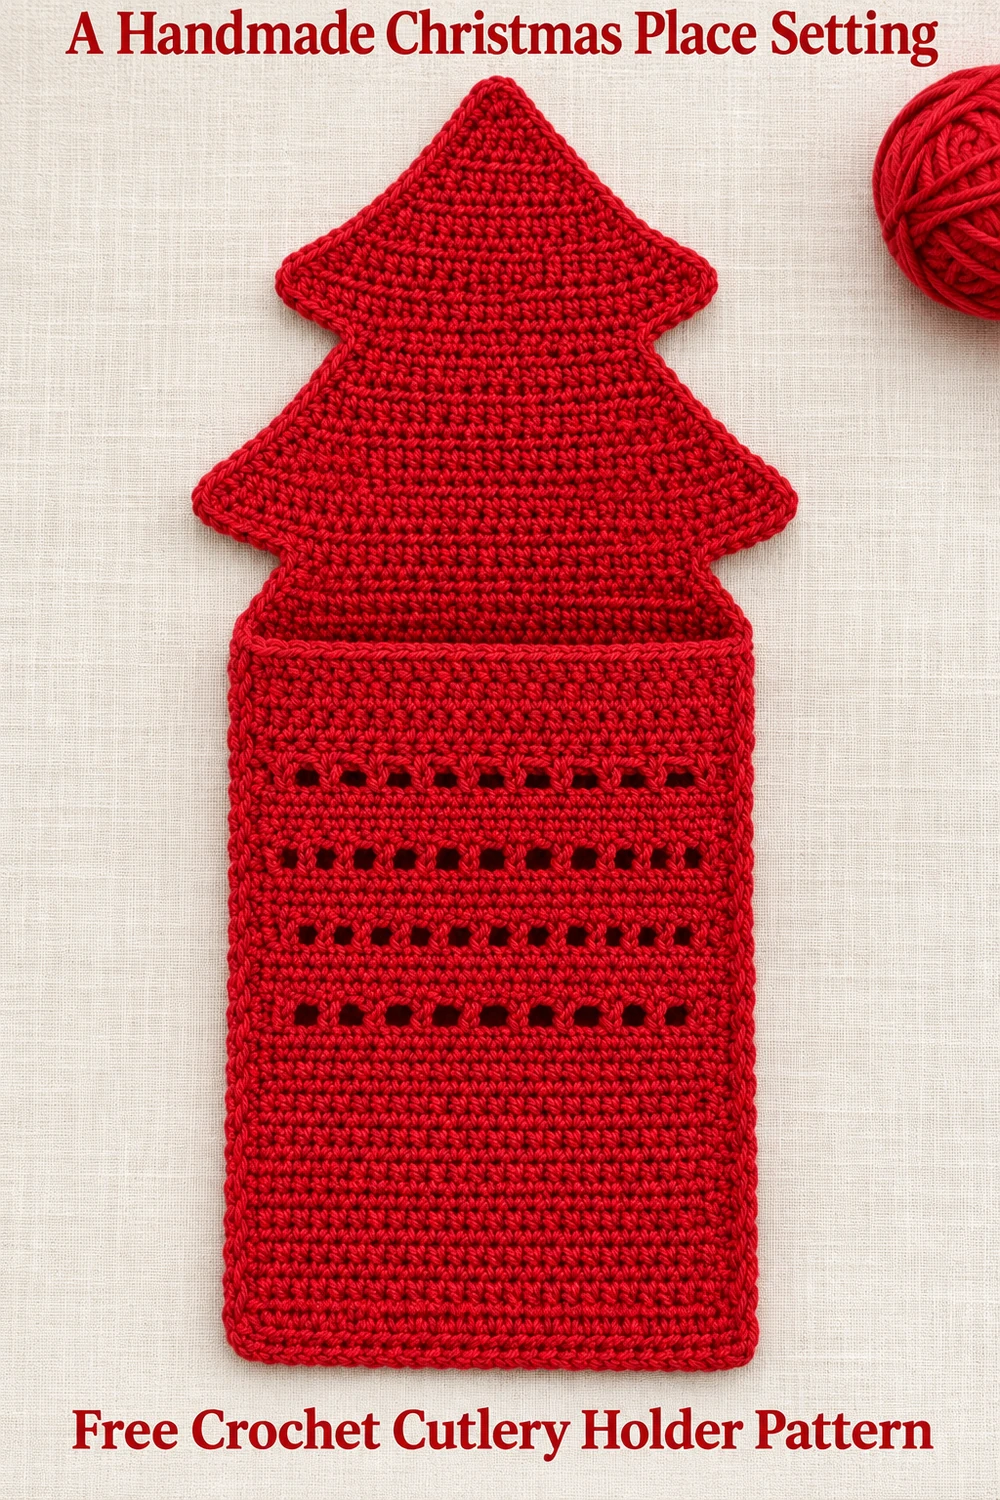
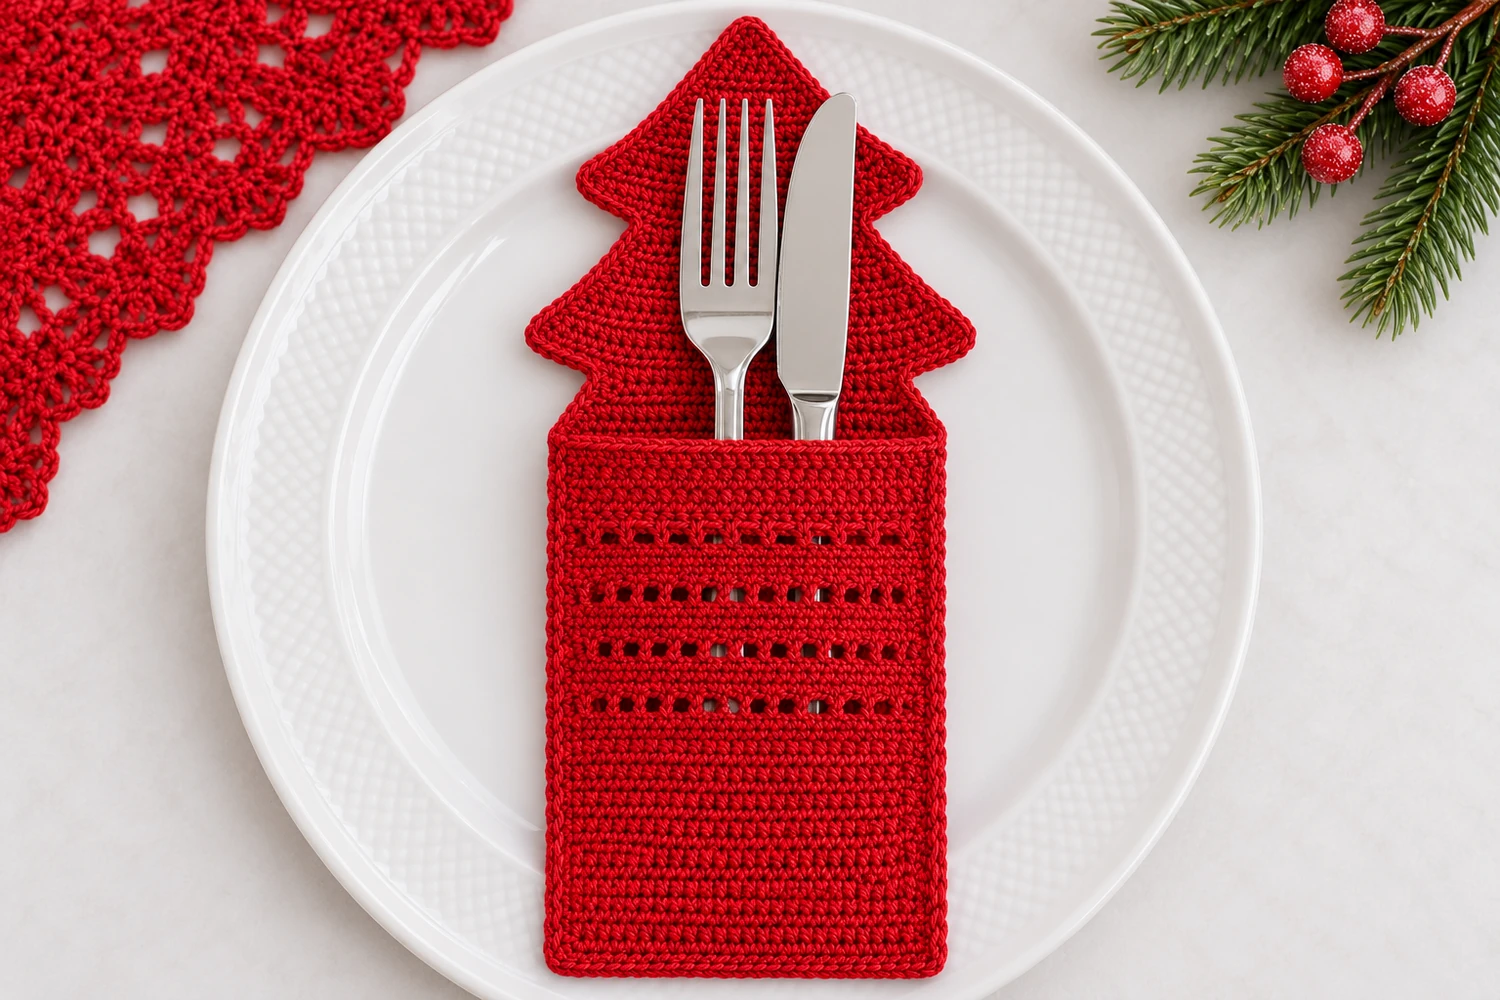
This Christmas tree crochet cutlery holder adds a bright red pocket to a festive place setting. A pointed, stepped tree rises behind the silverware, while four rows of little eyelets break up the solid fabric on the front.
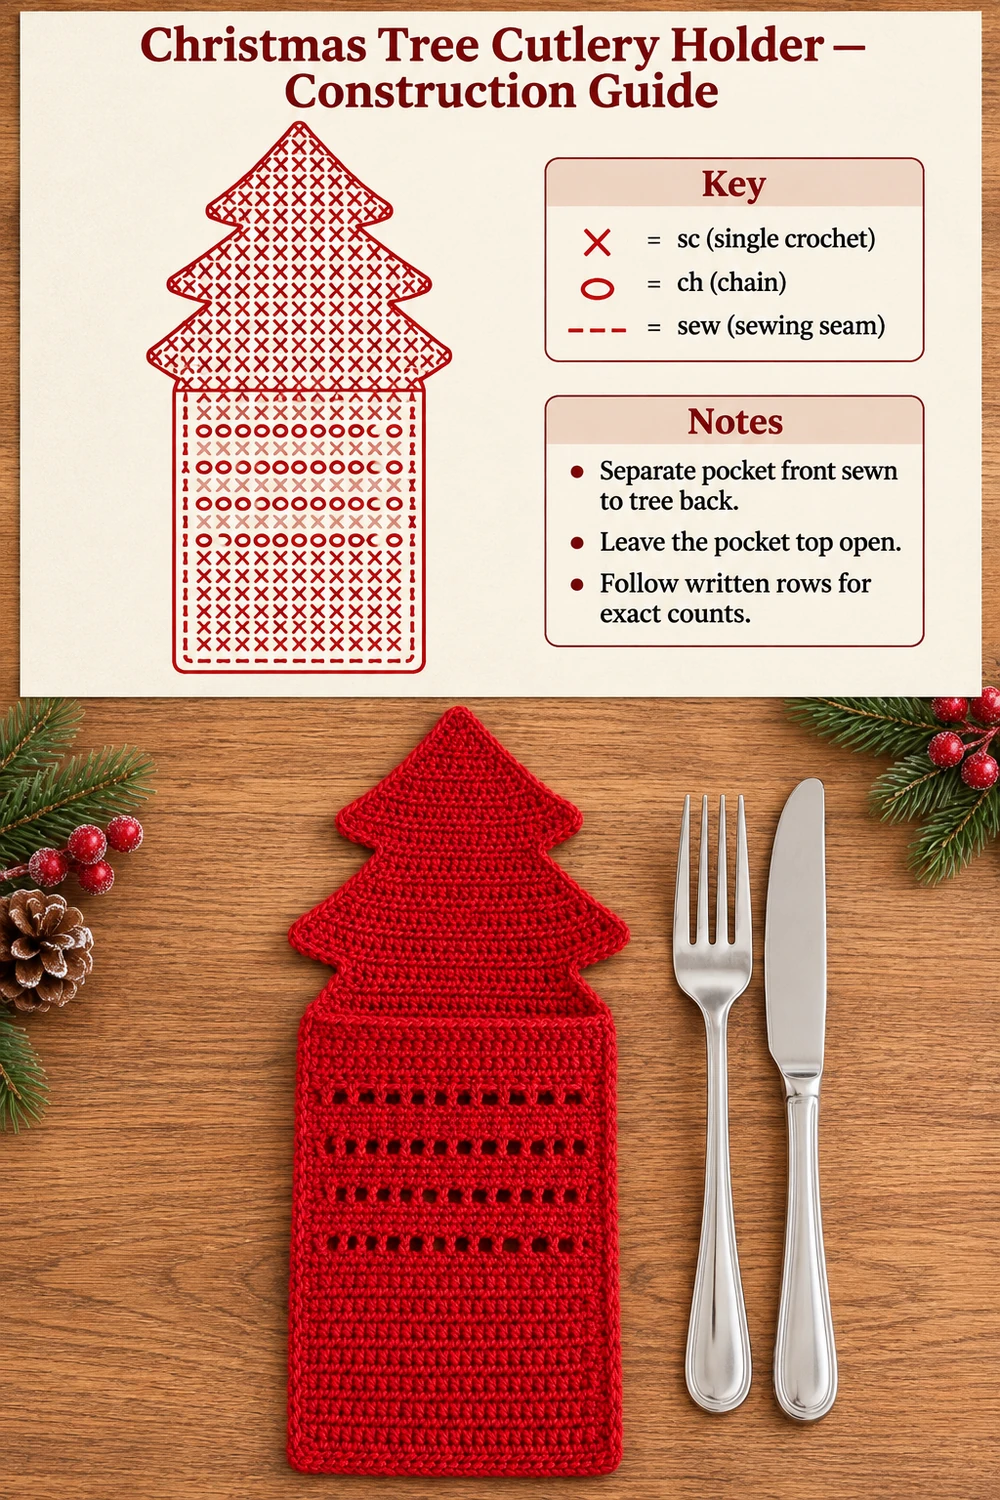
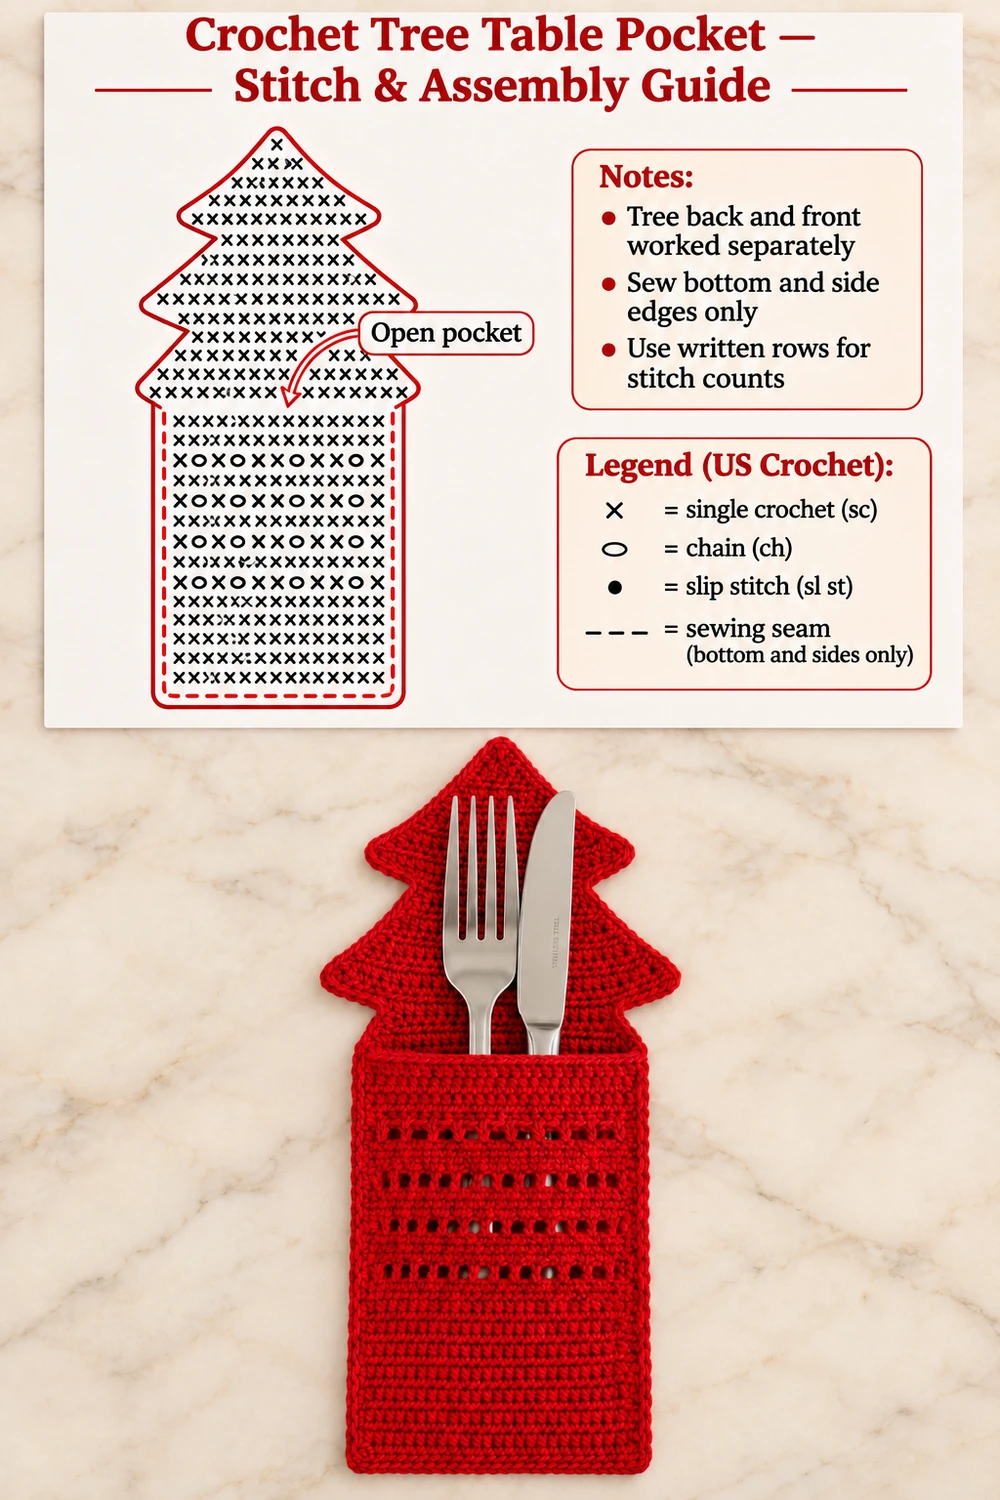
The holder has two separate pieces: a solid tree-shaped back and a rectangular pocket front. Sew the sides and bottom together and leave the upper edge open for the utensil handles. This original pattern is inspired by the reference photograph; it is not the original recipe behind that image. The fork, knife, and plate are styling props, not crochet components.
Christmas Tree Crochet Cutlery Holder Materials
- Smooth red sport-weight or light DK cotton. Allow approximately 50–70 g as a planning quantity, not measured consumption.
- A 2.75 mm crochet hook, or a hook that gives your yarn a firm, flexible fabric.
- Tapestry needle, scissors, removable stitch markers, rustproof pins, and a blocking mat.
- The tableware you intend to display, for checking the pocket before sewing.
Difficulty: Intermediate. Most of the crochet is single crochet; the tree changes width twice, and the pocket has simple chain eyelets. Estimated size: approximately 4–4½ inches (10–11.5 cm) across the pocket and 8–10 inches (20–25 cm) tall. These are estimates, not measurements from a sample. Yarn, hook, and tension determine the actual dimensions. The arithmetic has been checked, but the pattern has not been physically tested.
Before You Begin
Choose a smooth cotton with enough body to keep the tree tips defined. A loose fabric can sag around the utensil handles, while a very stiff fabric makes the pocket difficult to open. Use the same hook and yarn for both panels so their widths and row heights match.
Make a short 31-stitch swatch if you are unsure of the width. Lay your intended fork and knife handles together on it, leaving room at both sides for the seams. The utensils should slide into the pocket easily without stretching the fabric. Adjusting yarn or hook before making the panels is simpler than adding width afterward.
The back is worked from the tree tip downward. After the three branch sections, continue into a long rectangle. The separate pocket front is worked from its bottom upward. During assembly, its final row faces the tree and its foundation row meets the bottom of the back.
US Crochet Terms
- ch: chain
- sl st: slip stitch
- sc: single crochet
- inc: 2 sc in the same stitch
- st(s): stitch(es)
- sp: space
- RS / WS: right side / wrong side
Ch 1 at the beginning of a row never counts as a stitch. Work the first sc into the first actual stitch, not into the turning chain. Turn after every row unless the instructions say to fasten off.
When a row begins with an increase and ends with an increase, its stitch count grows by two. A chain eyelet replaces one skipped stitch with one chain. The Craft Yarn Council abbreviation guide explains the standard US terms.
Counts at a Glance
| Section | Rows | Count |
|---|---|---|
| Tree tip | 1–2 | 1 sc, then 3 sc |
| Upper branches | 3–10 | 5, 7, 9, 11, 13, 15, 17, 19 sc |
| Middle section restart | 11 | 11 sc centered over the previous 19 |
| Middle branches | 12–19 | 13, 15, 17, 19, 21, 23, 25, 27 sc |
| Lower section restart | 20 | 19 sc centered over the previous 27 |
| Lower branches | 21–28 | 21, 23, 25, 27, 29, 31, 33, 35 sc |
| Rectangular back | 29–66 | 31 sc per row; 38 rows total |
| Pocket front | 1–38 | 31 positions across each row |
| Eyelet rows | 19, 23, 27, 31 | 16 sc and 15 ch-1 spaces per row |
Mark the first row of the rectangular back and the final row of the pocket front. These two edges align at the opening when the panels are joined.
Crochet the Solid Tree-Shaped Back
Rows 1–10: Upper Branch Section
Row 1: ch 2. Sc in the second ch from the hook. Turn. (1 sc)
Row 2: ch 1, work 3 sc into the single stitch. Turn. (3 sc) This special increase starts the pointed tip without needing two separate end stitches.
Rows 3–10: ch 1, inc in the first st, sc in every st up to the last st, inc in the last st. Turn after each row. Counts are 5, 7, 9, 11, 13, 15, 17, and 19 sc. Fasten off after Row 10.
Do not continue increasing directly into the next section. The restart below creates the inward step between branch tiers. Keep a marker in each outer end stitch of Row 10 until you have located the centered restart.
Rows 11–19: Middle Branch Section
Row 11: with the same face of the work toward you, count four stitches inward from one end of Row 10. Join red in the fifth stitch. Ch 1, sc in that same stitch and in the next 10 stitches. Leave four stitches unworked at the other end. Turn. (11 sc)
The placement uses the central 11 stitches of 19: 4 unworked + 11 worked + 4 unworked = 19. The exposed end stitches form the underside of the upper branch tips.
Rows 12–19: ch 1, inc in the first st, sc in every st up to the last st, inc in the last st. Turn after each row. Counts are 13, 15, 17, 19, 21, 23, 25, and 27 sc. Fasten off after Row 19.
Rows 20–28: Lower Branch Section
Row 20: count four stitches inward from one end of Row 19 and join red in the fifth stitch. Ch 1, sc in that same stitch and in the next 18 stitches. Leave four stitches unworked at the far end. Turn. (19 sc)
Rows 21–28: ch 1, inc in the first st, sc in every st up to the last st, inc in the last st. Turn after each row. Counts are 21, 23, 25, 27, 29, 31, 33, and 35 sc. Fasten off after Row 28.
There are now three pairs of branch tips. Lay the panel flat with its single-stitch foundation at the top and check that the side steps match. If a restart is one stitch off center, correct it before making the rectangle.
Rows 29–66: Rectangular Backing
Row 29: skip the first 2 stitches of Row 28 and join red in the third stitch. Ch 1, sc in that stitch and in the next 30 stitches. Leave the last 2 stitches unworked. Turn. (31 sc)
Rows 30–66: ch 1, sc in each of the 31 stitches. Turn after each row. (31 sc per row) Fasten off with a generous tail. Rows 29–66 make 38 rectangular rows in total.
The unworked two-stitch ledges at each side of Row 28 mark the lower branches above the pocket. There is no separate trunk beneath the rectangle in this design.
Crochet the Pocket Front
This rectangle has the same 31-stitch width and 38-row height as the rectangular part of the back. Work it separately so the upper edge remains a true pocket opening.
Row 1: ch 32. Sc in the second ch from the hook and every remaining chain. Turn. (31 sc)
Rows 2–18: ch 1, sc in each of the 31 stitches. Turn. (31 sc per row) These solid rows form the lower portion of the pocket.
First Eyelet Band
Row 19: ch 1, sc in the first st. Repeat [ch 1, skip 1 st, sc in the next st] 15 times. Turn. (16 sc and 15 ch-1 spaces)
Row 20: ch 1, sc in the first sc. Repeat [sc around the next ch-1 space, sc in the next sc] 15 times. Turn. (31 sc)
Rows 21–22: ch 1, sc in every st. Turn. (31 sc per row)
Remaining Eyelet Bands
Row 23: repeat Row 19. (16 sc and 15 spaces)
Row 24: repeat Row 20. (31 sc)
Rows 25–26: sc in each st, beginning with ch 1 and turning after every row. (31 sc)
Row 27: repeat Row 19. (16 sc and 15 spaces)
Row 28: repeat Row 20. (31 sc)
Rows 29–30: ch 1, sc in each st, turn. (31 sc)
Row 31: repeat Row 19 for the fourth and final eyelet band. (16 sc and 15 spaces)
Row 32: repeat Row 20. (31 sc)
Rows 33–38: ch 1, sc in each st, turn. (31 sc per row) Fasten off. The seven solid rows after the last eyelet row create a firm upper rim.
Each eyelet row preserves 31 positions: 16 single crochet stitches plus 15 chains. In the next row, work around each chain opening rather than skipping it. Missing those openings would reduce the width to 16 stitches.
Block the Panels and Check the Fit
Weave in the short starting and restart tails on the back of the tree. Keep the long finishing tails available for sewing if their length is sufficient. Dampen both panels according to the cotton’s label and pin the rectangles to matching dimensions.
Shape the tree tip and six branch tips gently. Do not stretch the stepped edges until their stitches open into large gaps. Keep the long sides of the rectangle parallel and the pocket rim level. Let both pieces dry completely.
Place the front over the lower rectangle of the tree back, with the intended outer faces showing. The pocket’s foundation edge meets the bottom of the back; its Row 38 meets the top of the backing rectangle at Row 29. Pin both sides and the bottom.
Before sewing, slide the intended utensil handles between the layers. Their handles should fit without forcing the front outward. If the fit is too tight, change the yarn or hook and remake matching panels; do not simply stretch the pocket over the utensils and sew it under tension.
Sew the Pocket Sides and Bottom
Thread a tapestry needle with a comfortable length of matching red yarn. Starting at one upper pocket corner, sew down the first long side using small whip stitches through the corresponding edge strands of both panels. Match one front row to one back row.
Continue across the bottom, matching the 31 front foundation positions to the 31 stitches of the back’s final row. Sew up the second side in the same way. Keep the stitching snug enough to close the sides but loose enough that the edges remain flat.
Leave the entire upper pocket edge open. Do not sew across Row 38 of the front. Add a few reinforcing stitches at each upper side corner, where the pocket will be opened repeatedly. Secure the tail and weave it through several nearby stitches on the inside.
The pocket joins are sewing stitches, not crochet increases. No folding is needed: the two rectangles are already the required height. The back’s tree-shaped upper section stays single-layered above the pocket.
Finish the Tree Outline
Join red at a lower outside corner. Ch 1 and work a fine sc border around the holder’s outside perimeter. Along the sewn rectangle sides, catch both panel edges and work one sc at each matching pair of row ends. Across the bottom, work through both layers.
Above the pocket, follow the single-layer tree outline. Work one sc around each sc row end and one sc into each exposed horizontal ledge stitch. At an outward branch tip, add two extra sc at the turning point so the border rounds that point without pulling. At the top apex, work 3 sc into the tip area.
At each inward step, keep the border close to the fabric and do not bridge across the notch with a loose chain. Work 3 sc at each lower rectangle corner. Join to the first border sc and fasten off. The edge pickup locations depend on the precise seam placement; the fixed construction counts are the panel rows listed above.
Do not continue across the pocket opening while making this perimeter border. The opening already has its solid single-crochet rim. Keep the edging narrow and all red, as in the reference.
Using the Holder at the Table
Place the holder on a plate or beside it with the tree pointing upward. Insert clean utensil handles into the pocket, leaving the working ends visible. A fork and a table knife make a simple setting; avoid overfilling the pocket or pushing sharp tips through the eyelets.
The holder is for arranging tableware, not for protecting hands or surfaces from heat. Remove the utensils before lifting or washing the crochet. If you are making a set, finish one holder first and check it against your own tableware before repeating the pattern.
Troubleshooting
The Branch Tiers Are Uneven
Check the restart rows. Row 11 leaves four stitches unworked at both ends of a 19-stitch row; Row 20 leaves four at both ends of a 27-stitch row. Row 29 leaves two at both ends of the 35-stitch row. Unequal skips shift the center line.
The Pocket Narrows after an Eyelet Row
Count 16 sc and 15 chain spaces in the eyelet row, then return to 31 sc by working into both types of location. The beginning ch 1 is not an extra stitch. Put a marker in each end stitch if the holes make the edges difficult to follow.
The Upper Rim Flops Forward
Make sure the last seven rows are solid and the two top seam corners are reinforced. A hook that is too large for the yarn can make the whole pocket limp. Use firmer fabric rather than sewing the opening shut or adding an unrequested fastening.
The Side Seams Pucker
Match the 38 front rows to the 38 backing rows and loosen any overly tight sewing stitches. Do not gather several rows into one stitch near the rim. Block matching panels before sewing instead of trying to force different sizes together.
Care and Storage
Wash according to the yarn label, shape the empty pocket while damp, and dry flat. Test unfamiliar red yarn for color transfer before placing it on pale linens or plates. Avoid high heat that could flatten the texture or shrink the cotton unevenly.
Store the holders flat, with the tree tips supported. Check that the seams remain secure before the next use. A loose upper-corner seam is easier to repair before it spreads down the side of the pocket.
More Christmas Crochet for Your Home
For coordinating motifs, try the Lace Medallion Christmas Square or the Holly and Berries Granny Square. The Pearl and Satin Crochet Tree offers a smaller hanging tree for the same festive room.