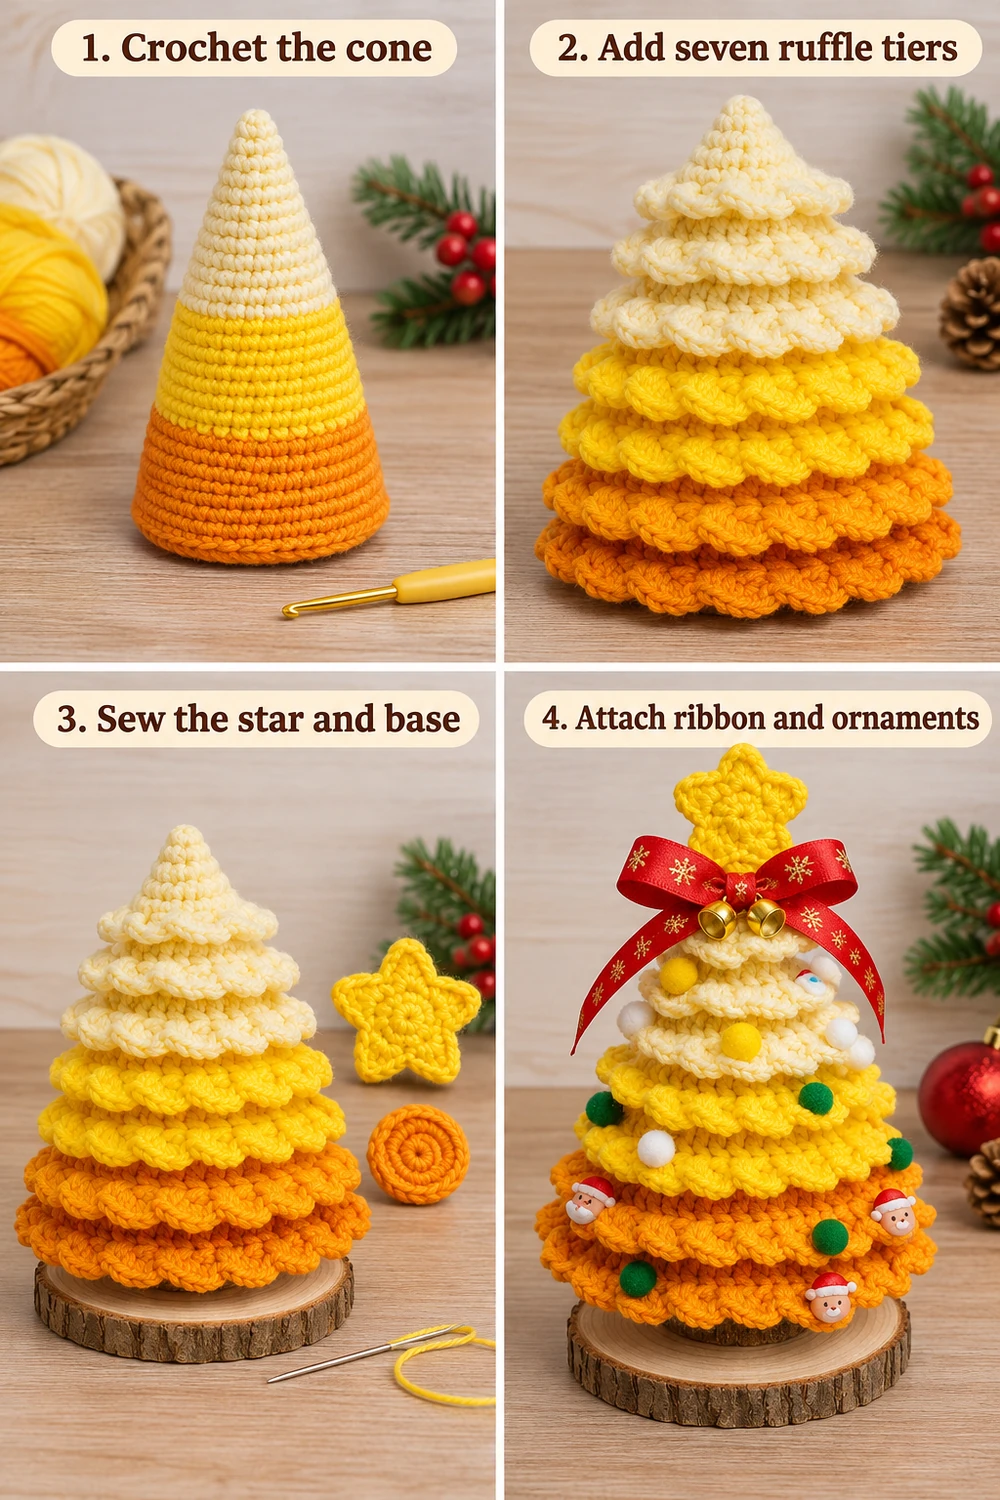
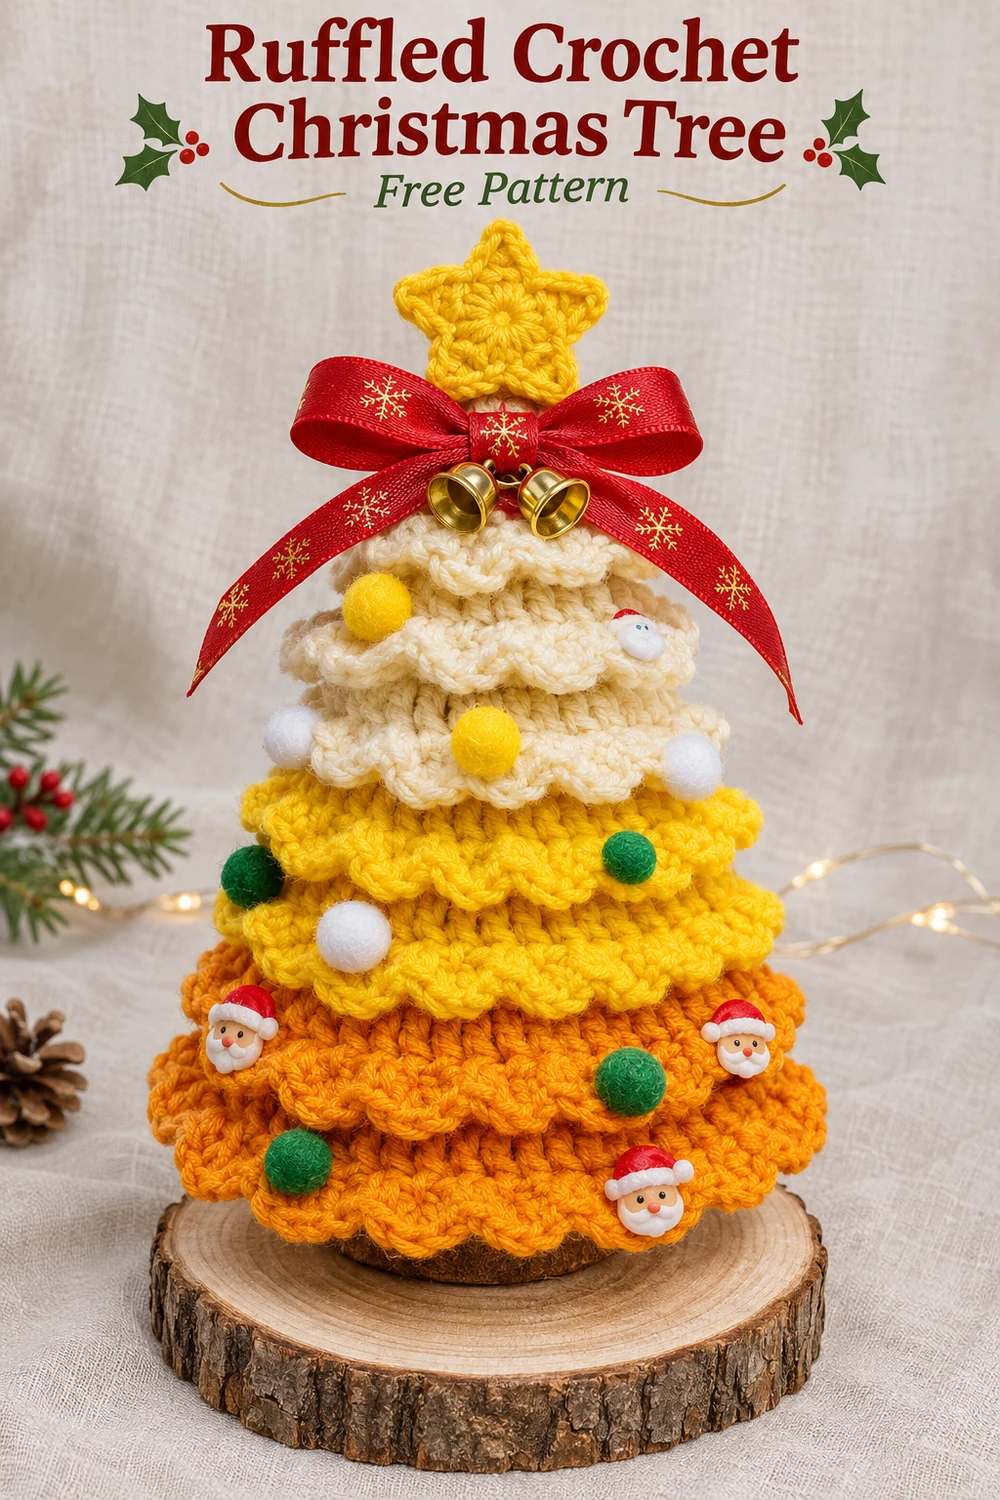
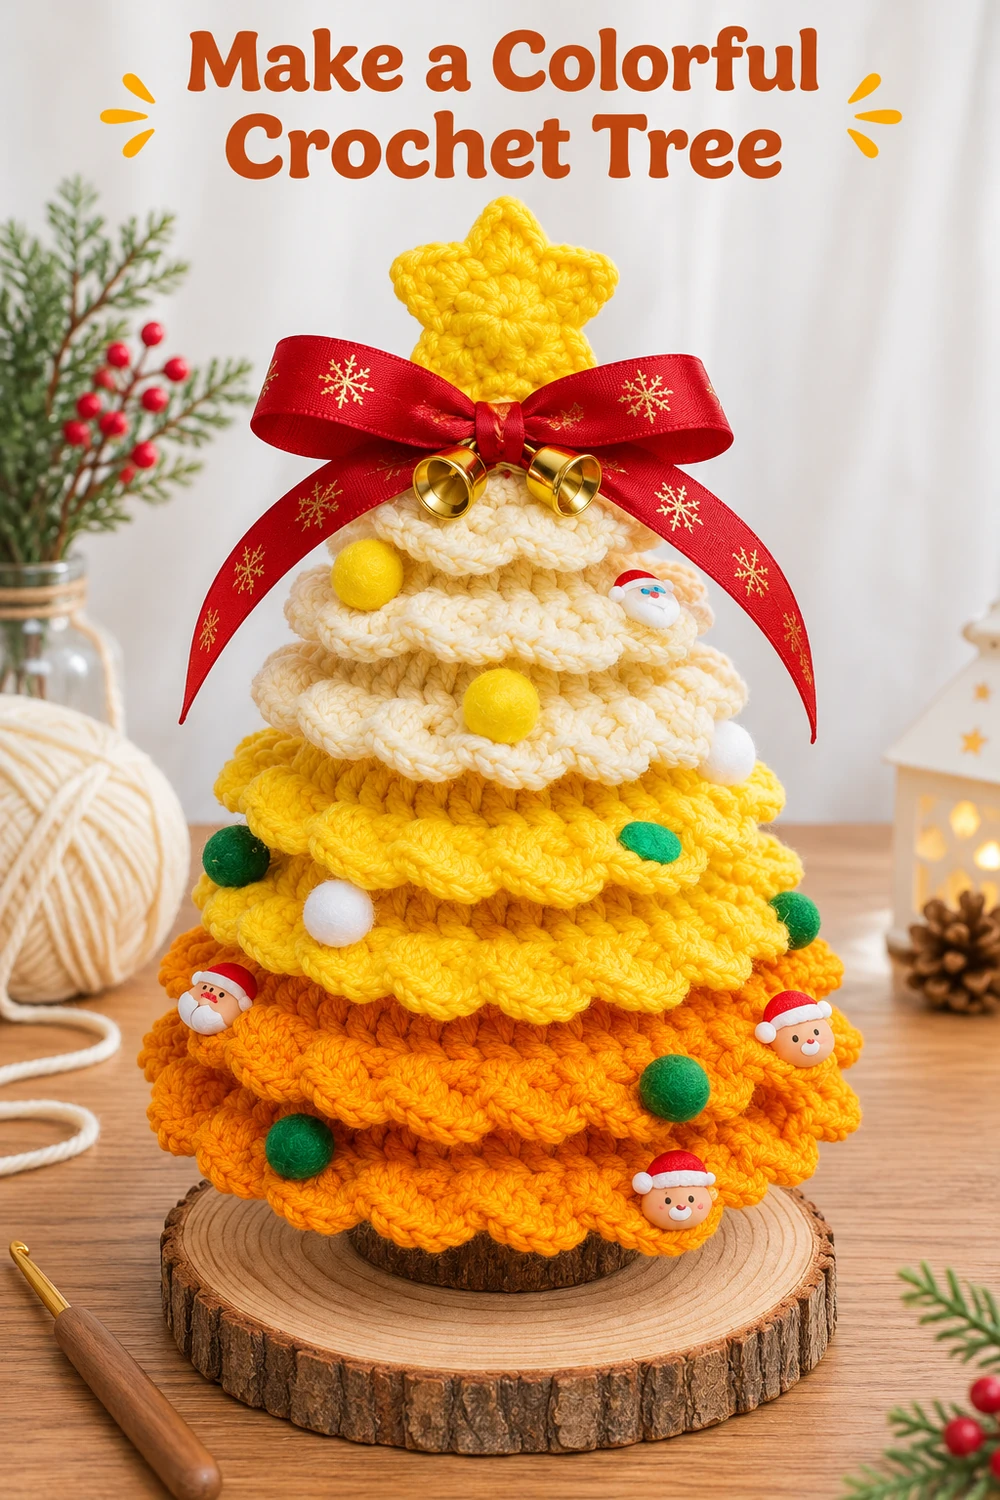
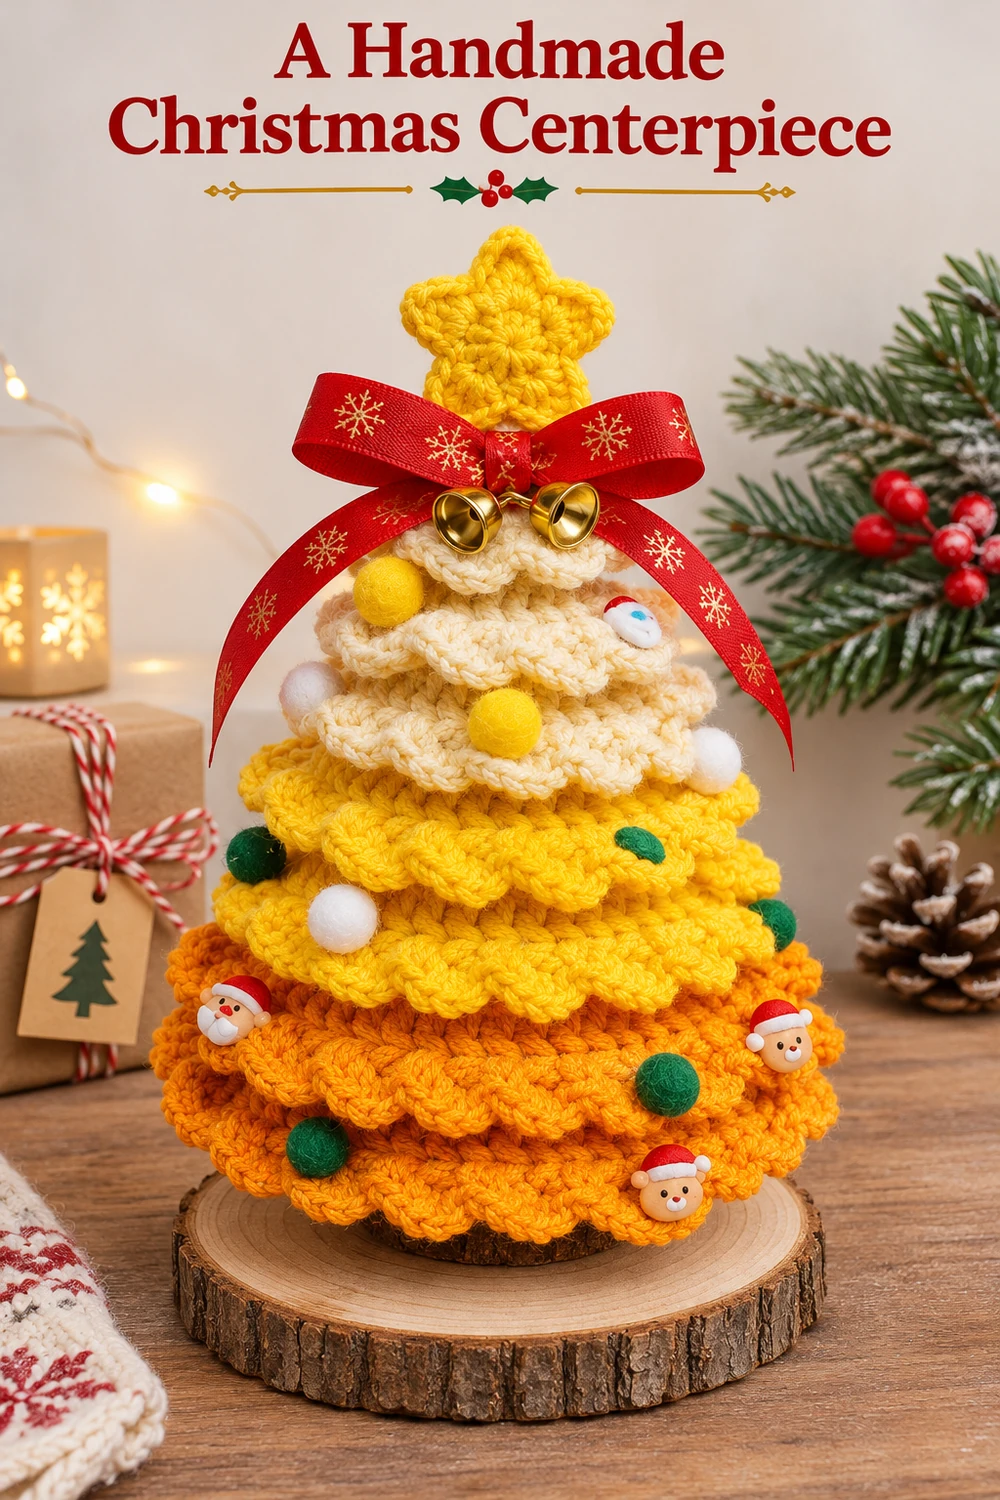
This ruffled crochet Christmas tree brings a warm burst of color to a holiday table. Cream branches at the top shade into sunny yellow and golden orange, while a crocheted yellow star, a red ribbon bow, and two little gold bells finish the silhouette. The scalloped layers overlap like soft branches rather than separate stacked disks.
The construction starts with one stuffed crochet cone. Seven decorative rounds are added to loops reserved on its surface, so the layers stay attached without sewing seven skirts together. This is an original pattern inspired by the supplied reference, not the photographer’s pattern. Counts have been checked mathematically; the pattern has not been physically tested. The styled images are generated illustrations of the intended result.
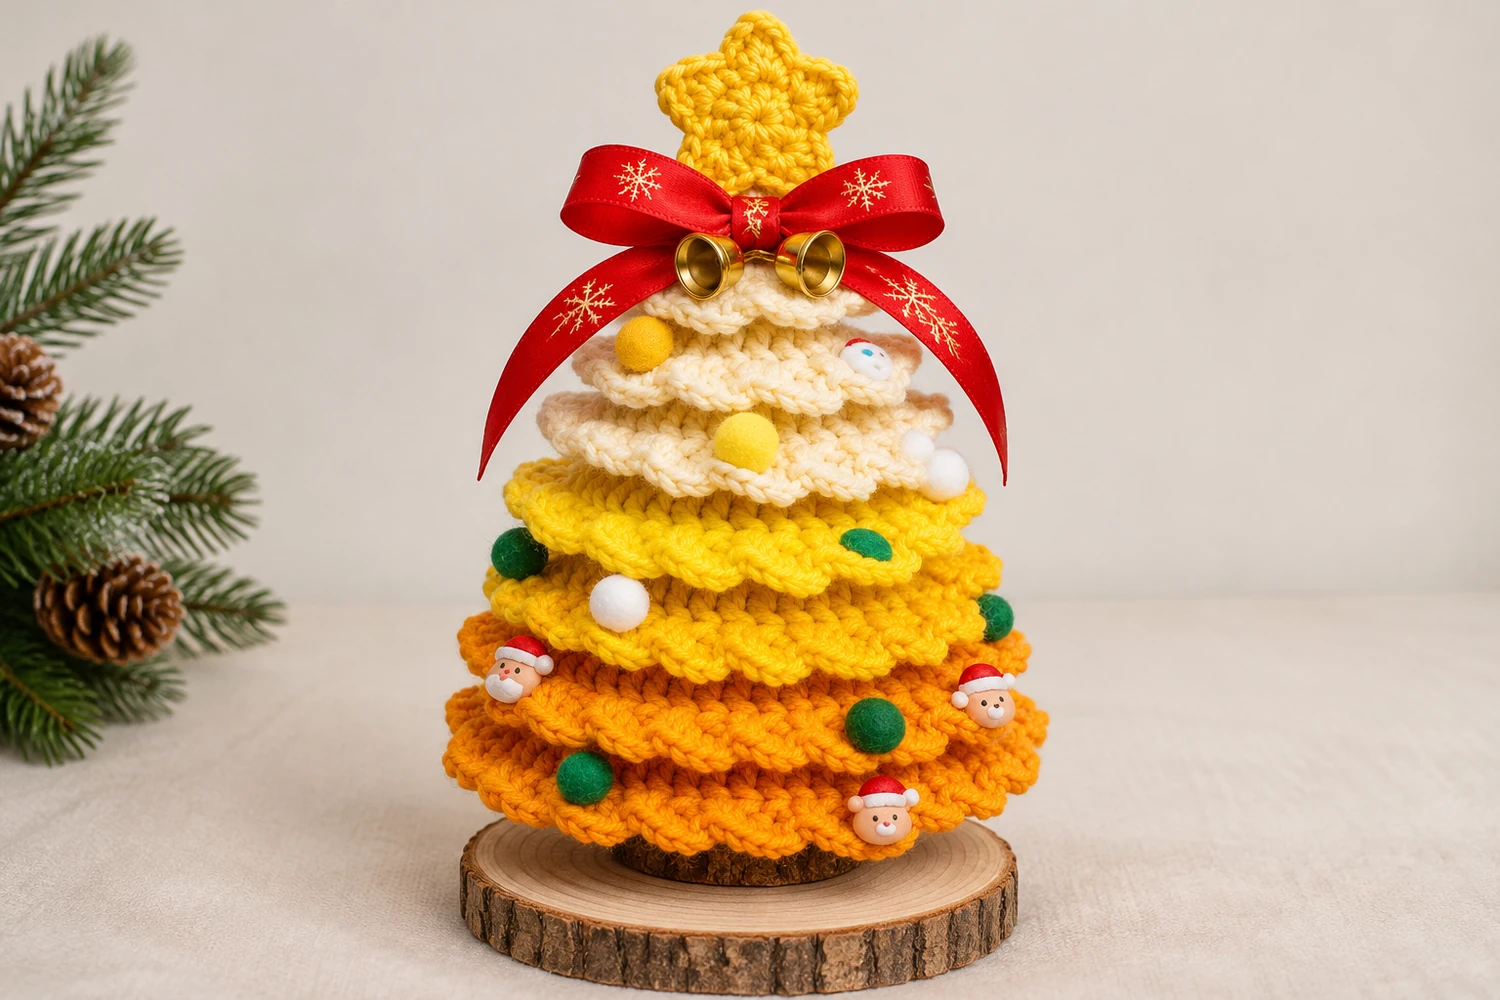
Ruffled Crochet Christmas Tree Materials
- DK or light worsted yarn of the same weight: cream, bright yellow, and golden orange. Allow approximately 50–70 g of each color as a purchasing estimate, not measured consumption.
- A 3.5 mm crochet hook, or a size that produces a firm single crochet fabric without visible stuffing.
- Polyester fiberfill, a tapestry needle, scissors, and removable stitch markers in seven colors or with numbered labels.
- A yellow yarn scrap for the five-point star, using the same hook.
- Approximately 24 in (60 cm) of 5/8 in (15 mm) red ribbon with a subtle gold pattern, plus two small gold craft bells with sewing loops.
- Small green, white, and yellow felt pom-poms and three small Santa-face craft buttons or charms with sewing holes. These are purchased embellishments, not crocheted pieces.
- A stable bark-edged wood slice approximately 6–7 in (15–18 cm) across, and a smaller flat wood disk about 3–4 in (8–10 cm) across for the visible trunk pedestal. Use craft adhesive suitable for wood and fiber, following its label.
Skill level: Intermediate. Estimated size: approximately 8–10 in (20–25 cm) tall including the star, before the wood stand, and 7–8 in (18–20 cm) across the lowest ruffle. These are design estimates; yarn and tension determine the actual dimensions.
Before You Start
The cone is worked from its tip downward in continuous half double crochet rounds. A marker identifies the first stitch. At seven levels you will work the following round in the back loops only, leaving a full ring of front loops available for the ruffles. Mark those front-loop rings before moving on; finding them afterward is much harder.
The cone remains a separate structural piece beneath the ruffles. Its slow increases create height, while the double crochet skirt rounds spread outward. Do not put the skirt stitches through both loops of the cone: doing so would close the surface loops needed for an even attachment.
Make a small half double crochet swatch to choose your hook. Firm fabric is more useful here than a particular gauge number. If stuffing shows through, reduce the hook size. Keep all three colors the same thickness so that changing color does not change the cone’s slope.
US Crochet Terms and Special Stitches
- MR = magic ring.
- ch = chain; sl st = slip stitch.
- sc = single crochet; hdc = half double crochet.
- dc = double crochet; tr = treble crochet.
- inc = work 2 stitches into the same stitch: hdc for the cone, sc for the base disk.
- BLO = back loop only; FLO = front loop only.
- st(s) = stitch(es); rep = repeat.
For a dc, yarn over once before inserting the hook, then pull through two loops twice. For a tr, yarn over twice and pull through two loops three times. Starting ch 1 and ch 2 do not count as stitches anywhere in this pattern. Joining slip stitches do not count either.
Ruffle shell: 5 dc in the same stitch. The edging repeat is [sc in the next st, skip 1 st, 5 dc in the next st, skip 1 st]. Each repeat uses four stitches from the preceding round and creates six stitches: one sc and five dc.
Crochet the Supporting Cone
Start in cream. Use continuous rounds unless a color change is specified. Counts in parentheses refer to the cone only; decorative ruffles are added later.
- Round 1: Work 6 hdc in a MR. Pull closed. (6)
- Round 2: Hdc in each st around. (6)
- Round 3: Inc in each st around. (12)
- Round 4: Hdc in each st around. (12) Mark this round for the first cream ruffle.
- Round 5: Working BLO throughout, hdc in each st. (12) Leave all 12 front loops of Round 4 free.
- Round 6: [Hdc in the next st, inc in the next st] 6 times. (18)
- Round 7: Hdc in each st. (18) Mark for the second cream ruffle.
- Round 8: BLO hdc in each st. (18) Leave the front loops of Round 7 free.
- Round 9: [Hdc in the next 2 sts, inc in the next st] 6 times. (24)
- Round 10: Hdc in each st. (24) Mark for the third cream ruffle.
- Round 11: BLO hdc in each st. (24) Leave the front loops of Round 10 free.
- Round 12: Change to yellow. [Hdc in the next 3 sts, inc in the next st] 6 times. (30)
- Round 13: Hdc in each st. (30) Mark for the first yellow ruffle.
- Round 14: BLO hdc in each st. (30) Leave the front loops of Round 13 free.
- Round 15: [Hdc in the next 4 sts, inc in the next st] 6 times. (36)
- Round 16: Hdc in each st. (36) Mark for the second yellow ruffle.
- Round 17: BLO hdc in each st. (36) Leave the front loops of Round 16 free.
- Round 18: Change to orange. [Hdc in the next 5 sts, inc in the next st] 6 times. (42)
- Round 19: Hdc in each st. (42) Mark for the first orange ruffle.
- Round 20: BLO hdc in each st. (42) Leave the front loops of Round 19 free.
- Round 21: [Hdc in the next 6 sts, inc in the next st] 6 times. (48)
- Round 22: Hdc in each st. (48) Mark for the second orange ruffle.
- Round 23: BLO hdc in each st. (48) Leave the front loops of Round 22 free.
- Round 24: Hdc in each st. (48) Sl st in the next st and fasten off, leaving a long sewing tail.
At a color change, pull the new color through the last two loops of the final hdc of the preceding round. Weave the old tail inside without drawing the cone inward. Keep the opening at the bottom accessible while you add the ruffles.
Add the Seven Scalloped Ruffles
Work from the lowest orange ring upward. Fold completed ruffles down and away from the next attachment ring. Hold the tip of the cone pointing toward you while making the first round of each skirt; the stitches should extend toward the wider base when the tree stands upright.
Two-round method for every skirt
- Skirt Round A: Join the matching yarn with a sl st in any reserved front loop. Ch 2. Work 2 dc in that same loop and 2 dc in every remaining reserved loop around. Join with a sl st to the first actual dc. Do not join to the starting chain.
- Skirt Round B: Ch 1. Starting in the first dc, repeat [sc in the next st, skip 1 st, 5 dc in the next st, skip 1 st] around. Join to the first sc. Fasten off and weave the ends into the inside of that skirt.
Placement and count checklist
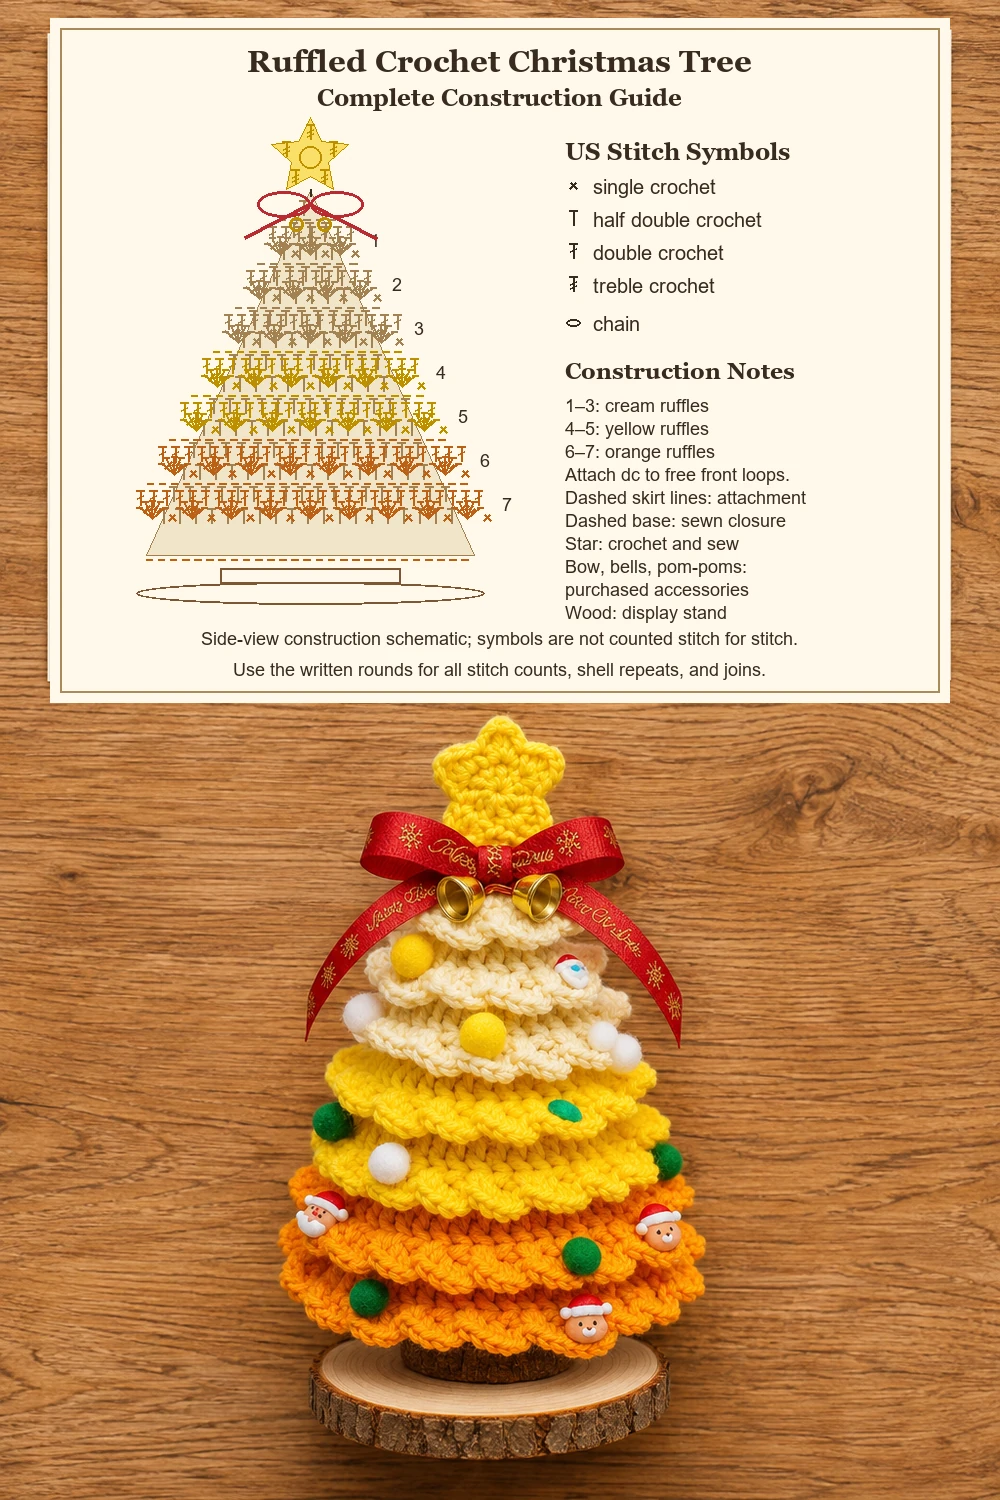
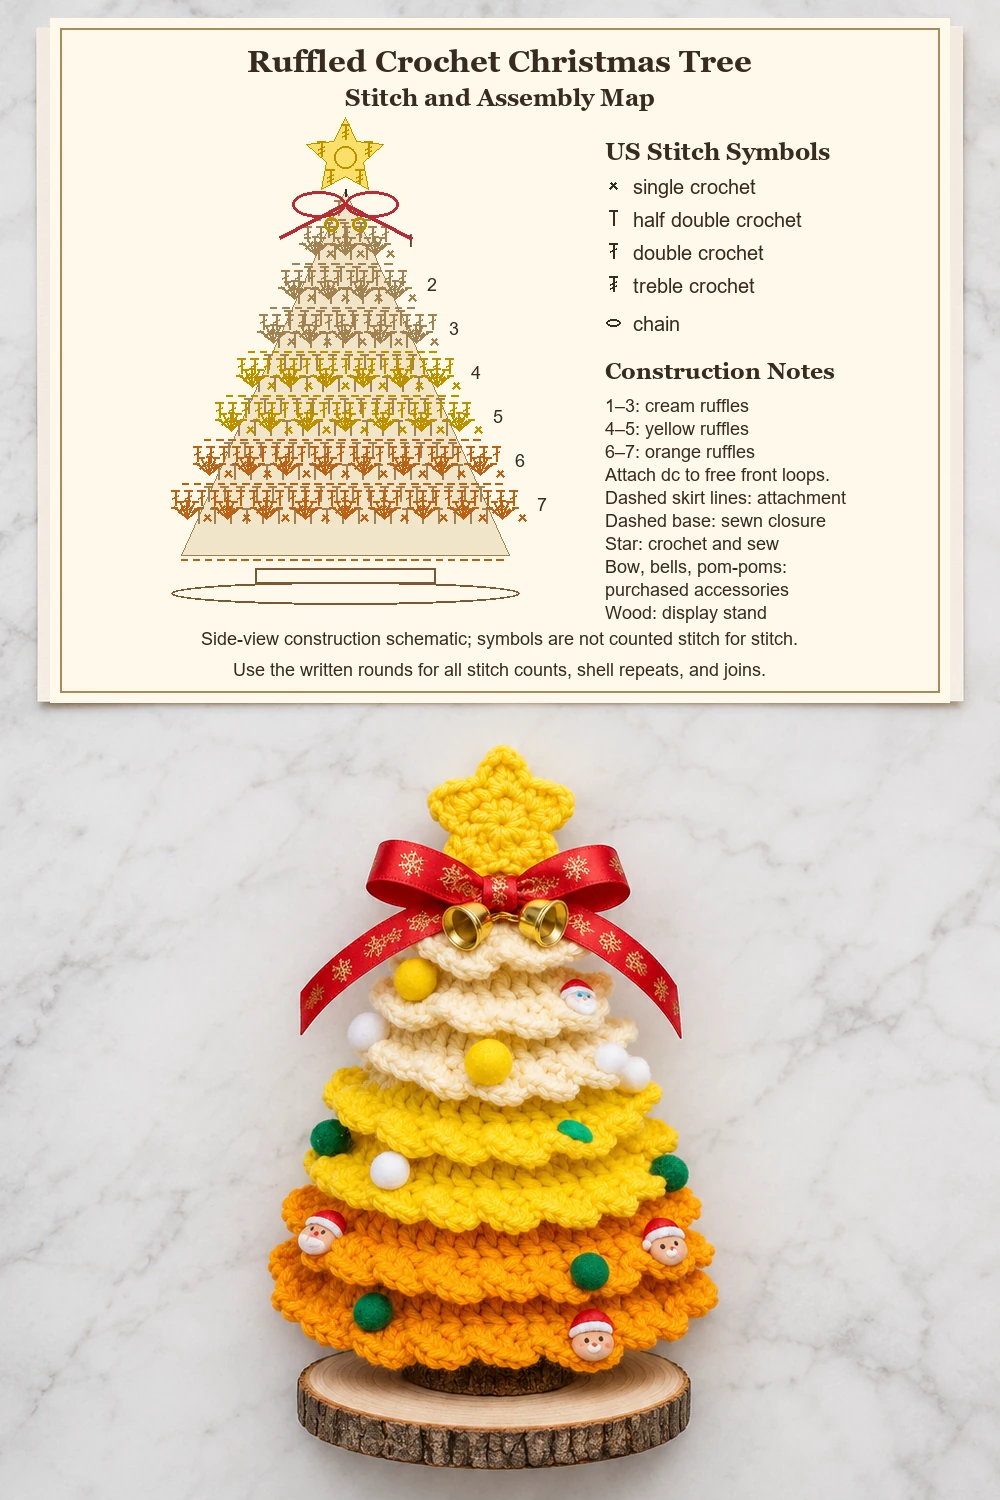
- Lowest skirt: Orange, cone Round 22: 48 loops; Round A = 96 dc; Round B = 24 shells and 24 sc, 144 stitches total.
- Next skirt: Orange, cone Round 19: 42 loops; Round A = 84 dc; Round B = 21 shells and 21 sc, 126 stitches total.
- Lower middle skirt: Yellow, cone Round 16: 36 loops; Round A = 72 dc; Round B = 18 shells and 18 sc, 108 stitches total.
- Upper middle skirt: Yellow, cone Round 13: 30 loops; Round A = 60 dc; Round B = 15 shells and 15 sc, 90 stitches total.
- Lowest cream skirt: Cream, cone Round 10: 24 loops; Round A = 48 dc; Round B = 12 shells and 12 sc, 72 stitches total.
- Middle cream skirt: Cream, cone Round 7: 18 loops; Round A = 36 dc; Round B = 9 shells and 9 sc, 54 stitches total.
- Top cream skirt: Cream, cone Round 4: 12 loops; Round A = 24 dc; Round B = 6 shells and 6 sc, 36 stitches total.
The decorative stitches intentionally outnumber their attachment loops. This is what creates the flare. Ease each skirt downward with your fingers without flattening its scalloped edge. The fronts of adjacent shells may touch; they do not need to be pinned into a perfectly flat circle.
Yellow Five-point Star
Make two matching pieces in yellow. Keep the foundation ring snug so the center does not show stuffing.
- Round 1: Work 10 sc in a MR. Join to the first sc. (10)
- Round 2: Repeat the following sequence 5 times: sl st in the next sc; in the following sc work (hdc, dc, tr, ch 2, sl st in the second ch from the hook, tr, dc, hdc). Each repeat uses two sc from Round 1. Join to the first sl st. (5 points)
Fasten off the first star. Leave a long tail on the second. Place them wrong sides together, aligning all five points. Whipstitch around the outer edges, adding just a pinch of stuffing before closing the final section. Sew the lower center of the star firmly to the cone tip with yellow yarn, keeping one point upright. The star is a separate crocheted component; it is not formed by folding the cone.
Round Base Closure and Stuffing
Make a flat orange disk in continuous rounds. This closes the tree; the wood beneath it is an accessory rather than part of the crochet instructions.
- Round 1: 6 sc in a MR. (6)
- Round 2: Inc in every st. (12)
- Round 3: [Sc in the next st, inc] 6 times. (18)
- Round 4: [Sc in the next 2 sts, inc] 6 times. (24)
- Round 5: [Sc in the next 3 sts, inc] 6 times. (30)
- Round 6: [Sc in the next 4 sts, inc] 6 times. (36)
- Round 7: [Sc in the next 5 sts, inc] 6 times. (42)
- Round 8: [Sc in the next 6 sts, inc] 6 times. (48) Sl st in the next st and fasten off.
Stuff the cone through its bottom opening in small amounts, reaching the narrow tip first. The cone should stand straight with a gently firm surface. Avoid overfilling: it can stretch the attachment rings and make the lower edge bulge. Hold the disk against the 48 stitches of the cone opening and whipstitch one disk stitch to one cone stitch all the way around. Add the last small amount of stuffing before closing the remaining gap.
Ribbon, Bells, and Applied Decorations
- Tie the red ribbon into a bow with two generous loops and two longer tails. Trim the tails neatly and fold any raw ends to the back if the ribbon frays.
- Sew the bow center to the cone immediately below the star and above the first cream skirt. Catch the cone fabric securely without pulling the top into a crease.
- Thread a needle through each bell’s sewing loop. Stitch one bell to each side of the bow center, taking several passes through the ribbon and cone. These are metal accessories, not crochet stitches.
- Arrange green, white, and yellow pom-poms across the skirt fronts. Leave spaces between them so the scallops remain visible. Sew through the dense center of each felt pom-pom and around sturdy crochet stitches.
- Sew the three Santa-face buttons around the orange section, with their faces pointing outward. Use the holes or loops supplied on the buttons and secure the thread ends inside the crochet wherever accessible.
The red bow is tied ribbon, the small colored balls are felt, and the Santa faces are purchased charms. No embroidery is needed for this version. If your accessories differ slightly, keep their size small enough that the soft ruffles retain their shape.
Mounting the Tree on the Wood Stand
Choose dry, smooth wood pieces with flat mating surfaces. Center the smaller wood disk on the larger slice and attach it with an adhesive suitable for the materials. Let it cure fully according to the product label. Position the closed crochet base on the smaller disk and attach it evenly, keeping adhesive beneath the central closure rather than on the outer orange shells.
Check the tree from the front and both sides before the adhesive sets. The star, bow, cone center, and pedestal should share the same vertical line. Allow the finished piece to cure undisturbed. This embellished centerpiece is intended as indoor decoration; its small bells, buttons, and pom-poms make it unsuitable as a child’s toy.
Finishing and Troubleshooting
A skirt is twisting around the cone
Count the attachment loops before adding the shell round. Every reserved loop receives exactly two dc in Round A. Missing one loop or accidentally working twice in a neighboring loop creates a local twist. Correct that round before adding the shells.
The shell round does not meet evenly
Each repeat consumes four dc, including both skipped stitches. The Round A counts are all divisible by four. Mark the first actual dc and count completed repeats rather than treating the joining slip stitch as an extra foundation stitch.
The lower layers hide too much of the color above
First check that you attached them to the marked rings, with three cone rounds between successive rings. Gently direct each skirt toward the base. Do not sew neighboring ruffles together, since that removes the natural space between layers. A very loose dc gauge may produce wider skirts than the estimated dimensions.
The tree leans or has a rounded bottom
Redistribute the stuffing before completing the closure. Keep the last part of the cone firm enough to hold its shape but leave the disk able to lie against a flat surface. Check the wood stand separately; an uneven wood face can tilt even a correctly stuffed tree.
Cleaning and storage
Dust gently with a soft brush. Because the tree includes ribbon, bells, felt, adhesive, and wood, do not machine wash or soak the finished centerpiece. Test any spot-cleaning method on a hidden area. Store upright in a box with space around the bow and star so the scallops do not remain compressed.
More Christmas Crochet Projects
For a lighter hanging decoration, try the Snowflower Lace Crochet Tree. The Christmas Wreath Crochet Square uses a separate applied motif on a white background, while the Red and Gold Crochet Angel adds another ribbon-like festive silhouette to a handmade display.
Visual Assembly Guide, Charts, and Pinterest Images
The two tabletop diagrams show the complete assembled silhouette and identify the cone, attached ruffles, separate star, sewn base closure, and purchased decorations. They are construction guides rather than flattened instructions for crocheting the whole tree in one piece. Use the written rounds above for exact stitch counts and placement. The six supporting images are grouped here after the complete pattern.