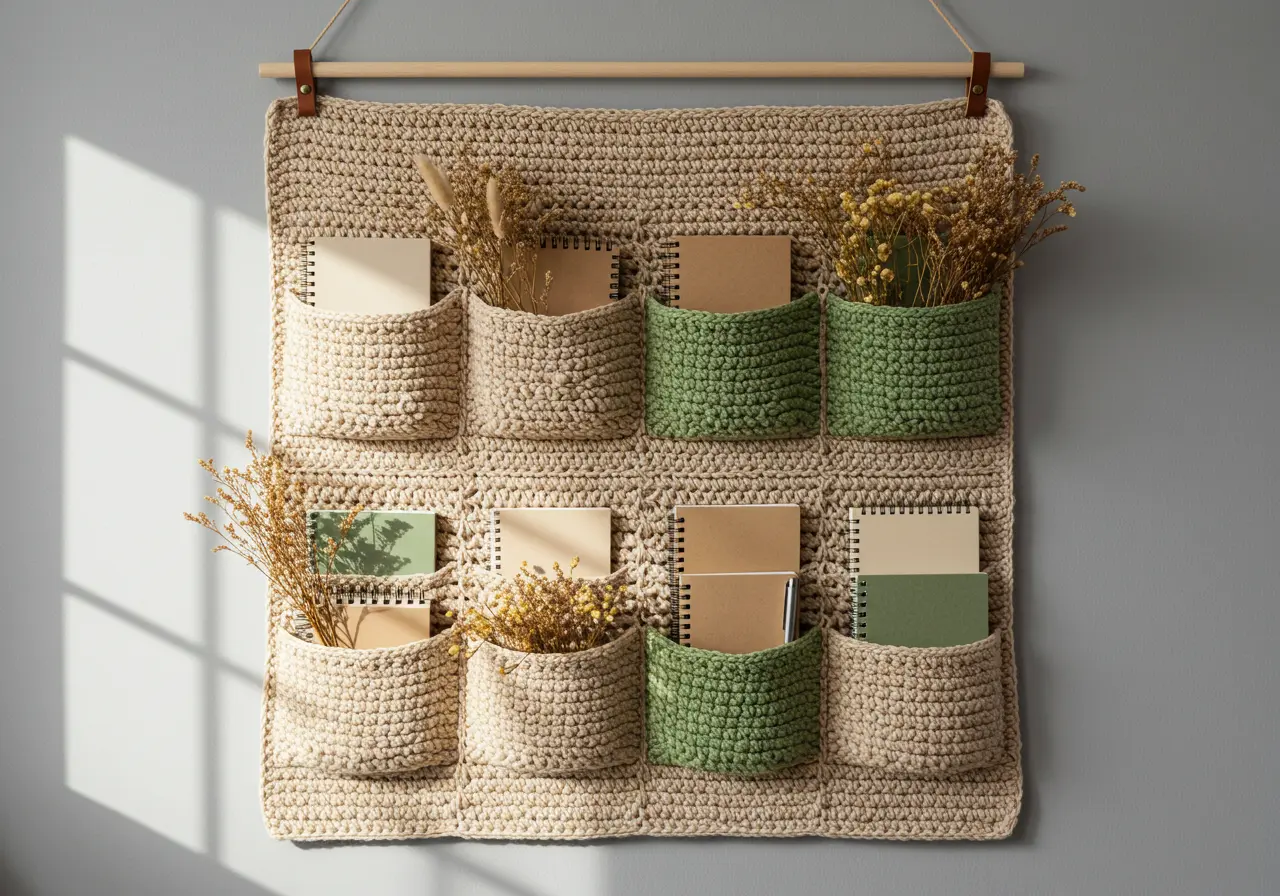
If your entryway, craft corner, or office needs a little calm, this crochet organizer is such a satisfying make. The chunky texture feels modern, the pockets are sturdy, and the color palette is totally up to you. We’ll build a single rectangular base, crochet nine simple pockets, and stitch them on in a clean 3×3 grid. Slip it onto a wooden dowel (or any rod you have) and enjoy clutter-free bliss you made by hand.
Crochet Organizer – Step-by-Step Tutorial
Pattern Details
Skill Level: Confident Beginner
Terminology: US crochet terms
Construction: Base rectangle worked flat; pockets worked flat bottom-up; pockets sewn to base; top finished with hanging tabs or a rod pocket.
What You’ll Need
Yarn (Bulky/Category 5 cotton or cotton blend) for structure
Main Color (base): ~500–600 g (≈ 550–700 yds / 500–640 m) in cream
Accent Colors (pockets): ~350–450 g total (≈ 400–520 yds / 365–475 m)
Sample look: 6 cream pockets + 3 sage / 3 beige pockets mixed in
Hook: 8 mm (L-11)
Notions: tapestry needle, scissors, 12–15 locking stitch markers, measuring tape
Hanging: wooden dowel or rod ~24–26″ (61–66 cm) wide + cord/strap (or make crochet tabs)
Yarn notes: Cotton holds shape and won’t stretch much. Acrylic works too but may drape more. If using worsted (#4), hold two strands together to mimic bulky.
Gauge
sc, worked flat: 10 sts × 11 rows = 4″ (10 cm).
Match height and get close on width for the best pocket fit. Adjust hook if needed.
Finished Size (as written)
Approx 22″ wide × 26″ tall (56 × 66 cm), including border and tabs.
Easy to resize—see Adjusting Size below.
Step-by-Step Instructions
A) Base Panel
Foundation: Ch 51.
Row 1: Sc in 2nd ch from hook and in each ch across (50 sc). Ch 1, turn.
Rows 2–60: Sc in each st across (50 sc). Ch 1, turn.
You should be around 20–22″ tall. Add/subtract rows to taste.
Clean Border (2 rounds):
Round 1: Ch 1, rotate to work around the rectangle. Sc evenly along each side; 3 sc in each corner. Join with sl st to first sc.
Round 2: Ch 1, sc around again with 3 sc in each corner. Join, fasten off.
Tip: Aim for ~1 sc per row on the sides; adjust so the edge lies flat.
B) Pockets (make 9)
The texture uses sc BLO (back loop only) for a sturdy, slightly ribbed fabric that resists sagging.
Pocket Size (each): about 6.5″ wide × 6″ tall (16.5 × 15 cm).
Pocket Pattern (make 9):
With chosen color, ch 18.
Row 1: Sc in 2nd ch from hook and across (17 sc). Ch 1, turn.
Rows 2–18: Sc BLO across (17 sc). Ch 1, turn.
After Row 18, pocket height ≈ 6″.
Top Lip (anti-stretch): Row 19: Sc through both loops across. Fasten off, weave the starting tail only (leave a long tail at the top corner if you prefer sewing with it).
Optional edging for definition:
Work 1 round of reverse sc (crab stitch) across the top edge only. Do not edge the sides/bottom—those will be sewn down.
Make 6 pockets in MC and 3 in an accent color (or any combo you like).
C) Layout & Placement
Lay the base panel flat with the shorter side at the top.
Arrange pockets in a 3×3 grid: three across, three down.
Spacing guide (easy):
Side margins: ~1.5″ (4 cm) each side
Gaps between pockets (horizontal & vertical): ~1.5″ (4 cm)
Use a ruler to align pocket bottoms; secure each pocket with locking markers at the corners (or safety pins).
Quick check: On the 50-stitch width, center each ~17-stitch pocket with ~6–7 stitches between pockets and at the sides. Eyeballing with a ruler works great.
D) Sewing the Pockets
Thread a long strand of matching yarn and use a whip stitch or mattress stitch.
Sew only the sides and bottom of each pocket; leave the top open.
Keep stitches small and consistent so the seam looks neat from the front.
After stitching the bottom edge, take an extra securing stitch in each bottom corner.
E) Hanging Options (choose one)
Option 1: Crochet Tabs (sturdy & simple) — make 3
Ch 10.
Row 1: Sc in 2nd ch and across (9 sc). Ch 1, turn.
Rows 2–12: Sc across (9 sc). Fasten off.
Fold each tab over your dowel/rod, position across the top edge (left, center, right), and sew both short ends to the back of the panel, spacing evenly.
Option 2: Rod Pocket (clean look)
Reattach yarn to the top back of the panel.
Row 1: Sc across the top edge working through the back loop of border stitches to create a hinge.
Rows 2–6: Sc across evenly.
Fold this flap to the back to create a channel, insert the dowel, and sew the flap down along its lower edge.
F) Finishing
Weave in all ends on the wrong side.
Lightly steam block (or mist and pat flat) to settle the stitches—avoid stretching the pockets.
Insert dowel and hang. If storing heavier items, use wall anchors or hang into a stud.
Adjusting Size (Made-to-Measure)
Width: Foundation sc count ÷ 2.5 ≈ width in inches. For a wider organizer, add chains in multiples of 1.
Height: Add/subtract rows on the base.
Pocket size: For wider/taller pockets, add 2–4 chains to the pocket foundation and/or 2–4 rows to pocket height.
Grid: Make 2×3 (6 pockets) or 4×3 (12 pockets)—just keep ~1.5″ gaps so the layout feels airy.
Tips & Variations
Use contrasting colors for a checkerboard effect.
Add a leather pull tab or label at one pocket edge.
For extra structure, line pockets with felt rectangles (light hand-stitching).
Swap sc BLO for hdc BLO to work faster—pockets get a bit taller, so subtract 1–2 rows.
For plants, slip in jars or nursery pots—but hang securely.
FAQ
Can I use worsted yarn?
Yes—hold two strands together with an 8 mm hook, or drop to a 6 mm hook and add stitches/rows to hit size.
Will acrylic stretch too much?
It can. Cotton or cotton-blend is firmer. If using acrylic, add the reverse-sc top lip to each pocket.
How much weight can it hold?
Great for notebooks, pens, mail, small tools, or dried florals. For heavier items, use wall anchors and keep contents light.
Loved this crochet organizer pattern? Pin it for later, share it with your crochet friends, and tag us when you hang yours!