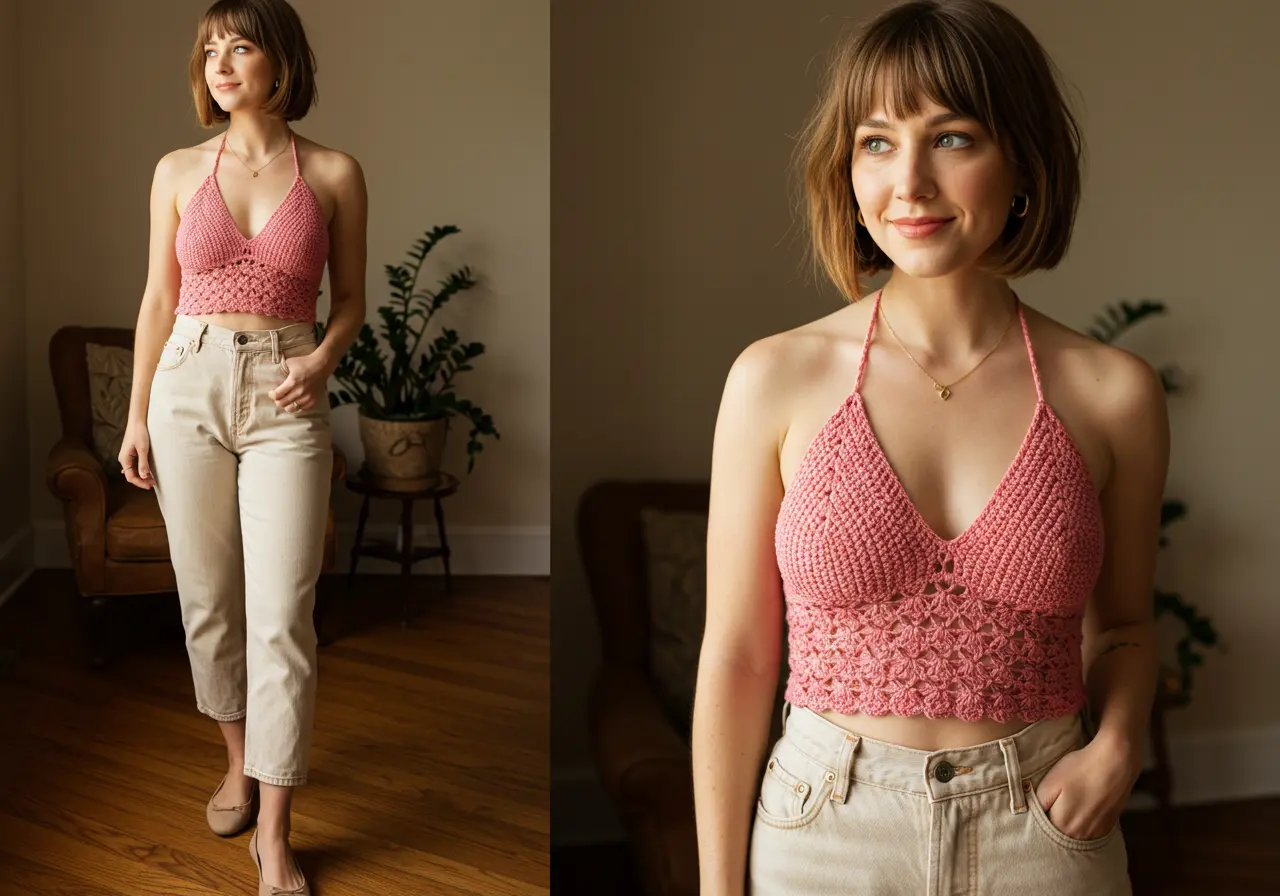
There’s something magical about crocheting your own clothes. Not only do you get a piece that reflects your unique style, but you also carry the joy of having made it with your own hands. A crochet halter top is one of those timeless, fun projects that feels light and breezy for summer, yet stylish enough to wear at festivals, beach days, or even layered with your favorite jacket.
In this guide, I’ll walk you through everything you need—from materials to finishing touches—so you can create a halter top you’ll be proud to wear.
What You’ll Need
Before you start crocheting, make sure you have these essentials:
Yarn – Cotton or bamboo blends are breathable and soft, making them perfect for warm weather. If you want a stretchy top, consider a cotton blend with elastic fibers.
Crochet hook – Usually between sizes 3.5mm and 4.5mm works best for halter tops. Always check the yarn label for the recommended hook size.
Scissors – To cut your yarn cleanly.
Tapestry needle – For weaving in ends.
Measuring tape – To ensure the perfect fit.
Choosing Your Pattern
If you’re new to crochet, start with a simple pattern that uses basic stitches like single crochet, half double crochet, and double crochet. More advanced crocheters can explore lace designs, granny square halters, or openwork stitches that give a bohemian vibe.
Pro Tip: Always check the gauge before starting—this ensures your halter will actually fit as expected.
Step-by-Step Instructions
Create the foundation chain – This will determine the width of your halter.
Work the body – Follow the pattern’s stitch sequence row by row. Beginners usually start with solid stitches for good coverage, while more advanced designs may include decorative open stitches.
Shape the neckline – Halter tops usually taper toward the top, so you’ll decrease stitches gradually.
Add the straps – Most halters have long ties that go around the neck and back. These can be crocheted chains or thicker straps for comfort.
Finish with edging – A simple single crochet border can make your work look neat and professional.
Tips & Variations
Color blocking – Use two or more yarn colors for a fun and trendy look.
Boho style – Add fringe at the hem for a festival-ready outfit.
Textured look – Try puff stitches or shell stitches for extra dimension.
Adjustable fit – Add ties or corset-style lacing on the back.
Styling Your Crochet Halter Top
One of the best things about a crochet halter top is its versatility! Here are some ways to wear it:
Pair it with high-waisted shorts for a casual summer look.
Layer it under a kimono or crochet cardigan for beach vibes.
Match it with a long flowy skirt for a bohemian festival outfit.
Wear it with jeans and a blazer for a chic, handmade-meets-modern style.
FAQ
Q: How much yarn do I need for a halter top?
A: Usually around 150–250 grams of cotton yarn, depending on your size and the stitch pattern.
Q: Can beginners really make this?
A: Absolutely! Start with a simple pattern that uses basic stitches and you’ll be surprised how quickly it comes together.
Q: Is cotton the only yarn option?
A: Cotton is best for summer tops, but you can also use bamboo, linen, or even soft acrylic blends if you prefer.
Suggested Internal Links
Call to Action
Free Pattern: Crochet Halter Top
Ready to make your own? Grab your hook and yarn, and start your first crochet halter top today!
If you found this guide helpful, share it with your crochet friends or pin it on Pinterest to save for later.


Hermos trabajo amo el crochet sos una genia