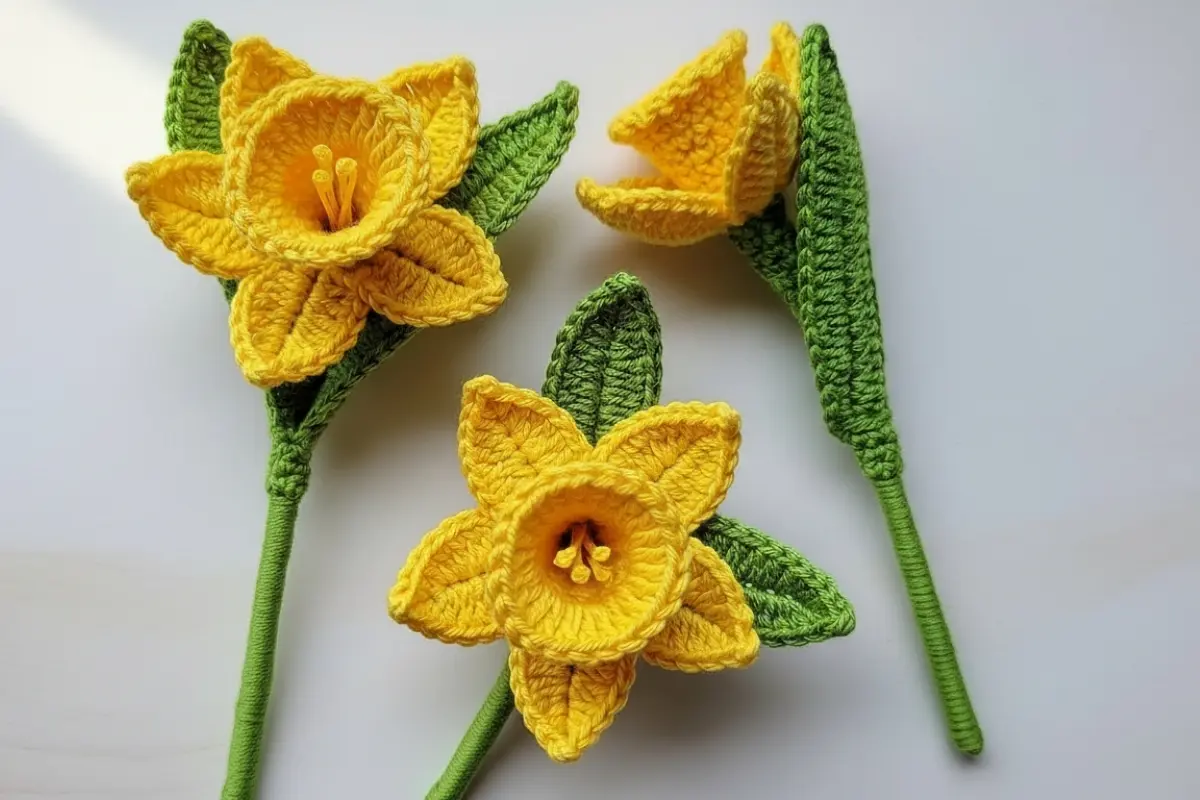
I’ve made this Crochet Daffodil Pattern more times than I can count—especially when spring starts calling for something bright and cheerful on my hook. There’s something incredibly satisfying about watching this little flower come to life, petal by petal.
What I love most is how versatile it is. I’ve used it in bouquets, attached it to gift wrapping, and even turned a few into delicate keychains. It’s one of those patterns that looks intricate but becomes surprisingly intuitive once you get into the rhythm.
When I first tested this pattern, I played around with different hook sizes and quickly realized that a slightly tighter tension gives the trumpet that crisp, sculpted shape that makes the daffodil feel so real. It’s a small detail—but it makes all the difference.
✨ What You’ll Need
- Yarn:
- Yellow (petals + trumpet)
- Green (stem + leaves)
- Hook: 2.5 mm – 3.0 mm (US C/2–D/3)
- Yarn needle
- Scissors
- Floral wire (for stem)
- Floral tape (optional)
- Stitch marker
📏 Finished Size
- Flower: approx. 9–11 cm (3.5–4.3 in)
- Stem: adjustable (20–25 cm typical)
📚 Abbreviations (US Terms)
- ch = chain
- sl st = slip stitch
- sc = single crochet
- hdc = half double crochet
- dc = double crochet
- tr = treble crochet
- inc = 2 sts in same st
- dec = decrease (sc2tog)
- st(s) = stitch(es)
- MR = magic ring
🌼 Pattern Notes
- Work in continuous rounds unless stated
- Use stitch marker to track rounds
- Flower is made in 3 parts:
- Trumpet (center)
- Petals
- Leaves + stem
🌟 Step-by-Step Instructions
🌼 PART 1 – TRUMPET (CENTER)
With yellow yarn:
Rnd 1: MR, 10 hdc into ring, sl st to join (10)
Rnd 2: ch 1, 1 sc in each st around (10)
Rnd 3: ch 1, 1 sc, 2 sc in next repeat around (15)
Rnd 4–5: 1 sc in each st around (15)
Rnd 6 (ruffled edge):
sl st, ch 2, 2 dc in same st, ch 2, sl st in next st repeat around
Fasten off, leave long tail.
👉 This creates the signature flared “trumpet” shape typical of daffodils
🌸 PART 2 – PETALS (MAKE 6)
With yellow yarn:
Rnd 1: MR, ch 2, 12 dc into ring, sl st to join (12)
Rnd 2 (petal shaping):
sl st in next st, ch 1, (sc, hdc, dc, tr, dc, hdc, sc) in next st, sl st in next st
Repeat 6 times total → 6 petals
Fasten off, leave long tail.
💡 Each petal is built into one stitch to create that sculpted, curved look.
🍃 PART 3 – LEAF (MAKE 1–2)
With green yarn:
Row 1: ch 15
Row 2: starting in 2nd ch from hook:
sc, hdc, dc, dc, tr, tr, dc, dc, hdc, sc, sl st
Fasten off.
(Optional: crochet second side for thicker leaf or fold and stitch)
🌿 PART 4 – STEM
Option 1 (recommended – realistic):
Wrap green yarn tightly around floral wire
Secure with glue or stitch lightly
Option 2 (crochet):
ch 25
sl st back along chain
Fasten off
🧵 Assembly
- Sew trumpet to center of petals
- Slightly cup petals upward for realism
- Attach flower to stem securely
- Sew leaf onto stem
- Wrap stem with floral tape (optional)
💛 Finishing Touches
Gently shape petals with your fingers.
For a more sculpted look, lightly steam block or use fabric stiffener.
🧶 My Experience & Practical Tips
After making several versions of this Crochet Daffodil Pattern, a few things really stood out to me:
- Tension matters more than you think: If your stitches are too loose, the trumpet won’t hold its shape well. I like to go down half a hook size for a firmer structure.
- Don’t skip shaping the petals: Right after assembly, I always pinch and curve each petal slightly upward—it instantly makes the flower look more lifelike.
- Use wire for the best result: The crochet stem works, but floral wire gives that natural bend you see in real daffodils.
- Watch your stitch placement in petals: Beginners often crowd stitches into the wrong space—make sure everything sits in that single stitch for proper shaping.
- Light stuffing trick (optional): For extra dimension, you can add a tiny bit of stuffing behind the trumpet before sewing—it subtly lifts the center.
🌼 Tips & Variations
- Try softer yellow or even white yarn for a different narcissus variety
- Add a hint of orange to the trumpet edge for realism
- Turn it into a brooch, bookmark, or bouquet piece
- Mix with other flowers for a spring arrangement
If you enjoy floral designs, you might also love combining this with a Daisy & Sunflower Bookmark Pattern for bright, cheerful projects, or exploring textured motifs like the African Flower Granny Square Pattern for something more geometric yet equally beautiful.
❓ FAQ (Schema Style)
Q: Is this Crochet Daffodil Pattern beginner-friendly?
A: It’s best suited for confident beginners or intermediate crocheters due to shaping techniques.
Q: Can I use cotton yarn?
A: Yes! Cotton works beautifully and helps the flower hold structure well.
Q: How long does it take to make one flower?
A: Around 1 to 2 hours depending on your speed and experience.
Q: Can I wash the finished flower?
A: Hand washing is recommended, especially if using wire.
If you enjoyed making this Crochet Daffodil Pattern, there are a few other designs that pair beautifully with it and can really expand your crochet collection in a natural, creative way.
For a full floral arrangement, the Crochet Tulip Bouquet Pattern – Easy & Realistic Amigurumi Flowers is a perfect next step. The tulips complement the daffodil’s shape so nicely, and together they create a soft, elegant spring bouquet that looks stunning in a vase or as a handmade gift.
If you’re in the mood for something quicker and a bit more playful, the Daisy & Sunflower Bookmark Crochet Pattern is such a lovely project. It’s lightweight, practical, and a great way to use leftover yarn while still creating something meaningful and giftable.
And if you’d like to explore a more structured and decorative style, the African Flower Granny Square Crochet Pattern is a wonderful option. It introduces a different kind of texture and construction, and it’s ideal if you’re thinking about building larger pieces like blankets or bags with a floral twist.
This Crochet Daffodil Pattern has become one of my go-to designs whenever I want something quick, meaningful, and visually striking. I’ve tested it with different yarns, hooks, and finishing styles—and it consistently delivers that lovely, realistic look.
Whether you’re making a handmade gift, preparing items for a craft fair, or simply adding a touch of spring to your home, this little daffodil never disappoints.
If you make one, you’ll probably end up making a whole bouquet—just like I did. And honestly, there are worse habits to have.