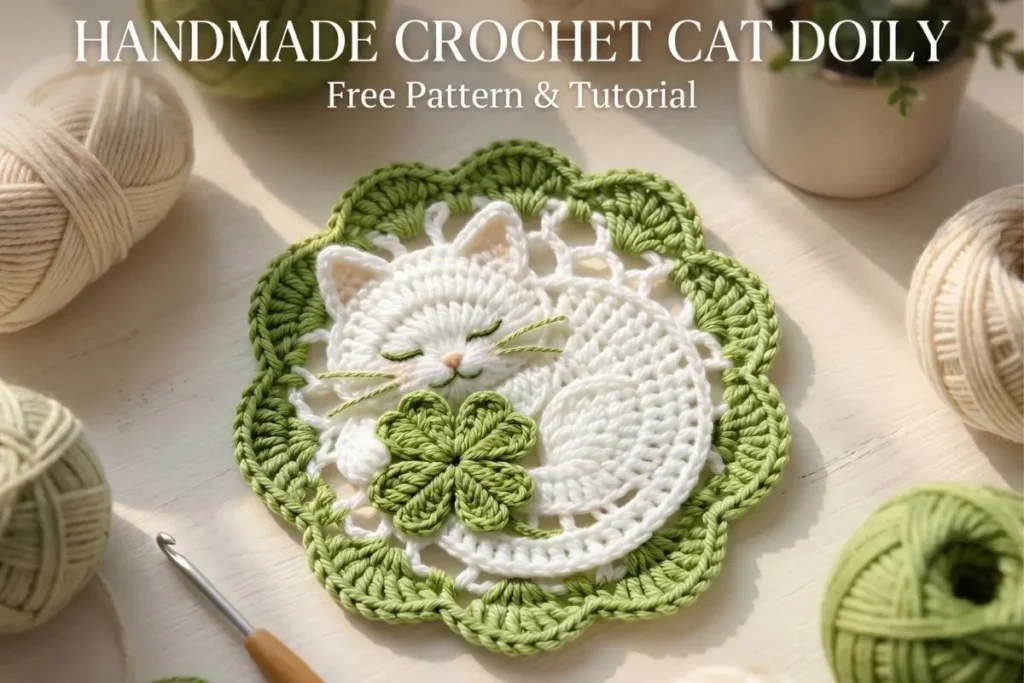
There’s something especially peaceful about combining delicate lacework with a sleeping cat design, and this Sleeping White Cat Doily Crochet Pattern does exactly that. I’ve made similar decorative doilies for seasonal displays and handmade gifts, and they always attract attention because they combine elegance with personality.
What I love most about this project is how the sleeping cat appears to rest naturally on the lace background while the shamrock motif adds a touch of charm and symbolism. During testing, I found that maintaining even tension throughout the lace rounds made a noticeable difference in achieving a beautifully balanced finished piece.
Whether you’re creating home décor for yourself, making a thoughtful handmade gift, or adding a unique item to your craft fair collection, this pattern offers a rewarding crochet experience with stunning results.
Skill Level
Intermediate to Advanced
Finished Size
Approximately 8–10 in (20–25 cm) diameter depending on yarn and tension
Terminology
US Crochet Terms (Craft Yarn Council Standards)
What You’ll Need
Materials
- Cotton crochet thread #3 or #5
- 2.5 mm crochet hook (B/1–C/2)
- Tapestry needle
- Stitch markers
- Green embroidery floss
- Blush pink embroidery floss
Colors
- Color A: White (cat and lace center)
- Color B: Light Green (border and shamrock)
Abbreviations (US Terms)
- ch = chain
- sl st = slip stitch
- sc = single crochet
- hdc = half double crochet
- dc = double crochet
- tr = treble crochet
- st = stitch
- sp = space
- rep = repeat
- rnd = round
- inc = increase
- FO = fasten off
- RS = right side
- WS = wrong side
Construction Overview
This project is worked in separate components:
- Cat body
- Cat head
- Tail
- Shamrock flower
- Lace background circle
- Scalloped border
- Embroidery details
- Assembly
Step-by-Step Instructions
PART 1 — CAT BODY
Using Color A.
Row 1
Ch 16.
Work 1 dc in 4th ch from hook.
Work dc across.
(14 dc)
Ch 3, turn.
Row 2
Work dc in each st across.
(14 dc)
Ch 3, turn.
Rows 3–8
Rep Row 2.
Fasten off leaving long tail.
Body should form a soft oval when lightly shaped.
PART 2 — CAT HEAD
Using Color A.
Round 1
Magic Ring.
12 dc in ring.
Join with sl st.
(12 dc)
Round 2
Ch 2.
2 dc in each st around.
Join.
(24 dc)
Round 3
Ch 2.
1 dc in next st, 2 dc in next st.
Rep around.
Join.
(36 dc)
FO.
PART 3 — EARS (MAKE 2)
Join yarn to top of head.
Ear
Ch 1.
(sc, hdc, dc) into same st.
Ch 1.
(dc, hdc, sc) into next st.
Sl st into next st.
Repeat for second ear.
FO.
Shape ears by gently blocking.
PART 4 — TAIL
Using Color A.
Round 1
Ch 26.
Work sc in second chain from hook and in each chain.
(25 sc)
Round 2
Without turning:
Work 3 sc in every st across.
This creates the natural curl.
FO leaving tail.
PART 5 — SHAMROCK MOTIF
Using Color B.
Round 1
Magic Ring.
10 sc in ring.
Join.
Petal Round
*Ch 4.
Work 4 dc into ring.
Ch 4.
Sl st in next st.*
Repeat 5 times.
FO.
Lightly shape petals.
PART 6 — LACE BACKGROUND
Using Color A.
Round 1
Magic Ring.
24 dc in ring.
Join.
Round 2
Ch 5.
Skip 1 st.
Sc in next st.
Ch 5, skip 1 st, sc in next st.
Repeat around.
Join.
24 chain loops created.
Round 3
Into each loop work:
(1 sc, 5 dc, 1 sc)
around.
Join.
Round 4
Sl st to center of shell.
Ch 6.
Sc between shells.
Repeat around.
Join.
Round 5
Into every ch-6 loop work:
(1 sc, 7 dc, 1 sc)
Join.
FO.
PART 7 — GREEN SCALLOPED BORDER
Join Color B.
Border Round
Work behind previous lace round.
*Sc between shell groups.
Ch 2.
9 dc into next space.
Ch 2.
Sc into next joining point.*
Repeat around entire edge.
Join.
This creates the large rounded petals visible in the original piece.
Assembly
PART 8 — ASSEMBLY
Positioning
Place cat body slightly right of center.
Attach head overlapping body.
Sew curled tail around lower right side.
Attach shamrock at lower center.
Stitch securely.
Embroidery Details
PART 9 — EMBROIDERY DETAILS
Eyes
Using green embroidery floss:
Embroider two slightly curved sleeping eyes.
Approximately 3/8 in (1 cm) long.
Nose
Using blush pink floss:
Create a small satin stitch triangle.
Mouth
Using green floss:
Work a tiny inverted “Y” beneath the nose.
Whiskers
Using green floss:
Embroider three whiskers on each side.
Length approximately 1–1.5 in (2.5–4 cm).
Blocking
Wet block lightly.
Pin lace background into a perfect circle.
Shape scalloped border evenly.
Allow to dry completely.
My Experience & Practical Tips
After working on several decorative lace projects, I’ve found that small adjustments during the process can make a big difference in the final appearance of a Sleeping White Cat Doily Crochet Pattern.
First, try not to crochet the lace rounds too tightly. Tight tension can cause the doily to curl inward and make blocking more difficult later.
When creating the cat head, take a moment to shape the circle gently before assembly. This helps the sleeping cat silhouette look softer and more natural once attached.
For the curled tail, resist the temptation to stretch the stitches. The natural curl forms because of the stitch density, and pulling it too much can reduce that charming effect.
If you’re new to embroidery details, mark the eye placement with removable stitch markers before stitching. This simple step helps keep the sleeping expression balanced.
One common beginner mistake is over-blocking the lace. The goal is to define the stitch pattern, not stretch it excessively. Gentle blocking usually creates the most elegant result.
Pattern Notes
- Maintain consistent tension throughout the lace rounds.
- Blocking is highly recommended for best presentation.
- Stitch markers can help identify joining points during assembly.
- Embroidery details add significant character to the finished piece.
- Finished size may vary depending on thread weight and personal tension.
Tips & Variations
- Use ivory instead of bright white for a vintage-inspired look.
- Try a darker green shamrock for stronger contrast.
- Add a ribbon hanger to display the doily as wall décor.
- Create a matching seasonal collection using different floral motifs.
- Experiment with metallic embroidery thread for decorative accents.
Finishing Touches
The finishing details truly bring this Sleeping White Cat Doily Crochet Pattern to life. Take your time positioning the facial features and shaping the lace border evenly during blocking. These final steps highlight the delicate craftsmanship and give the piece its polished appearance.
FAQ Section
Is this Sleeping White Cat Doily Crochet Pattern suitable for beginners?
This pattern is best suited for intermediate to advanced crocheters because it combines lacework, assembly, shaping, and embroidery details.
What thread size works best?
Cotton crochet thread #3 or #5 works beautifully and helps achieve crisp stitch definition.
Do I need to block the finished doily?
Yes. Blocking helps the lace background and scalloped border open fully and display their intended shape.
Can I use regular yarn instead of crochet thread?
You can, but the finished size and appearance will change significantly.
Is this pattern suitable for gifts?
Absolutely. The combination of a sleeping cat and shamrock motif makes it a memorable handmade gift for cat lovers and crochet enthusiasts.
If you enjoy delicate lace projects like this Sleeping White Cat Doily Crochet Pattern, you might also love my Easy Lacy Crochet Coaster Pattern for Beginners, which is a wonderful introduction to creating elegant lace designs on a smaller scale.
For crocheters who appreciate floral details, the Crochet Daffodil Pattern – Realistic 3D Narcissus Flower offers beautiful shaping techniques that create lifelike blooms perfect for spring décor and handmade gifts.
And if you’re looking to expand your collection of decorative flowers, don’t miss the Crochet Tulip Bouquet Pattern – Easy & Realistic Amigurumi Flowers. This charming project combines realistic petals with beginner-friendly construction, making it a lovely companion pattern for floral crochet enthusiasts.
Conclusion
This Sleeping White Cat Doily Crochet Pattern is one of those projects that feels special from the first stitches to the final blocking session. The design combines delicate lace, charming embroidery details, and a peaceful sleeping cat motif that stands out beautifully in any room.
After testing and shaping the finished piece, I found it works wonderfully as tabletop décor, a thoughtful handmade gift, or even a unique item for craft fairs and seasonal displays. The careful combination of textures and motifs creates a project that feels both elegant and heartwarming.
If you make this pattern, enjoy the process, take your time with the finishing details, and don’t forget to share your finished creation with fellow crochet lovers.
Loved this pattern? Share it with your crochet friends!