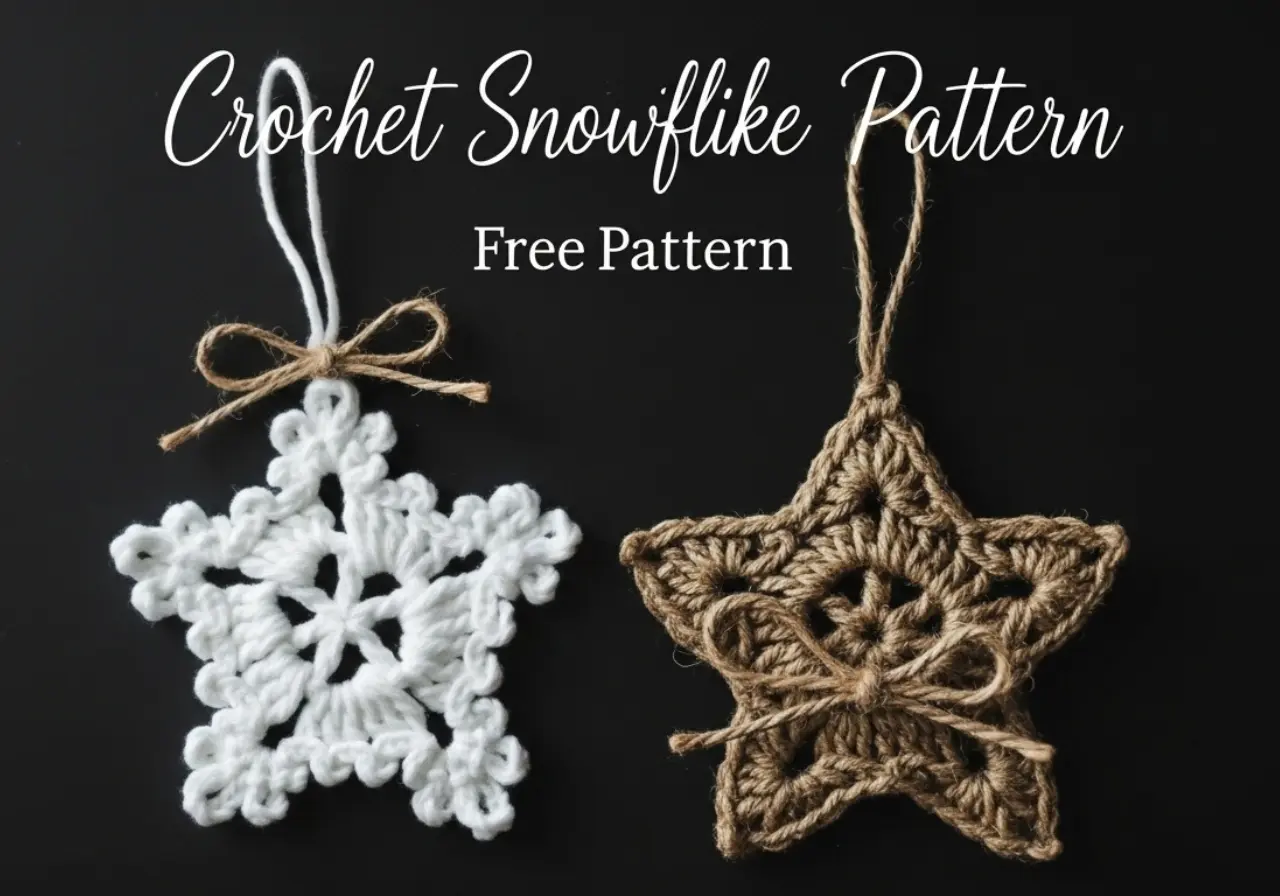
Few things capture the cozy magic of winter like a handmade snowflake.
With just a bit of yarn and your crochet hook, you can create delicate lace-like snowflakes that look like they’ve fallen straight from the clouds — soft, sparkly, and unique every single time.
This crochet snowflake pattern is simple enough for beginners but detailed enough to satisfy experienced crocheters looking for a relaxing, meditative project. It’s the kind of pattern that invites you to slow down, sip some cocoa, and enjoy the process stitch by stitch.
Whether you plan to hang them on your Christmas tree, gift them as keepsakes, or use them as table decor, these snowflakes will bring a touch of handmade warmth and winter beauty wherever they go.
What You’ll Need
To make your crochet snowflake, gather the following materials:
Yarn: Light / DK weight yarn (the designer used “Feels Like Butter” by Lion Brand)
Hook: 3.75 mm (or adjust to match your tension)
Tapestry needle for weaving in ends
Blocking pins and mat to shape your snowflake
Optional:
Fabric stiffener or starch
Small beads or sequins for sparkle
Fine thread or ribbon for hanging
Finished Size: approximately 4″ (10 cm), depending on yarn and hook.
Tip: Using cotton or bamboo yarn gives a crisp, defined look; acrylic makes it softer and fluffier — both are beautiful in their own way.
Abbreviations
CH = chain
DC = double crochet (US terms)
SC = single crochet (US) — not used in this pattern
SS = slip stitch
MC = magic circle / ring
Step-by-Step Instructions – Crochet Snowflake Pattern
(Note: Do not alter this pattern — it reproduces the original design exactly.)
Round 1 — Center Ring
Make a magic circle.
Into the ring: CH 6 (counts as first DC + CH-3 space).
(DC, CH 3) five more times — you’ll have 6 DC clusters and 6 CH-3 spaces.
Join with a SS into the 3rd chain of your starting CH-6.
Pull the ring tight to close.
Result: 6 DC and 6 CH-3 loops around the center.
Round 2 — Building the Base
SS into the first CH-3 space.
CH 3 (counts as first DC), then 4 DC in the same space, CH 3.
Repeat (5 DC, CH 3) in each CH-3 space.
Join with SS to the top of the beginning CH-3.
Result: 6 petal bases — each with 5 DCs separated by CH-3 spaces (30 DC total).
Round 3 — Forming the Snowflake Points
For each CH-3 space:
SS to the middle DC (3rd) of the previous round’s 5-DC group.
CH 3, SS into the same stitch (this forms a tiny loop).
SS into the next CH-3 space.
In that CH-3 space, work the following chain loops, each anchored with a SS:
CH 3, SS
CH 5, SS
CH 7, SS
CH 5, SS
CH 3, SS
Repeat the entire sequence for all 6 CH-3 spaces.
Finish off and weave in ends.
Tip: Keep your loops consistent and gently pull them into shape as you go — this ensures the final flake is symmetrical and airy.
Finishing Touches
Once your snowflake is complete, it’s time to make it shine!
Blocking
Lightly dampen your snowflake using a spray bottle or by dipping it in water.
Gently pin it flat on a blocking mat or foam board, arranging the points evenly.
Let it dry completely before removing pins.
Stiffening (Optional but Recommended)
If you want your snowflake to hold its shape as an ornament:
Mix 1 part PVA glue with 1 part water, or use a starch spray or sugar-water mix.
Dip or brush the mixture onto the snowflake and re-pin it into shape.
Let it dry overnight.
You can also sprinkle a touch of fine glitter onto the wet stiffener for a frosted sparkle. ✨
Creative Variations – Crochet Snowflake Pattern
Mini Snowflakes: Use thread-weight yarn (size 10 cotton) and a 1.5 mm hook for delicate lace-style snowflakes perfect for cards or garlands.
Layered Snowflakes: Make two of the same pattern in different colors and stitch them together slightly offset — it gives a gorgeous 3D effect.
Beaded Elegance: Add tiny seed beads to your CH loops before stiffening for an icy shimmer.
Color Play: Try pale blue, silver, or even gold yarns for a festive, modern look.
Snowflake Garland: Connect several snowflakes with a crocheted chain or ribbon for a stunning handmade decoration.
Expert Tips
Steam-blocking your snowflakes after stiffening gives them a crisp, professional finish.
For gifts, attach your snowflake to a card with “Made with love and yarn” written on it.
Store finished snowflakes flat in tissue paper to preserve their shape between holidays.
If you want extra structure, crochet two identical snowflakes and glue them back-to-back with a bit of stiffener in between.
FAQ
Can I use cotton thread instead of yarn?
Yes! Cotton crochet thread gives a more delicate and traditional lace look. Just switch to a smaller hook.
My snowflake isn’t lying flat — what did I do wrong?
No worries! This pattern naturally curls before blocking. Once you pin it and let it dry, it’ll open beautifully.
Can I use this pattern for selling finished items?
Absolutely — just credit “The World Crochet” for the design inspiration. Handmade sellers love turning these into sets for holiday markets!
How can I add a loop for hanging?
Before finishing off, simply chain 15, then SS into the base of the snowflake point to create a small loop.
Call to Action
If this crochet snowflake pattern melted your heart like a real snowflake on your palm — don’t keep it to yourself!
Share it with your crochet community, pin it on Pinterest, and tag us on Instagram at @TheWorldCrochet.
We’d love to see how your snowflakes sparkle this holiday season!