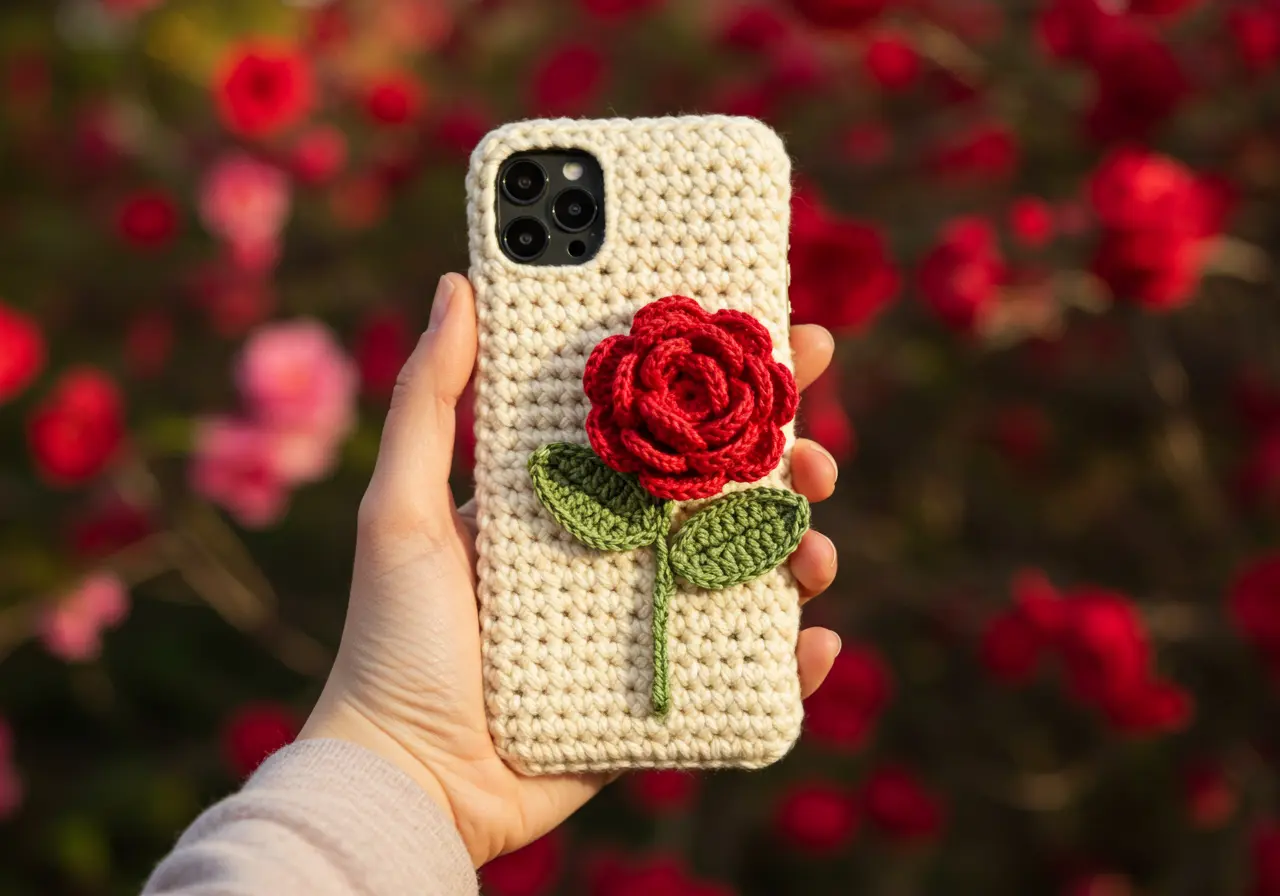
If you’re looking for a crochet project that’s both practical and beautiful, this crochet phone case with rose will win your heart. It’s sturdy enough to protect your phone, yet elegant enough to turn it into a stylish accessory. The best part? It’s fully customizable to fit any phone size and can be made in your favorite colors.
This pattern is perfect for confident beginners and intermediate crocheters who enjoy projects with texture and floral details. We’ll work the base in one piece, then add a realistic rose, leaves, and stem for a truly unique finish.
Pattern Details
Skill Level: Beginner–Intermediate (basic stitches + simple shaping)
Terminology: US crochet terms
Construction: Bottom-up, worked in the round as an oval. Rose and leaves are crocheted separately and sewn on.
Materials You’ll Need
Yarn (cotton, worsted/medium #4):
Main color (case): 30–50 g (beige in the sample)
Red (rose): 10–15 g
Green (leaves & stem): 10 g
Hook: 3.5 mm (E-4) for a dense fabric; if you crochet loosely, use 3.25 mm
Notions: tapestry needle, scissors, 4 stitch markers, optional thin silicone case (liner)
Optional: small amount of fabric glue for extra security on appliqués
Gauge
Worked in sc, in the round: 18 sts × 22 rows = 4″ (10 cm)
Phone cases need negative ease (snug fit). If your gauge is looser, go down a hook size.
Measurements & Fit
This is a made-to-measure pattern with an example for a 6.1″ phone (iPhone 13/14).
Measure your phone width and thickness.
Foundation chain length = phone width + thickness − 0.3–0.5 cm (for snug fit).
Example: For a 6.1″ iPhone (approx. 7.1 cm wide × 0.75 cm thick), a chain of 18–20 ch works with the given gauge.
Abbreviations (US Terms)
ch = chain, sl st = slip stitch, sc = single crochet, hdc = half double crochet, dc = double crochet, tr = treble, sk = skip, st(s) = stitch(es), RS = right side, WS = wrong side, rep = repeat, pm = place marker.
Step-by-Step Instructions – Crochet Phone Case with Rose
Notes Before You Start
Work the case in a spiral (do not join rounds) unless stated.
Use a marker at the first stitch of each round and move it up as you go.
Two finishing options:
A. Easy sleeve (open top)
B. With camera window (as shown in photo)
Part 1 — Phone Case (Base)
Foundation & Round 1 – Oval Base
Chain the length you calculated (e.g., ch 19).
Sc in 2nd ch from hook and in each ch to last ch; 3 sc in last ch to turn.
Continue on underside of the chain: sc in each ch to starting end; 2 sc in same ch as first sc to round the second corner.
You now have an oval. Pm in first sc to track the spiral.
Round 2
Sc around, placing increases only at both ends: in each of the 3 end stitches, work 2 sc.
Long sides: 1 sc in each st.
Round 3
Repeat Round 2 (increase only at the 3 end sts on each end).
Stop increasing once the oval matches your phone’s bottom outline.
Rounds 4–? (Side Walls)
Sc in each st around without increases until the height is 0.5–1 cm below the top of your phone.
Tightening Round (optional)
[Sc in next 7 sts, sc2tog] repeat around (adjust multiple to your stitch count).
Choose Your Finish
Option A — Easy Sleeve (Open Top)
Top Edge: Work 1 round of sl st (loosely) or reverse sc (crab stitch).
Fasten off, weave ends.
Jump to Part 2 (Rose & Leaves).
Option B — With Camera Window
Mark the window with stitch markers (4 corners). For most recent iPhones, a 3–3.5 cm square works well.
Window starts 2–3 rounds below top edge.
Sc to Marker A (lower-left of window). Chain W (width in stitches — usually 10–12 ch for 3–3.5 cm).
Skip W sts on body, sc in next st (this creates lower edge of the window).
Continue round in sc. On next round, sc into each ch across the bridge.
Work 2–3 more rounds, always sc-ing across bridge stitches.
Top Edge: Finish with reverse sc (crab stitch) around entire top edge.
Optional: To round the corners, work 1 final sl st round around the window opening.
Part 2 — Rose
Foundation:
With red, ch 60.
Row 1 (Shell Bases):
Sc in 2nd ch from hook.
Sk 1 ch, 5 dc in next ch (shell), sk 1 ch, sc in next ch.
Repeat to end.
For last 15 ch, make shells of 6 dc instead of 5 dc (larger petals).
Row 2 (Petal Ruffle):
Turn, sl st into first sc to anchor.
Across each shell: (sc, hdc, 4 dc, hdc, sc).
Sl st into next sc between shells, repeat.
Fasten off, leaving long tail for sewing.
Shaping the Rose:
Start rolling from small-petal end, sewing through base every 1–2 shells.
Fluff petals.
Part 3 — Leaves & Stem
Large Leaf:
With green, ch 14.
Working in back bumps: sc in 2nd ch, hdc, dc, dc, dc, hdc, sc.
Ch 1, rotate, mirror stitches back to start.
Sl st to first st to close.
Optional vein: surface sl st up center.
Small Leaf:
Same as large, but start with ch 10 and one fewer dc in middle.
Stem:
Option 1 (thin): Ch length, sl st back.
Option 2 (thicker): Ch length, sc in 2nd ch and across; ch 1, turn, sl st back through back loops only.
Part 4 — Assembly
Lay case flat, back facing up.
Pin stem diagonally.
Place large leaf near stem base, two small leaves above/below.
Position rose to right side, centered horizontally.
Sew stem with tiny whip stitches.
Sew leaves around edges + center for flatness.
Stitch rose through base only, keeping petals fluffy.
Finishing Touches
Weave in all ends on WS.
Optional: insert thin silicone liner and sew at top edge.
Light steam block leaves only (avoid case to keep snug fit).
Adjustments & Troubleshooting
Too tight? Add 1 plain round before tightening round or use larger hook.
Too loose? Add extra decrease round near top: [sc in 5, sc2tog] around.
Edges curling at window? Add reinforcement round or sl st edging.
Phone pops out? Add button tab closure: ch 10–12 from back top edge, sl st back, sew button to front.
Quick Recipe for 6.1″ iPhone
Hook 3.5 mm, MC chain 19; work oval base Rnds 1–3 with increases at ends; sides up to ~13.5–14 cm tall.
Window: ch 11, sk 11, sc in next (≈3.2–3.5 cm); reinforce 3 rounds.
Edge: 1 round reverse sc.
Rose: ch 60, shells (5 dc; last 15 ch use 6 dc), ruffle in Row 2; roll & sew.
Leaves: 1 × ch14 (large), 2 × ch10 (small).
Stem: ch 45–55, sl st back.
Care Instructions
Hand wash in cool water, reshape, lay flat to dry.
Avoid bleach.
If case loosens over time, a quick wash/dry restores snug fit.
Suggested Internal Links
📣 Call to Action
Enjoyed this crochet phone case with rose? Share it with your crochet friends, save it to your Pinterest boards, and let your creativity bloom! 🌹📱